🧢 Beautiful ✨ Detailed πŸ’ Adorable

Twinkling Snowflakes Pattern

Twinkling Snowflakes Pattern
4.5β˜… Rating
2-3 Hours Time Needed
1.6K Made This
βœ‚οΈ

Intermediate Level

Ideal for those with basic crochet experience, featuring slightly more advanced stitches and techniques to expand your skills.

⏱️

Bite-Sized Project

Finishes in 2-4 hoursβ€”perfect for an afternoon of creative relaxation.

πŸŽ„

Holiday Cheer

Festive fun for the season, bringing handmade magic to celebrations and creating new family traditions.

About This Twinkling Snowflakes Pattern

This pattern contains complete instructions to crochet three different snowflakes: small, medium and large. Each snowflake is worked in the round with clusters, chains and picot-like decorative points for a delicate finish. The pattern uses Bernat Handicrafter Holidays White Sparkle to give a subtle shimmer.
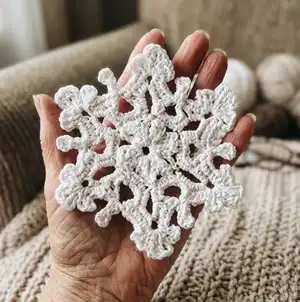
Twinkling Snowflakes Pattern crochet pattern - detailed view of completed project

Perfect for ornaments, window decorations or gift toppers, these snowflakes block beautifully with spray starch. Written round-by-round instructions and stitch abbreviations are included for clarity.

Why You'll Love This Twinkling Snowflakes Pattern

I absolutely love this pattern because it turns simple crochet stitches into a beautiful, lacy snowflake that feels magical. I designed three sizes so you can mix and match for garlands, ornaments, or table displays. The sparkle yarn adds a festive shine without overwhelming the delicate stitchwork. I enjoy how satisfying it is to pin and block each snowflake to perfect the shape; the finishing truly brings the pattern to life. Making a set of these is a wonderful, quick project that makes lovely handmade gifts.

Twinkling Snowflakes Pattern step 1 - construction progress Twinkling Snowflakes Pattern step 2 - assembly progress Twinkling Snowflakes Pattern step 3 - details and accessories Twinkling Snowflakes Pattern step 4 - final assembly and finishing

Switch Things Up

I love customizing these snowflakes by changing yarn and hook to create different sizes and textures; using metallic or variegated yarns gives a totally new look.

You can make a mini set for a garland by using a lighter-weight thread and a smaller hook for delicate, dainty snowflakes.

Try bulky or chunky yarn with a larger hook to create oversized dΓ©cor pieces that look great on mantel displays or wreaths.

I often embroider a tiny bead or sequin at the center for extra sparkleβ€”just sew on a small accent before blocking.

For tree ornaments, add a loop of coordinating ribbon or crochet a small hanging chain directly into one of the ch-3 spaces.

I also like to stitch several snowflakes together into a layered ornament for depth and a dimensional look.

If you want stiffer points, use a light starch and pin more aggressively during blocking to shape each prong sharply.

Try combining the three sizes into a mobile by suspending them at different lengths for an elegant hanging display.

You can also add a felt backing and sew a button to turn a snowflake into a festive coaster or trivet.

I recommend experimenting with fiber blends like wool or cotton for different drape and blocking characteristics to get the exact effect you want.

Common Mistakes & How to Fix Them

βœ— Skipping the initial joining slip stitch when forming the starting chain ring; always join with a sl st to form a neat, stable center before proceeding. βœ— Not counting chains and clusters precisely during rounds which causes lopsided motifs; carefully count ch- spaces and clusters after each round to keep the pattern even. βœ— Pulling yarn too tightly on cluster or picot sections causing the points to pucker; keep a slightly looser tension when forming long chains and clusters so points lay flat when blocked. βœ— Failing to pin and starch the snowflake during finishing which results in a floppy shape; pin to measurements and lightly apply spray starch then steam iron to set the lace.
Twinkling Snowflakes Pattern

Make delicate, sparkling crochet snowflakes to decorate your home or gifts. This pattern includes three sizes with clear round-by-round instructions so you can create elegant snowflakes for holiday decor. You will love the lacy texture and the subtle sparkle from the White Sparkle yarn.

Intermediate 2-3 Hours

Materials Needed for Twinkling Snowflakes Pattern

β€” Main Fabric

  • 01
    Bernat Handicrafter Holidays (2.8 oz/80 g; 138 yds/126 m) White Sparkle (48005) - 1 ball will make approx 4 snowflakes

β€” Tools Required

  • 01
    Size U.S. F/5 (3.75 mm) crochet hook or size needed to obtain gauge
  • 02
    Spray starch (optional) for finishing
  • 03
    Pins for blocking and pinning to measurements
  • 04
    Steam iron (lightly) for finishing
  • 05
    Scissors
  • 06
    Yarn needle for weaving ends

Progress Tracker

0% Complete

β€” Measurements :

Info :

Snowflake 1: Approx 7" [18 cm] diameter. Snowflake 2: Approx 8Β½" [21.5 cm] diameter. Snowflake 3: Approx 10" [25.5 cm] diameter.

β€” Gauge :

Info :

16 sc and 17 rows = 4" [10 cm].

β€” Materials :

Info :

Bernat Handicrafter Holidays (2.8 oz/80 g; 138 yds/126 m) White Sparkle (48005). 1 ball will make approx 4 Snowflakes. Size U.S. F/5 (3.75 mm) crochet hook or size needed to obtain gauge. Spray starch (optional).

β€” Snowflake 1 :

Round 1 :

Ch 6. Join with sl st to first ch to form a ring.

Round 2 :

1st rnd: *Ch 4. [(Yoh) twice and draw up a loop in ring. (Yoh and draw through 2 loops on hook) twice] twice. Yoh and draw through all loops on hook - Tr cluster made. Ch 4. Sl st in ring. Rep from * 5 times more. Fasten off.

Round 3 :

2nd rnd: Ch 3. Join yarn with sl st to first Tr cluster. (Ch 9. Sl st in same sp as previous sl st. Ch 3. Sl st in next Tr cluster) 5 times. Ch 9. Sl st in same sp as previous sl st. Join with sl st to first ch.

Round 4 :

2nd rnd (continued detail): Sl st in next ch-3 sp. Ch 3. (Yoh and draw up a loop. Yoh and draw through 2 loops on hook) twice in same sp as last sl st. Yoh and draw through all loops on hook - beg cluster made. [Ch 5. (Yoh and draw up a loop. Yoh and draw through 2 loops on hook) 3 times in next ch-3 sp. Yoh and draw through all loops on hook - cluster made] 11 times. Ch 5. Join with sl st to top of first cluster.

Round 5 :

3rd rnd: Ch 1. *1 sc in each of next 3 ch. [(3 sc. Ch 3) 3 times. 3 sc] in next ch-9 loop. Rep from * 5 times more. Join with sl st to first sc. Fasten off.

Round 6 :

3rd rnd (expanded detail): (Sl st. Ch 1. 1 sc. Ch 5. 1 sc) in next ch-5 sp. *(Sl st. Ch 3. Cluster) in next cluster. (Ch 3. Cluster in top of cluster just made) twice. (Ch 3. Sl st. Ch 6. Sl st. Ch 3. Sl st) all in top of last cluster. Working down towards 2nd rnd, (Ch 3. Sl st to base of cluster) 3 times. (1 sc. Ch 5. 1 sc) in next ch-5 sp. (Sl st. Ch 3. Cluster) in next cluster. (Ch 3. Sl st. Ch 6. Sl st. Ch 3. Sl st) all in top of cluster. Working down towards 2nd rnd, ch 3. Sl st to base of cluster.** (1 sc. Ch 5. 1 sc) in next ch-5 sp. Rep from * 4 times more, then from * to ** once. Join with sl st to first sc. Fasten off.

Round 7 :

4th rnd: Join yarn with sl st to first ch-3 sp. Ch 1. 2 sc in same sp as sl st. *1 sc in each of next 3 sc. (1 sc. Ch 3. 1 dc. Ch 3. 1 sc. Ch 3. 1 sc) in next ch-9 sp. Ch 3. Sl st to first ch. Turn.

Round 8 :

4th rnd (continued): (Ch 4. 2 tr. Ch 4. Sl st. Ch 3. 1 dc. Ch 3. Sl st. Ch 4. 2 tr. Ch 4. Sl st. Ch 3. 1 dc. Ch 3. Sl st) 3 times in last ch-6 sp made - top cluster made. Turn. 6 dc in same ch-3 sp as last 6 dc. Ch 1.** 1 sc in next ch-1 sp. Rep from * 4 times more, then from * to ** once. Join with sl st to first sc. Fasten off.

β€” Snowflake 2 :

Round 1 :

Ch 7. Join with sl st to first ch to form a ring.

Round 2 :

1st rnd: Ch 1. (3 sc. Ch 9) 6 times in ring. Join with sl st to first sc. Fasten off.

Round 3 :

2nd rnd: Join yarn with sl st to any ch-9 loop. Ch 3. (2 dc. Ch 3. 3 dc) in same sp as sl st. [Ch 1. (3 dc. Ch 3. 3 dc) in next ch-9 loop] 5 times. Ch 1. Join with sl st to top of ch 3.

Round 4 :

3rd rnd: Sl st back into last ch-1 sp. Ch 1. 1 sc in same sp as sl st. *Ch 1. 6 dc in next ch-3 sp. Ch 6. Sl st to first ch. Turn. (Ch 4. 2 tr. Ch 4. Sl st) 3 times in last ch-6 sp made - top cluster made. Turn. 6 dc in same ch-3 sp as last 6 dc. Ch 1.** 1 sc in next ch-1 sp. Rep from * 4 times more, then from * to ** once. Join with sl st to first sc. Fasten off.

β€” Snowflake 3 :

Round 1 :

Ch 6. Join with sl st to first ch to form a ring.

Round 2 :

1st rnd: Ch 6 (counts as dc and ch 3). (1 dc. Ch 3) 11 times in ring. Join with sl st to 3rd ch of ch-6. 12 ch-3 sps.

Round 3 :

2nd rnd: Sl st in next ch-3 sp. Ch 3. 1 sc in each of next ch-3 sp. 1 sc in each of next 3 sc. 2 sc in next ch-3 sp. Ch 4. (1 hdc. Ch 2. Sl st) in 2nd ch from hook. Ch 2. Skip next 9 sc. 2 sc in next ch-3 sp. Rep from * 5 times more. Fasten off.

Round 4 :

3rd rnd: Ch 1. 1 sc in each of next 3 ch. (1 sc. Ch 3) 3 times. 3 sc in next ch-9 loop. Rep from * 5 times more. Join with sl st to first sc. Fasten off.

Round 5 :

4th rnd: Join yarn with sl st to first ch-3 sp. Ch 1. 2 sc in same sp as sl st. *1 sc in each of next 3 sc. (1 sc. Ch 3. 1 dc. Ch 3. 1 sc. Ch 3. 1 sc) in next ch-9 sp. Ch 3. Sl st to first ch. Turn. (Ch 4. 2 tr. Ch 4. Sl st. Ch 3. 1 dc. Ch 3. Sl st. Ch 4. 2 tr. Ch 4. Sl st. Ch 3. 1 dc. Ch 3. Sl st) 3 times in last ch-6 sp made - top cluster made. Turn. 6 dc in same ch-3 sp as last 6 dc. Ch 1. 1 sc in next ch-1 sp. Rep from * 4 times more, then from * to ** once. Join with sl st to first sc. Fasten off.

β€” Finishing :

Info :

Pin snowflake to measurements. Apply spray starch if desired and steam iron lightly.

β€” Key / Symbols :

Info :

Key symbols used in charts: β€’ = slip st (sl st). + = single crochet (sc). T = half double crochet (hdc). T with bar = double crochet (dc). Long T = treble crochet (tr). Oval = beg cluster. Cluster shapes indicate cluster and tr cluster as shown on chart.

Assembly Instructions

  • Pin each completed snowflake carefully to the measurements specified (7", 8Β½", 10") on a blocking board to ensure correct shape and size.
  • Apply spray starch lightly over the pinned snowflake, then steam iron gently from above or steam without touching to set the lace and points.
  • Allow the snowflake to dry completely while pinned to maintain its shape, then remove pins and carefully trim any loose ends.
  • Use a yarn needle to weave in all ends on the back side of the snowflake, securing knots as needed to prevent unravelling.

Important Notes

  • πŸ’‘Use the recommended hook size or adjust to obtain 16 sc and 17 rows = 4" [10 cm] gauge for consistent sizing.
  • πŸ’‘Fasten off and weave in ends after the rounds indicated to keep the snowflake tidy before blocking and finishing.
  • πŸ’‘Pin and block each snowflake to the measurements before applying spray starch to get crisp points and a professional finish.

Create sparkling snowflakes that brighten your home or gifts with handmade charm. These lace-like motifs are quick to make and perfect for holiday decor or ornaments. Pin, starch, and steam lightly for crisp points and a professional finish. 🧢✨

You ask,

we answer.

FAQs

What size will the finished snowflakes be?

Snowflake 1 measures approximately 7" (18 cm), Snowflake 2 measures approximately 8Β½" (21.5 cm), and Snowflake 3 measures approximately 10" (25.5 cm) when using the recommended yarn and hook.

Can I use a different yarn or hook size?

Yes, different yarn weights and hook sizes will change the final size and drape. Use a larger hook for a looser, bigger snowflake and a smaller hook for a denser, smaller motif; check gauge if exact sizing is important.

Do I need to starch and block the snowflakes?

Pinning and lightly starching (spray starch) then steaming will give the snowflakes crisp points and a flat, even shape; this finishing step is recommended for best results.

How long does it typically take to make a snowflake?

Most crocheters finish a single snowflake in 2-3 hours depending on complexity and experience; making a set will take longer.