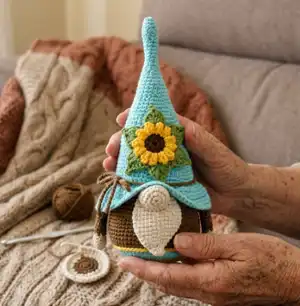
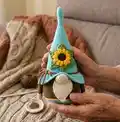
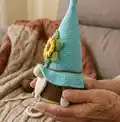
Make a charming crochet gnome with a tall hat, sunflower detail and classic beard. This pattern walks you through every part from hat to arms with clear, photographed steps. You'll enjoy shaping the hat brim and assembling the little character for a delightful handmade gift. Suitable for crafters who like a rewarding, detailed project.
Progress Tracker
0% Complete
— Gauge / Tension :
Rd 1 :
6SC in magic ring (6)
Rd 2 :
INC in each st around (12)
Rd 3 :
*(SC in next st, INC in next st)from*rep x6 (18)
Rd 4 :
*(SC in next st, INC in next st, SC in next st)from*rep x6 (24)
Rd 5 :
*(SC in next 3sts, INC in next st)from*rep x6 (30)
Rd 6 :
*(SC in next 2sts, INC in next st, SC in next 2sts)from*rep x6 (36)
— Hat :
Info :
Use a contrast thread to mark the beginning of each round. Do not remove it until your work is completed
Rd 1 :
Blue: 6SC in magic ring, tighten the ring (6)
Rd 2 :
*(INC in next st, SC in next st)from*rep x3 (9)
Rd 3-12 :
SC in each st around (9)
Rd 13 :
*(SC in next sts, INC in next st, SC in next st)from*rep x3 (12)
Rd 14 :
SC in each st around (12)
Rd 15 :
*(SC in next 3sts, INC in next st)from*rep x3 (15)
Rd 16 :
SC in each st around (15)
Rd 17 :
*(SC in next 2sts, INC in next st, SC in next 2sts)from*rep x3 (18)
Rd 18 :
SC in each st around (18)
Rd 19 :
*(SC in next 5sts, INC in next st)from*rep x3 (21)
Rd 20 :
SC in each st around (21)
Rd 21 :
*(SC in next 3sts, INC in next st, SC in next 3sts)from*rep x3 (24)
Rd 22 :
SC in each st around (24)
Rd 23 :
*(SC in next 7sts, INC in next st)from*rep x3 (27)
Rd 24 :
SC in each st around (27)
Rd 25 :
*(SC in next 4sts, INC in next st, SC in next 4sts)from*rep x3 (30)
Rd 26 :
SC in each st around (30)
Rd 27 :
*(SC in next 9sts, INC in next st)from*rep x3 (33)
Rd 28 :
SC in each st around (33)
Rd 29 :
*(SC in next 5sts, INC in next st, SC in next 5sts)from*rep x3 (36)
Rd 30 :
SC in each st around (36)
Rd 31 :
*(SC in next 11sts, INC in next st)from*rep x3 (39)
Rd 32 :
SC in each st around (39)
Rd 33 :
*(SC in next 6sts, INC in next st, SC in next 6sts)from*rep x3 (42)
Rd 34 :
SC in each st around (42)
Rd 35 :
*(SC in next 13sts, INC in next st)from*rep x3 (45)
Rd 36 :
SC in each st around (45)
Rd 37 :
*(SC in next 7sts, INC in next st, SC in next 7sts)from*rep x3 (48)
Rd 38 :
SC in each st around (48)
Rd 39 :
*(SC in next 15sts, INC in next st)from*rep x3 (51)
Rd 40 :
SC in each st around (51)
Rd 41 :
*(SC in next 8sts, INC in next st, SC in next 8sts)from*rep x3 (54)
Rd 42 :
*(SC in next 26sts, INC in next st)from*rep x2 (56)
Rd 43-45 :
SC in each st around (56)
— Continue - HAT BRIM :
Rd 46 :
Ch2, *(DC FLO in next 6sts, 2DC FLO in next st)from*rep x3, hdc FLO in next st, SC FLO in next 5sts, INC FLO in next st, SC FLO in next 5sts, hdc FLO in next st, *(2DC FLO in next st, DC FLO in next 6sts)from*rep x3, DC FLO in next st, sl st in 2nd Ch (64)
Rd 47 :
Ch2, DC in next 25sts, hdc in next st, SC in next 12sts, hdc in next st, DC in next 24sts, sl st in 2nd Ch (64)
Rd 48 :
Ch2, *(DC in next 7sts, 2DC in next st)from*rep x3, hdc in next st, SC in next 6sts, INC in next st, SC in next 6sts, hdc in next st, *(2DC in next st, DC in next 7sts)from*rep x3, DC in next st, sl st in 2nd Ch (72)
Rd 49 :
SC in next 72sts around (72), sl st in 1st stitch of rd. Cut off Blue
— Body :
Info :
Work in continuous rounds
Rd 1 :
With Brown work BLO into stitches of Rd 46: SC BLO in each st around (56)
Rd 2 :
SC in next 11sts, SC BLO in next 5sts (we will attach the arm here), SC in next 8sts, SC BLO in next 8sts (we will attach a beard here), SC in next 8sts, SC BLO in next 5sts (we will attach the arm here), SC in next 11sts (56)
Rd 3-7 :
SC in each st around (56)
Rd 8 :
*(SC in next 13sts, INC in next st)from*rep x4 (60)
Rd 9-12 :
SC in each st around (60)
Rd 13 :
*(SC in next 7sts, INC in next st, SC in next 7sts)from*rep x4 (64)
Rd 14-15 :
SC in each st around. Change to Blue in last stitch. Cut off Brown (64)
Rd 16 :
Blue: *(SC BLO in next 3sts, SC2tog BLO, SC BLO in next 3sts)from*rep x8 (56)
Rd 17-18 :
SC in each st around (56). Drop a loop from your hook
Rd 18 Info :
Yellow: work surface slip stitch into stitches of Rd 16. Cut off Yellow
Rd 19 :
Grab a dropped blue loop back on your hook and continue: *(SC in next 5sts, SC2tog)from*rep x8 (48). Stuff
Rd 20-21 :
SC in each st around (48)
Rd 22 :
SC BLO in each st around (48)
Rd 23 :
*(SC in next 2sts, SC2tog, SC in next 2sts)from*rep x8 (40)
Rd 24 :
*(SC in next 3sts, SC2tog)from*rep x8 (32)
Rd 25 :
*(SC in next st, SC2tog, SC in next st)from*rep x8 (24)
Rd 26 :
*(SC in next st, SC2tog)from*rep x8 (16). Stuff
Rd 27 :
SC2tog x8. Cut off thread and sew the opening (8)
— Stand :
Rd 1 :
With Yellow work into stitches of Rd 21 of the Body: SC FLO in each st around. Cut off thread (48)
— Arms (work in continuous rounds) :
STEP 1 PALMS Rd 1 :
Wheat: 5SC in magic ring, tighten the ring (5)
Rd 2 :
INC in each st around (10)
Rd 3-5 :
SC in each st around. Change to Brown in last st. Cut off Wheat (10)
Rd 6-7 :
Brown: SC in each st around (10)
Rd 8 :
SC BLO in each st around (10)
Rd 9-17 :
SC in each st around (10). Cut off thread leaving a long tail for sewing.
— Nose (work in continuous rounds) :
Rd 1 :
Wheat: 6SC in magic ring, tighten the ring (6)
Rd 2 :
INC in each st around (12)
Rd 3 :
*(SC in next st, INC in next st)from*rep x6 (18)
Rd 4-5 :
SC in each st around (18)
Rd 6 :
*(SC in next st, SC2tog)from*rep x6 (12). Cut off thread leaving a long tail for sewing. Stuff the nose a bit
— Beard :
Rd 1 :
Off-white: Chain 2. 3SC in 2nd st from hook (work in continuous rounds) (3)
Rd 2 :
INC in each of 3SC (6)
Rd 3 :
INC in each of next 2sts, SC in next 2sts, INC in next st, SC in next st (9)
Rd 4 :
SC in next st, INC in each of next 2sts, SC in next 5sts, INC in next st (12)
Rd 5 :
SC in next 2sts, INC in each of next 2sts, SC in next 5sts, INC in next st, SC in next 2sts (15)
Rd 6 :
SC in next 3sts, INC in each of next 2sts, SC in next 9sts, INC in next st (18)
Rd 7 :
SC in next 4sts, INC in each of next 2sts, SC in next 8sts, INC in next st, SC in next 3sts (21)
Rd 8 :
SC in next 5sts, INC in each of next 2sts, SC in next 14sts (23)
Rd 9 :
SC in next 6sts, INC in each of next 2sts, SC in next 14sts, INC in next st (26)
Rd 10-12 :
SC in each st around (26)
Rd 13 :
SC in next 8sts, SC2tog, SC in next 11sts, SC2tog, SC in next 3sts (24)
Rd 14 :
SC in next 7sts, SC2tog, SC in next 10sts, SC2tog, SC in next 3sts (22)
Rd 15 :
SC in next 6sts, SC2tog, SC in next 9sts, SC2tog, SC in next 3sts (20)
Rd 16 :
SC in each st around (20). Cut off thread leaving a long tail for sewing
— Sunflower :
Rd 1 :
Brown: in magic ring: Ch2, 11DC, sl st in Ch 2nd st of rd. Cut off thread (11)
Rd 2 Petal :
Join Bright Yellow: 1) Chain 3 (count as 1 DC). 2) 4DC in next st. 3) Drop a loop from your hook. 4) Insert a hook into 3rd Chain. When you will work other petals insert your hook in 1st DC. 5) And insert the hook back into the dropped loop. 6) Yarn over and pull through both loops on your hook. Petal is done. Now work to end (Ch2, Petal) around, and sl st at the end (total is 12 petals). Cut off thread
Rd 3 :
Join Green grass and make leaves: Ch1, *(all in next 2Ch-space: [hdc, 2DC, TR, Ch4, sl st in previous TR, TR, 2DC, hdc]); SC in next 2Ch-space)from*rep x6. Total is 6 leaves
— Assembling :
Info :
Attach (sew on/glue) the nose on the beard and then sew on the stitches FLO made in front of the body under the hat brim especially for the beard. Sew on the arms to body under the hat brim to the stitches you've made on Rd 2 of the body.
Info :
Attach sunflower to hat as decoration and secure firmly. Pin pieces before sewing to check placement.
— Twisted Cord :
Info :
The initial thread length should be three times as long as the length of the final cord. For example, if your final cord should be approx. 50cm, you need to grab 150cm threads. 1 Take a double Brown thread about 150 cm length, make a knot on one end. 2 Hook on for something (I use a door handle) and start to twist. 3 Fold in half and remove the end from the door handle. 4 Straighten the cord and make a knot on the other end.
This lovely Sunflower Gnome pattern brings a touch of handmade charm to any shelf or gift table. It combines classic amigurumi shaping with a pretty flower accent for a unique look. Make one for yourself or create a whole family of gnomes to brighten the season 🌻🧶