🧶 Beautiful ✨ Detailed 💝 Adorable

Floral Fairy House Amigurumi Pattern

Floral Fairy House Amigurumi Pattern
4.3★ Rating
12-15 Hours Time Needed
2.7K Made This
✂️

Intermediate Level

Ideal for those with basic crochet experience, featuring slightly more advanced stitches and techniques to expand your skills.

⏱️

Multi-Day Project

A rewarding 12+ hour journey—perfect for dedicated crafters who love detailed work.

🏡

Cozy Accent

A warm touch for your space that transforms ordinary corners into inviting nooks filled with handmade charm.

About This Floral Fairy House Amigurumi Pattern

This pattern makes a decorative Floral Fairy House about 29 cm tall with a bottom diameter of 11 cm. It combines crocheted fabric with a plastic canvas core for structure and a fishing-line reinforced roof for durability. Youll make layered petals, a removable cone roof, windows, a door and tiny green details to finish the look.

Floral Fairy House Amigurumi Pattern crochet pattern - detailed view of completed project

The pattern uses cotton yarns in three shades for the petals plus beige for the house body and green for accents. Detailed step-by-step rounds, photos and clear assembly notes guide you through building and finishing the house.

Why You'll Love This Floral Fairy House Amigurumi Pattern

I absolutely love this pattern because it blends crochet with simple structural techniques to create a long-lasting decorative piece. I enjoy how the plastic canvas gives the house a professional, stable shape while the yarn makes it soft and charming. The layered petal roof is one of my favorite parts—it looks intricate but is fun to make in repeatable pieces. Building the house feels like making a tiny world, and the finished piece brings a lot of joy to any shelf or gift box.

Floral Fairy House Amigurumi Pattern step 1 - construction progress Floral Fairy House Amigurumi Pattern step 2 - assembly progress Floral Fairy House Amigurumi Pattern step 3 - details and accessories Floral Fairy House Amigurumi Pattern step 4 - final assembly and finishing

Switch Things Up

I love how easy it is to customize this house: change the petal colors to create seasonal themes like pastels for spring or rich oranges for autumn.

If you want a larger house, try using a thicker yarn and a bigger hook and scale the canvas pieces accordingly — the shape will remain the same but you may need a larger canvas sheet.

I often swap the fishing line for thin wire if I want a slightly bendable roof; be sure to protect and wrap wire ends so they dont catch the yarn.

For a simpler version, skip the plastic canvas and make a soft house by making the wall panel in two layers and stuffing lightly for a plush look.

Try adding tiny LED fairy lights inside the house for a magical glow; secure a small battery pack inside and route the lights through slit openings before final assembly.

I sometimes embroider tiny vines and flowers onto the walls before attaching windows to add detail without extra bulk.

If you prefer sewing over gluing, sew petals to the base rather than gluing—use small stitches through the petal centers for a secure attachment.

Make mini versions as keychains by using thinner yarn, smaller hooks and reducing stitches proportionally; the canvas can be omitted for a flexible miniature.

Swap the door style: make a round porthole door by cutting the canvas differently and crocheting a circular door leaf to give the house a different personality.

To create a set, vary the number of petal layers and color combos so each house has a unique roof profile while following the same basic assembly steps.

Common Mistakes & How to Fix Them

✗ Skipping stitch markers when working the circular base can cause miscounted increases; mark the beginning of each round and recount regularly to maintain the correct stitch count. ✗ Not trimming the plastic canvas to fit precisely will create bulges or uneven seams; measure against your crocheted circle and cut the canvas slightly smaller for a snug fit. ✗ Failing to secure the fishing line end can cause it to pull out of the stitches; gently melt the fishing line end with a lighter and press it into the crocheting for a secure finish. ✗ Using too much glue on roof petals can make them stiff and messy; apply a thin line of glue only in the center and press edges gently so petals retain shape. ✗ Overstuffing or uneven stuffing of the house base will distort the cylinder shape; stuff gradually and check shaping often while sewing the bottom to the wall.

Floral Fairy House Amigurumi Pattern

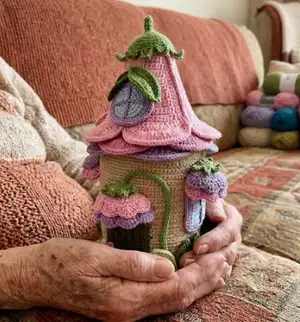
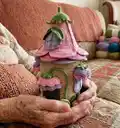
Create a charming floral fairy house you can display or gift—handmade with cotton yarn, plastic canvas and a little fishing line for a sturdy roof. This pattern walks you through crocheting the base, constructing the canvas-reinforced walls, and building a layered petal roof. Youll enjoy the mix of crochet and simple assembly to make a durable, decorative fairy house.

Intermediate 12-15 Hours

Materials Needed for Floral Fairy House Amigurumi Pattern

— Main Fabric

  • 01
    Alize Cotton Gold Hobby (cotton) - shades and article numbers listed as 262*3, 98 and 166 (use for main house and accents)
  • 02
    Yarn Art Jeans (cotton/jeans yarn) - color numbers 36, 11, 69, 82, 75 used for petals and details (choose three shades of same color with different saturation for petals)
  • 03
    Beige yarn for house body - approx quantity to crochet bottom and walls (use recommended yarns above)
  • 04
    Light blue yarn for windows - small amount (rectangles 10 sc x 12 rows)
  • 05
    Dark green yarn for door covering and sepals - small amounts
  • 06
    1 mm diameter fishing line - about 100-meter skein recommended for roof reinforcement
  • 07
    Hard plastic canvas sheet 26 x 33 cm - 1 sheet for walls and bottom support
  • 08
    Small button or bead for doorknob (matching color)

— Tools Required

  • 01
    Crochet hook size 2.25 mm (recommended; hook size may vary with your tension)
  • 02
    Hard plastic canvas 26x33 cm (1 sheet)
  • 03
    1 mm diameter fishing line (100 m skein recommended)
  • 04
    Scissors
  • 05
    Big-eyed sewing needle (for canvas and sewing parts)
  • 06
    Yarn needle for sewing and weaving ends
  • 07
    Stitch markers (to mark round starts)
  • 08
    Lighter (to melt fishing line end)
  • 09
    Hot glue gun (for fixing petals and parts)
  • 10
    Small button or bead for doorknob
  • 11
    Pins for assembly (optional)

Progress Tracker

0% Complete

— Bottom :

Round 1 :

6 sc in AR (6)

Round 2 :

inc*6=12 sc (12)

Round 3 :

(1 sc, inc)*6=18 sc (18)

Round 4 :

1 sc, inc, (2 sc, inc)*5, 1 sc=24 sc (24)

Round 5 :

(3 sc, inc)*6=30 sc (30)

Round 6 :

2 sc, inc, (4 sc, inc)*5, 2 sc=36 sc (36)

Round 7 :

(5 sc, inc)*6=42 sc (42)

Round 8 :

3 sc, inc, (6 sc, inc)*5, 3 sc=48 sc (48)

Round 9 :

(7 sc, inc)*6=54 sc (54)

Round 10 :

4 sc, inc, (8 sc, inc)*5, 4 sc=60 sc (60)

Round 11 :

(9 sc, inc)*6=66 sc (66)

Round 12 :

5 sc, inc, (10 sc, inc)*5, 5 sc=72 sc (72)

Round 13 :

(11 sc, inc)*6=78 sc (78)

Round 14 :

6 sc, inc, (12 sc, inc)*5, 6 sc=84 sc (84)

Round 15 :

(13 sc, inc)*6=90 sc (90)

Info :

To make the completion of the circle more accurate, after the last increase, crochet another 1 sc and then 1 sl st. Leave a long end of the thread.

— Canvas bottom and first assembly :

Info :

Cut a circle from the canvas with a diameter slightly smaller than crocheted. Sew the canvas to the circle with small stitches.

Info :

Crochet the second circle in the same way. Put 3 layers together and sew over the edge. Stitch several times through the center.

Info :

Carefully cut out the door opening on the canvas panel. Do not discard the cut piece.

— Walls :

Info :

Cut a strip along the entire length (33 cm) 15 cm wide from a sheet of canvas. Roll it into a cylinder - my diameter clearly coincided with the diameter of the bottom. If the cylinder diameter is not much larger, cut off the excess; if overlap is about 3 cm leave it.

Info :

Crochet the walls of the house with beige yarn. Chain 91 and crochet back and forth rows 90 sc in a row.

Info :

Crochet half the height of the canvas; the author got 21 rows.

Info :

Next crochet only from one side in a height of 38 sc to the end of the canvas. Cut the thread.

Info :

Skip 14 loops in the middle of the canvas and crochet from the other side also 38 sc to the end of the canvas.

Info :

This will be the inside of the house. Attach the crocheted canvas to the plastic canvas by stitching vertical lines at a distance of 1.5-2 cm from each other; on the short side retreat 3 cm on both sides.

Info :

Crochet the second piece for the outer side in the same way. Fold the wall with the plastic canvas outward and sew the edges of the crocheted canvases end-to-end.

Info :

Then join the edges of the canvas end-to-end and sew them through the crocheted fabric. Cut a strip about 4 cm wide from the canvas and overlap the seam with it; sew the strip on both sides through the crocheted fabric.

Info :

Sew the second (outer) piece to the outside starting from the door opening, sew over the edge. Then sew a vertical seam on the back side of the house.

Info :

Sew the top and bottom sides over the edge. Sew the bottom to the wall; when stitching, it is not necessary to grab the canvas, grab only the edge of the crocheted fabric with a needle.

— Roof base (with fishing line) :

Info :

Crochet the base of the roof with fishing line. Before starting work, burn the end of the fishing line with a lighter so that a ball forms at the end; this will prevent the fishing line from slipping out of crocheting.

Round 1 :

6 sc in AR (use fishing line in the base) (6)

Info :

From the second round add a fishing line and crochet so that it is under the stitches.

Round 2 :

inc*6=12 sc (12)

Round 3 :

12 sc (12)

Round 4 :

(1 sc, inc)*6=18 sc (18)

Round 5 :

18 sc (18)

Round 6 :

(2 sc, inc)*6=24 sc (24)

Round 7 :

24 sc (24)

Round 8 :

(3 sc, inc)*6=30 sc (30)

Round 9 :

30 sc (30)

Round 10 :

(4 sc, inc)*6=36 sc (36)

Round 11 :

36 sc (36)

Round 12 :

(5 sc, inc)*6=42 sc (42)

Round 13 :

42 sc (42)

Round 14 :

(6 sc, inc)*6=48 sc (48)

Round 15 :

48 sc (48)

Round 16 :

(7 sc, inc)*6=54 sc (54)

Round 17 :

54 sc (54)

Round 18 :

(8 sc, inc)*6=60 sc (60)

Round 19 :

60 sc (60)

Round 20 :

(9 sc, inc)*6=66 sc (66)

Round 21 :

66 sc (66)

Round 22 :

(10 sc, inc)*6=72 sc (72)

Round 23 :

72 sc (72)

Round 24 :

(11 sc, inc)*6=78 sc (78)

Round 25 :

78 sc (78)

Round 26 :

(12 sc, inc)*6=84 sc (84)

Round 27 :

84 sc (84)

Round 28 :

(13 sc, inc)*6=90 sc (90)

Round 29 :

90 sc. Cut the fishing line leaving a short end. (90)

Info :

Gently melt the end of the fishing line, protruding it from crocheting, and quickly press it to crocheting. The melted fishing line will stick to the yarn. Crochet a few more sc to close the line, finish with a sl st and cut the thread.

— Roof petals (make 15 total in three shades) :

Info :

Crochet roof petals with lilac yarn. Adjust the ring and work back-and-forth rows with turning chains (not spiral) for petals; later make petals in other two shades (three shades total, five petals each).

Round 1 :

3 sc in AR (adjust ring) (3)

Round 2 :

3 sc (3)

Round 3 :

3 sc (3)

Round 4 :

1 sc, inc, 1 sc = 4 sc (4)

Round 5 :

4 sc (4)

Round 6 :

4 sc (4)

Round 7 :

2 sc, inc, 1 sc = 5 sc (5)

Round 8 :

5 sc (5)

Round 9 :

5 sc (5)

Round 10 :

2 sc, inc, 2 sc = 6 sc (6)

Round 11 :

6 sc (6)

Round 12 :

6 sc (6)

Round 13 :

2 sc, inc, 3 sc = 7 sc (7)

Round 14 :

7 sc (7)

Round 15 :

7 sc (7)

Round 16 :

2 sc, inc, 4 sc = 8 sc (8)

Round 17 :

8 sc (8)

Round 18 :

8 sc (8)

Round 19 :

2 sc, inc, 5 sc = 9 sc (9)

Round 20 :

9 sc (9)

Round 21 :

9 sc (9)

Round 22 :

2 sc, inc, 6 sc = 10 sc (10)

Round 23 :

10 sc (10)

Round 24 :

10 sc (10)

Round 25 :

1 sc, 2 htr, (2 dc in every st)*4, 2 htr, 1 sc

Info :

Sc along the straight sides. Make 3 inc at the narrow end.

Info :

Along the wide end: 2 ch, 2 dc in every st, (1 dc, 2 ch, sl st) in the last st. Cut the yarn.

Info :

Join yarn to the narrow end and sc around without increasing, adding a fishing line to the round for stiffness.

Info :

Make 5 petals in lilac, then crochet 5 more pieces of two other shades so you have 15 petals total (5 petals per shade).

— Petals assembly :

Info :

Fasten the petals to the base of the roof: apply a thin line of glue in the center of each petal and glue one at a time. About the 25th row of petals should fall on the edge of the base.

Info :

Gently lift the edges of each petal and glue completely. Glue the second layer of petals a little higher and offset relative to the first row. Glue the third row. Thanks to the fishing line and glue, the roof is very hard and durable.

— Sepal (green top) :

Round 1 :

6 sc in AR (6)

Round 2 :

6 sc (6)

Round 3 :

6 sc (6)

Round 4 :

6 sc (6)

Round 5 :

inc*6=12 sc (12)

Round 6 :

(1 sc, inc)*6=18 sc (18)

Round 7 :

(2 sc, inc)*6=24 sc (24)

Round 8 :

(3 sc, inc)*6=30 sc (30)

Rounds 9-10 :

2 rounds of 30 sc (30)

Info :

Crochet an angle (petal-like projection) for the sepal: 7 ch, 2 sl st, 1 sc, 1 htr, 2 dc, skip 2 st of the base, 1 sl st. Repeat around to make 5 angles. Put the sepal on the top of the roof and sew or glue.

— Door, door leaf and visor :

Info :

Put off the roof, take the door. Cut the door leaf from the canvas so that it is 5 mm smaller than the opening in height and width.

Info :

With dark green yarn crochet a rectangle to cover the door from two sides. The number of sc and rows depends on your tension. Sew the door along 3 sides over the edge.

Info :

Sew the door to the opening making several stitches through the canvas in 2 points. Sew a small button or a bead as a doorknob (author used 2 mini-buttons put together).

Visor Round 1 :

6 sc in AR (6)

Visor Round 2 :

inc*6=12 sc (12)

Visor Round 3 :

(1 sc, inc)*6=18 sc (18)

Visor Round 4 :

(2 sc, inc)*6=24 sc (24)

Visor Round 5 :

(3 sc, inc)*6=30 sc (30)

Visor Round 6 :

(4 sc, inc)*6=36 sc (36)

Visor Round 7 :

(5 sc, inc)*6=42 sc (42)

Visor Rounds 8-9 :

2 rounds of 42 sc (42)

Info :

Crochet shells along the edge: skip 1 st, 6 dc in 1 st, skip 1 st, 1 sc. Make 10 such shells. Since there are 42 sc in the circle, 2 st will be excess; in 2 places skip 2 st instead of one. Leave a long end of thread.

Info :

Fold the part in half aligning the shells and glue inside, giving a dome shape. Sew over the edge with the end of the thread. Crochet the second layer of the visor with pink yarn: 3 sc in AR, then crochet back and forth rows with a turning ch (not spiral rounds).

Visor (pink) Round 1 :

3 sc in AR (3)

Visor (pink) Round 2 :

inc*3=6 sc (6)

Visor (pink) Round 3 :

(1 sc, inc)*3=9 sc (9)

Visor (pink) Round 4 :

(2 sc, inc)*3=12 sc (12)

Visor (pink) Round 5 :

(3 sc, inc)*3=15 sc (15)

Visor (pink) Round 6 :

(4 sc, inc)*3=18 sc (18)

Visor (pink) Round 7 :

(5 sc, inc)*3=21 sc (21)

Info :

Crochet 5 shells of 5 dc. Skip 2 st before the first shell because 1 st will be excess. Apply glue to the fold of the lilac visor and glue the pink layer over it. Sew/ glue visor to the wall and additionally sew with the thread end so it does not hang down low.

— Windows :

Info :

Crochet windows with light blue yarn. Crochet a rectangle 10 sc wide and 12 rows high. Sew windows to the house canvas and add crosses or details as desired (the pattern shows a circular window with cross bars).

— Final assembly and finishing :

Info :

After finishing the walls, bottom and roof, attach the glued petal roof (the roof is not attached to the house in any way in the example; it is simply put on top). Place the sepal on the top of the roof and sew or glue.

Info :

Attach windows and door details by sewing through the canvas in a few places for secure fixing. Sew on small decorative beads or buttons for doorknob and other accents.

Info :

Weave in remaining ends and make any small decorative leaves and tendrils as desired. The house is now complete and ready to display.

Assembly Instructions

  • Cut a circle from the plastic canvas slightly smaller than the crocheted bottom and sew the canvas to the crocheted circle with small stitches; stack three crocheted layers together and stitch through the center for stability.
  • Roll a 33 cm x 15 cm canvas strip into a cylinder to match the bottom diameter, crochet the canvas-covered wall pieces (inner and outer) and sew the canvas edges end-to-end through the crocheted fabric to create the house wall.
  • Sew the crocheted bottom to the wall by grabbing only the edge of the crocheted fabric (do not need to pierce canvas) and stitch evenly around to secure base and wall.
  • Glue petals to the roof base one at a time with a thin line of glue in the center, layering petals in three rows and offsetting the two upper rows slightly; attach the green sepal on top by sewing or gluing.
  • Cut the door leaf from canvas 5 mm smaller than opening, crochet the dark-green cover to fit and sew along three sides, then attach door to opening by stitching through canvas at two points and add a small button bead doorknob.
  • Sew or glue the lilac visor to the door top, then glue the pink layer over it and reinforce with a few stitches; sew windows and small decorative elements in place through the canvas.

Important Notes

  • 💡Use stitch markers to mark the beginning and end of rounds, especially when working increases and the roof cone to avoid miscounting.
  • 💡Measure and cut the plastic canvas slightly smaller than your crocheted circles so the crocheted fabric overlaps and covers the canvas edges for a neat finish.
  • 💡Handle the fishing line carefully: melt the end slightly and press into the stitches to secure it so it will not slip out of the crocheting.
  • 💡Use a thin line of hot glue when attaching petals; too much glue will stiffen and show through the yarn and too little will not hold the petal edges.
  • 💡Pin parts and check fit before permanently sewing or gluing—this helps ensure the roof, door and windows line up neatly before final attachment.

This Floral Fairy House pattern brings a touch of handmade magic to your home—perfect for shelves, nurseries, or as a special gift. The combination of crochet, plastic canvas and a reinforced roof makes the house both charming and durable. Make it in your favorite colors and enjoy the layering process as it comes to life. 🧶✨🌸

You ask,

we answer.

FAQs

What size will the finished piece be?

The finished house measures approximately 29 cm in height with a bottom diameter of about 11 cm using the recommended yarn and hook size.

Can I use a different yarn weight?

Yes, but changing yarn weight will affect the final size; adjust your hook size accordingly and expect to modify canvas sizing and number of chains for the wall panel.

Do I need to know how to work with plastic canvas and fishing line?

Basic sewing skills and comfort handling canvas and fishing line are helpful; the pattern explains how to cut, attach and stitch the canvas and how to secure the fishing line safely by melting its end.

How long does this project typically take to complete?

Most crafters will spend about 12-15 hours across multiple sessions, depending on experience and how much time you spend on assembly and decoration.