About This Minimals Cat Amigurumi Pattern
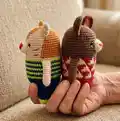
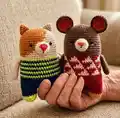
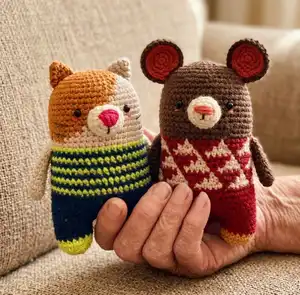
This pattern creates a minimalist striped cat amigurumi, combining two-tone head details with a striped body and little legs. The design uses simple single crochet rounds with strategic color changes to create the cat's personality. You will work in continuous rounds, divide for legs and sew on small parts like snout, ears, and arms.
Includes clear round-by-round instructions, symbol charts, and photo hints for placement. Finished size is approximately 15 cm (5.9 inches) using the recommended hook and yarn.
Why You'll Love This Minimals Cat Amigurumi Pattern
I absolutely love this pattern because it packs so much charm into a small, doable project. The striped body and two-tone head give the cat lots of personality with only simple color changes. I enjoy the balance of shaping (head and legs division) and quick little parts like the snout and ears that bring the face to life. This design is great for trying out precise placement of eyes and facial embroidery, and it makes a lovely handmade gift.
Switch Things Up
I love playing with color variations on this pattern; try pastel stripes or monochrome to change the personality instantly.
I often change yarn weight and hook size to create different sizes — a bulkier yarn gives a cozy, chunky cat while a finer yarn makes a pocket-sized version.
I like to swap safety eyes for embroidered eyes for a softer, baby-safe toy; embroidery can also add expressive brows or eyelashes.
You can add tiny crocheted accessories like a scarf, hat, or pocket to make each cat unique and give it character.
I sometimes add a small wire inside the arms for posability so the cat can hold tiny props or sit differently.
Try stitching a patterned sweater using surface crochet or duplicate stitch over the stripes for extra texture and color detail.
I recommend experimenting with face placement — moving the snout or eyes slightly changes the expression a lot, so pin pieces before sewing.
Make a keychain version by using finer yarn and a smaller hook, then attach a keyring to the top of the head or a loop on the back.
If you want a sturdier base, slip a small wooden peg into the heel of each foot as shown in the tip to straighten the doll and help it stand.
I also enjoy adding small embroidered whiskers or felt cheeks for a pop of color and extra charm on gifting versions.
Common Mistakes & How to Fix Them
✗ Forgetting to mark the beginning of rounds leads to mismatched stripes and shaping; use a stitch marker at the start of every round and move it as you work to keep row counts accurate.
✗ Not changing yarn colors exactly where the symbol chart indicates will produce uneven stripes; follow the symbol pattern carefully and switch colors at the end of the stitch before the marked change.
✗ Overstuffing the head or body makes seams and facial placements difficult; stuff gradually and evenly to maintain a smooth shape and ease of sewing details.
✗ Skipping the step to weave the yarn tail through the front loops when closing legs causes gaps; always weave the tail through the front loops of remaining stitches and pull tight to close securely.