🧶 Beautiful ✨ Detailed 💝 Adorable

French Countryside Blanket Pattern

French Countryside Blanket Pattern
3.9★ Rating
12-15 Hours Time Needed
1.9K Made This
✂️

Beginner Friendly Level

Perfect for those just starting their crochet journey, with clear instructions and simple techniques

⏱️

Multi-Day Project

A rewarding 12+ hour journey—perfect for dedicated crafters who love detailed work.

🤗

Soft Hug

Gentle, plush, and full of warmth, creating a sense of comfort and coziness wherever they find a home.

About This French Countryside Blanket Pattern

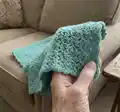
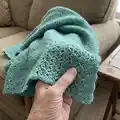
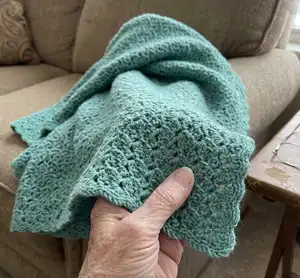
This pattern creates the French Countryside Blanket worked in the textured Paris Stitch for a soft, gently lacy throw. It uses simple stitches—double crochet, single crochet and chains—to build a lovely repeating texture and a matching Paris Stitch border. The pattern includes full sizing tables, yarn substitution guidance and step-by-step photos to help place border stitches exactly where they belong.

French Countryside Blanket Pattern crochet pattern - detailed view of completed project

Written for a medium size blanket with a 4.5mm hook and DK/light worsted yarn, but easily customizable by changing starting chains and number of rows. Ideal for making baby blankets, throws or striped versions with self-patterning yarn.

Why You'll Love This French Countryside Blanket Pattern

I absolutely love this pattern because the Paris Stitch creates a beautiful textured fabric that feels luxurious yet stitches up quickly. I enjoy how the stitch is simple—only dc, sc and chain—but yields a sophisticated, almost lacy result that still has great warmth. The border instructions and step-by-step photos make finishing the blanket satisfying and straightforward, which I always appreciate. I also love how adaptable it is: changing yarn weight, color or length gives each blanket a unique personality that I enjoy gifting and displaying.

French Countryside Blanket Pattern step 1 - construction progress French Countryside Blanket Pattern step 2 - assembly progress French Countryside Blanket Pattern step 3 - details and accessories French Countryside Blanket Pattern step 4 - final assembly and finishing

Switch Things Up

I love customizing this blanket by changing colors — try soft pastels for a baby blanket or bold stripes for a modern throw.

I often use different yarn weights to change the size and texture; a bulkier yarn with a larger hook gives a chunky cozy blanket while finer yarn makes a delicate mini version.

I sometimes add a fringe or tassels to the short ends for a boho look; use an extra skein in a contrast color for a pop.

I like to experiment with the border by using a different color for the Paris Stitch round and then a neutral slip stitch round to frame the blanket.

If I want a larger blanket I use Table 1 to pick a larger starting chain and then follow Table 2 to determine the number of rows for my desired length.

I also enjoy making a set of coordinated pieces — matching cushion covers using the same Paris Stitch look great in a living room.

For travel-friendly minis, I use fingering or sport weight yarn and a smaller hook to create keychain or small lap blankets as gifts.

I sometimes block the finished blanket lightly to open the texture and even out the edges; pin to shape and spray lightly with water if needed.

I recommend trying self-patterning yarn for an interesting stripe effect without changing colors — it looks funky and modern.

Don’t be afraid to change the border style — a simple sc round instead of Paris Stitch gives a cleaner edge if you prefer minimal finishes.

Common Mistakes & How to Fix Them

✗ Skipping the gauge swatch can lead to a blanket that is too large or too small; make a 10 cm swatch and adjust hook size to match the tension before starting. ✗ Not using the correct multiple for starting chains results in edge distortion; start with a multiple of 4 plus 2 as specified and consult Table 1 for recommended starting chain counts. ✗ Making the last row incorrectly will misplace the border stitches and corners; follow the instruction to omit the last dc in the turning ch on the final body row so the top side counts as the first border side. ✗ Placing Paris stitches into the wrong side-space creates uneven borders; identify the smaller (third) space on the side edges as shown in the photos and place Paris stitches there for consistent spacing. ✗ Overstuffing or uneven tension when finishing can distort the blanket shape; maintain even tension throughout, block gently after finishing and weave in ends neatly.

French Countryside Blanket Pattern

Create a cozy, textured French Countryside Blanket using the charming Paris Stitch. This pattern guides you step-by-step through the easy stitch repeats and a simple border so you can make a beautiful throw or baby blanket. With clear photos and helpful tables for sizing and yarn substitutions, you can customize the blanket to your preferred dimensions and colors. Perfect for a relaxing, rewarding crochet project.

Beginner Friendly 12-15 Hours

Materials Needed for French Countryside Blanket Pattern

— Main Fabric

  • 01
    Ouma Ralie Feels Like Cashmere from Kismet Yarns - Seafoam Green - 9 x 100g (recommended for sample blanket)
  • 02
    Yarn weight: Light (3) / DK (label weight)
  • 03
    Meterage: 273 yards / 250 meters per 100g skein (approximate for recommended yarn)
  • 04
    Unit weight: 3.53 ounces / 100 grams
  • 05
    Fibers: 100% Acrylic (as used in sample yarn specification)
  • 06
    Suggested substitutes: Rico Essentials Acrylic Antipilling DK (approx. DK / Light 3 weight)
  • 07
    Suggested substitutes: King Cole Cherished Baby DK
  • 08
    Suggested substitutes: Stylecraft Bambino DK
  • 09
    Suggested substitutes: Lion Brand Jeans; Lion Brand Mandala Ombre; Lion Brand Jamie; Lion Brand Vanna's Style
  • 10
    Suggested substitutes: Schachenmayr Original Soft and Easy; Schachenmayr Bravo; Red Heart Baby Hugs Light; Scheepjes Softfun; Scheepjes Colour Crafter; Scheepjes Softfun Denim

— Tools Required

  • 01
    Crochet hook size 4.5mm (H) - used for the pattern sample
  • 02
    Alternative crochet hook suggestion: US G / 4mm for different yarn substitutions
  • 03
    Knitting needle size suggested (for yarn spec reference): US 4-7 or 3.5-4.5mm (not required for crochet but listed in yarn specs)
  • 04
    Yarn needle for weaving in ends
  • 05
    Scissors
  • 06
    Measuring tape to check width and length against tables

Progress Tracker

0% Complete

— Special Stitches :

Info :

Paris Stitch: Each (2 dc, ch 2, sc) makes one Paris Stitch

Info :

CORNER: For the CORNER, make: (dc, ch 1) x 3, dc, sl st in the indicated st

— Blanket :

Info :

Instructions are written for a medium size blanket, consult Table 1 on page 3 for number of starting chains for other blanket sizes.

Info :

With a 4.5mm H, make 222 ch

Row 1 :

(RS) 2 dc in 4th ch from H (photo 1-2), ch 2, sc in next ch (photo 2-3), *skip 2 ch, 2 dc in next ch, ch 2, sc in next ch*, rep from * to * until last ch, dc in last ch (photo 4-5), turn [55 Paris Stitches]

Row 2 :

ch 2, *(2 dc, ch 2, sc) in ch2-sp (photo 6-7)*, rep from * to * until end of row, dc around turning ch (photo 8-9)

Info :

Repeat Row 2 until your desired length (the blanket in the photo has 103 rows)

Info :

Last Row should be made with RS facing: (RS) rep Row 2, but don’t make the last dc in turning ch

— Border :

Info :

The border will consist of one round of Paris stitches and one round of slip stitches. The last row made for the body will count as the first side (top side) of the border, detailed instructions with photo's will help you to place the stitches for the other 3 sides of the blanket.

Round 1 :

Left Side: The first corner will be made in the first dc of the 2 dc indicated by the purple arrow in photo 10 (the red arrow indicates where you normally would have made the last dc of the row, which is omitted in the last row): for the CORNER, make: (dc, ch 1) x 3, dc, sl st in the indicated st (photo 11), turn so that the left side is now on top (photo 12), locate the space on the left side made by the last dc at the end of each row (it is the smaller (third) space, not the big space, indicated by the white arrows in photo 12), make a Paris st in each of these spaces until the next corner (it works out as 1 Paris st for every 2 rows, photo 13), don't make a Paris st in the last sp, make a CORNER in the last sp (photo 14-15)

Round 1 :

Bottom: turn so that the bottom is now on top, make a Paris st in the bottom of the same ch where the 2 dc of row 1 was made (photo 16-17) until the next corner, make a CORNER in the ch2-sp at the end of this side (photo 18-19)

Round 1 :

Right Side: locate the space indicated by the arrows in photo 20-21 (it is the dc at the end of each row, one of the smaller spaces), make a Paris st in each of these spaces (photo 21, it works out as very third space) until the end of this side, make a CORNER in the last space before the ch2-starting-chain of the top row (photo 22-23)

Round 2 :

sl st in the BLO of each st around (insert your H from the top into each st, photo 24-26, the first 2 sl sts will be in the ch2-starting-chain, see arrows in photo 27), fasten off

Info :

Weave in yarn ends

Assembly Instructions

  • Count and place the first border corner on the top side using the last body row as the first side; make the CORNER as (dc, ch 1) x 3, dc, sl st in the indicated stitch before turning the work to work the side edge.
  • Work Paris stitches down the left side in the smaller spaces made by the last dc at the end of each row (about one Paris stitch for every two rows) until you reach the next corner and then make the CORNER in the last space.
  • Work Paris stitches along the bottom by placing a Paris stitch into the bottom of the same chain where the initial 2 dc of Row 1 were made until you reach the corner, then make a CORNER in the ch2-space to turn.
  • When returning to the right side, place Paris stitches into the smaller end-of-row spaces (it works out as every third space for that side) and finish the last corner before working Round 2 of slip stitches; fasten off and weave in ends securely.

Important Notes

  • 💡Make a gauge swatch to check tension: 9 rows and 5 Paris stitches = 4.25 x 4.25 inches / 11 x 11 cm is the pattern tension guide.
  • 💡Pattern is written in US terminology and uses a multiple of 4 plus 2 for starting chains; consult Table 1 for suggested starting chain counts.
  • 💡If substituting yarn, make a swatch and check both stitch and row gauge since yarns classified as DK/Light (3) can vary in thickness.
  • 💡Photos at the end of the document show step-by-step placements for border and corner stitches—use them to accurately place Paris stitches on the sides.

This French Countryside Blanket pattern brings a soft, textural Paris Stitch to life in a beautiful seafoam green throw. The easy stitch repeat and clear border instructions mean you can finish a polished blanket with confidence. Customize sizes using the included tables and enjoy gifting or keeping this cozy, handmade piece. 🧶✨

You ask,

we answer.

FAQs

What size will the finished piece be?

The finished medium blanket measures approximately 48 inches x 50 inches (123 cm x 127 cm) using the recommended yarn and hook.

Can I use different yarn weights for this pattern?

Yes, you can substitute yarns, but you must make a swatch and check gauge because different yarn weights will change the final size; consult the yarn substitution guidance and Table 1 & 2.

Do I need prior crochet experience for this pattern?

This pattern is rated Beginner Friendly so basic knowledge of dc, sc and chains is sufficient; photos and step-by-step border instructions make it a great first textured blanket.

How long does this project typically take to complete?

Most crocheters complete this project in 12-15 hours depending on size and pace, though time will vary if you change yarn weight or make a larger blanket.

How do I size the blanket differently?

Adjust the number of starting chains using a multiple of 4 plus 2 and consult Table 1 for width guidance and Table 2 for approximate row counts to reach your desired length.