🧢 Beautiful ✨ Detailed πŸ’ Adorable

Twinkletoes the Tiny Gecko Amigurumi Pattern

Twinkletoes the Tiny Gecko Amigurumi Pattern
4.6β˜… Rating
2-3 Hours Time Needed
3.9K Made This
βœ‚οΈ

Beginner Friendly Level

Perfect for those just starting their crochet journey, with clear instructions and simple techniques

⏱️

Bite-Sized Project

Finishes in 2-4 hoursβ€”perfect for an afternoon of creative relaxation.

🎁

Tiny Treasure

Small, sweet, and gift-worthy creations that fit perfectly in the palm of your hand with detailed charm.

About This Twinkletoes the Tiny Gecko Amigurumi Pattern

Twinkletoes the Tiny Gecko is a small, no-sew amigurumi you can crochet in an afternoon. The pattern is written in US terminology and works continuously from head to tail for easy shaping. It includes a special leg/toe stitch tutorial so you can make the signature gecko feet with confidence.
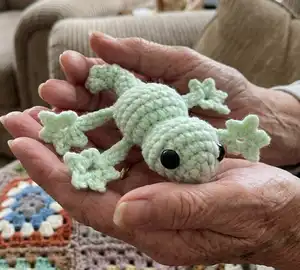
Twinkletoes the Tiny Gecko Amigurumi Pattern crochet pattern - detailed view of completed project

This design offers both a medium and chunky yarn option, with clear photos to guide you through placement and finishing. Suitable for beginners who want a quick, satisfying make.

Why You'll Love This Twinkletoes the Tiny Gecko Amigurumi Pattern

I absolutely love this pattern because it turns simple stitches into a characterful little gecko with minimal effort. I enjoy how quickly it works up β€” you can make several in an afternoon and experiment with colors. The leg/toe special stitch is one of my favorite touches; it gives the gecko personality without complicated sewing. I also appreciate that it is a no-sew design, so assembling feels fast and satisfying every time.

Twinkletoes the Tiny Gecko Amigurumi Pattern step 1 - construction progress Twinkletoes the Tiny Gecko Amigurumi Pattern step 2 - assembly progress Twinkletoes the Tiny Gecko Amigurumi Pattern step 3 - details and accessories Twinkletoes the Tiny Gecko Amigurumi Pattern step 4 - final assembly and finishing

Switch Things Up

I love customizing this tiny gecko by changing yarn colors β€” try ombre or speckled yarn for fun texture.

I sometimes use pastel shades for a soft nursery-friendly look or neon colors for a playful keychain version.

To make a mini keychain, use a lighter fingering yarn with a smaller hook and attach a keyring to the tail before finishing.

If you want a chunkier, cuddlier gecko I use bulky yarn and a 5.0mm hook for a plush version that stands out.

I often switch eye styles: safety eyes for durability, or embroider eyes for a baby-safe toy.

Try adding tiny embroidered spots, stripes, or a tiny crocheted tongue for personality and expression.

I also experiment with different tail shapes β€” curl it more for a whimsical look or slightly flatten it for a resting pose.

For a more poseable version, I sometimes insert a small piece of wire in the limbs before stuffing so the gecko can hold onto branches or edges.

I like to create themed sets by varying feet colors or adding a tiny scarf or crown to make gift-ready characters.

Finally, practice the leg tutorial a few times on scrap yarn to make sure your toes match β€” slight adjustments in chain length or placement can change the look dramatically.

Common Mistakes & How to Fix Them

βœ— Skipping the stitch marker when working in continuous rounds leads to lost rounds; place a stitch marker at the beginning of each round and move it up to keep track. βœ— Forgetting to stuff gradually causes uneven shaping in the head and tail; stuff a little at a time and check the shape frequently while you work. βœ— Not counting stitches after increases and decreases results in incorrect shaping; count your stitches at the end of each round, especially after shaping rounds. βœ— Working the limbs too close to the body or crocheting into the chain stitch can distort placement; move the limbs outward and avoid the chain stitch when instructed to keep symmetry.
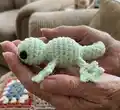
Twinkletoes the Tiny Gecko Amigurumi Pattern

Make an adorable tiny gecko that fits in the palm of your hand with this beginner-friendly amigurumi pattern. Youll enjoy a no-sew design with clear photos and a helpful leg tutorial. Perfect for gifting, keychains, or pocket pals β€” this pattern focuses on simple shaping and cute toes.

Beginner Friendly 2-3 Hours

Materials Needed for Twinkletoes the Tiny Gecko Amigurumi Pattern

β€” Main Fabric

  • 01
    Medium weight yarn (#4) for tiny Twinkletoes (recommended for the small version)
  • 02
    Premier Parfait Chunky (or other bulky yarn) for chunky Twinkletoes
  • 03
    Suggested colors: light pastel or any preferred color for gecko body (amount depends on size/version)
  • 04
    10mm safety eyes for the medium version
  • 05
    14mm safety eyes for the chunky version
  • 06
    Fiber fill stuffing (small amount) for head, body, and tail

β€” Tools Required

  • 01
    Crochet hook size 4.0mm for medium Twinkletoes
  • 02
    Crochet hook size 5.0mm for chunky Twinkletoes
  • 03
    10mm safety eyes (medium version)
  • 04
    14mm safety eyes (chunky version)
  • 05
    Fiber fill stuffing
  • 06
    Yarn needle for sewing and weaving tails
  • 07
    Stitch markers
  • 08
    Scissors

Progress Tracker

0% Complete

β€” Body :

Info :

Special stitch: Leg *picture tutorial on page 5* - Ch 10, sl st in 2nd ch from hook and the third ch. That third ch will be your "base chain". Ch 2, sl st in 2nd ch from hook, sl st in base stitch. Repeat * * 3 more times, for a total of 5 toes. Sl st in the 7 stitches back down the chain, then continue on with the round.

Round 1 :

Make 4 sc in a mc (4)

Round 2 :

Inc x 4 (8)

Round 3 :

*inc, 3 sc* x 2 (10)

Round 4 :

Inc x 5, 5 sc (15)

Round 5 :

3 sc in the next st, 8 sc, 3 sc in the next st, 5 sc (19)

Round 6 :

Sc in each st (19) *Place a SM between the 6th & 7th sc of this row. This is a guide for the center/top of the body.* (Pink SM)

Round 7 :

Sc in in each st (19)

Info :

Insert safety eyes between r3 & r4, with 4 or 5 st visible in between them. Use the SM from r6 as a visual guide to place each eye equal distance away from the SM.

Round 8 :

Dec x 6, 7 sc (13)

Info :

Stuff head

Round 9 :

Dec x 4, 5 sc (9)

Round 10 :

3 sc in the next st, inc x 3, 3 sc in the next st, 4 sc (16)

Round 11 :

Leg, sc, inc, *2 sc, inc* x 2, sc, inc, leg, 6 sc (20)

Round 12-14 :

Sc in each st (20) *Make sure to move the limbs outward and be careful not to sc in the chain stitch from the leg*

Round 15 :

Leg, sc, *dec, sc* x 4, sc, leg, 6 sc (16)

Round 16 :

*2 sc, dec* x 3, 4 sc (13)

Info :

Stuff body

Round 17 :

*sc, dec* x 4, sc (9)

Info :

You will now be making the tail - Stuff the tail lightly as you go, until it gets too narrow to stuff

Round 18 :

Sc in each st (9)

Round 19 :

*dec, sc* x 2, 3 sc (7)

Round 20 :

Sc in each st (7)

Round 21 :

Dec, 5 sc (6)

Round 22 :

Sc in each st (6)

Round 23 :

Dec, 4 sc (5)

Round 24 :

Sc in each st (5)

Round 25 :

Dec, 3 sc (4)

Round 26 :

Sc in each st (4)

Info :

Fasten off and leave a long tail

Infos :

Sew the hole closed, keep the yarn on your needle. Slightly curve the tip of the gecko-tail to the side so that the tip of the gecko-tail is beside R23/R24. Insert your needle between the rounds to bring the tip of the gecko-tail to it. Weave the yarn-tail through the stitches a few more times, to secure the curl. Don't weave the yarn-tail to the opposite side, it will give it an indent!

β€” Leg Tutorial :

Step 1 :

Ch 10

Step 2 :

Sl st in 2nd ch from hook and the third ch. That third ch will be your "base chain".

Step 3 :

Ch 2

Step 4 :

Sl st in 2nd ch from hook, sl st in base stitch

Step 5 :

Ch 2

Step 6 :

Sl st in 2nd ch from hook, sl st in base stitch

Step 7 :

Ch 2

Step 8 :

Sl st in 2nd ch from hook, sl st in base stitch

Step 9 :

Ch 2

Step 10 :

Sl st in 2nd ch from hook, sl st in base stitch

Step 11 :

Sl st in the 7 stitches back down the chain

Assembly Instructions

  • Insert safety eyes between rounds 3 and 4, leaving 4 or 5 stitches visible between them and using the stitch marker placed between the 6th and 7th stitch of round 6 as a visual center guide.
  • Fasten off at the tail and leave a long yarn tail, then sew the remaining hole closed while keeping the yarn on your needle for neat finishing.
  • Slightly curve the tip of the gecko tail to the side so it sits beside rounds 23/24, then bring the tip to the body by inserting your needle between the rounds and pulling through to the body.
  • Weave the yarn-tail through the tail stitches a few more times to secure the curl and keep the tail from unrolling and shifting.
  • Avoid weaving the yarn-tail to the opposite side of the tail curl, as this will create an indent in the tail shape; secure on the same side instead.

Important Notes

  • πŸ’‘This pattern is written in US crochet terminology.
  • πŸ’‘The stitch count at the end of each round does not include the limbs.
  • πŸ’‘This design is made all in one piece; it starts at the head and finishes at the tail.
  • πŸ’‘This pattern is worked in continuous rounds unless otherwise specified; place a stitch marker at the beginning of each round for best results.

Twinkletoes was designed to be a quick, heartwarming make that fits in your hand and sparks joy. Whether you make a single gecko or a whole clutch of colors, each one is filled with personality and charm. Happy crocheting and may your little geckos bring smiles and cozy handmade magic to every gift! 🧢✨

You ask,

we answer.

FAQs

What size will the finished piece be?

The finished tiny gecko measures approximately palm-sized when using medium weight yarn and a 4.0mm hook; the chunky version will be larger when using bulky yarn and a 5.0mm hook.

Can I use different yarn weights for this pattern?

Yes, you can substitute yarn weights, but the finished size will change; use a correspondingly larger or smaller hook and adjust eye size accordingly.

Do I need prior crochet experience for this pattern?

This pattern is beginner friendly and no-sew, but basic knowledge of single crochet, increases, decreases, and slip stitches is helpful.

How long does this project typically take to complete?

Most crocheters complete the tiny gecko in about 2-3 hours for the medium version; the chunky version may be quicker due to thicker yarn.