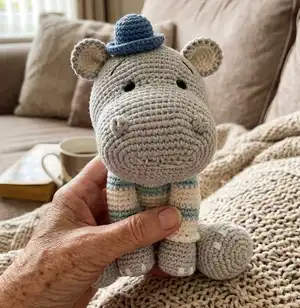
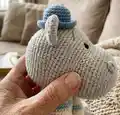
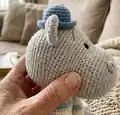
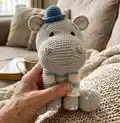
Make a sweet, huggable hippo named Bepo with this full crochet pattern. You will enjoy creating the soft shapes, striped sweater body, and tiny hat using clear step-by-step rounds and photos. The pattern includes materials, abbreviations, and assembly directions so you can finish a charming amigurumi to gift or keep.
Progress Tracker
0% Complete
— NOSTRILS (make 2) :
Rnd 1 :
start 6 sc in a magic ring (6)
Rnd 2 :
sc in all 6 st (6)
Info :
Finish with a slip st in the next st and fasten off leaving a long tail for sewing.
— HEAD :
Rnd 1 :
make a chain of 12
Rnd 2 :
start crocheting in the second loop from the hook . 10 sc, 3 sc in the last loop of the chain. Turn your work round so that you can now crochet on the other side of the chain, 9 sc and increase in the last chain (24)
Rnd 3 :
inc, 9 sc, (inc) x 3, 9 sc, (inc) x 2 (30)
Rnd 4 :
(1 sc, inc) x 2, 9 sc, (1 sc, inc) x 3, 10 sc, inc (36)
Rnd 5 :
(2 sc, inc) x 2, 9 sc, (2 sc, inc) x 3, 11 sc, inc (42)
Rnd 6 :
(3 sc, inc) x 2, 9 sc, (3 sc, inc) x 3, 12 sc, inc (48)
Rnd 7 :
(4 sc, inc) x 2, 9 sc, (4 sc, inc) x 3, 13 sc, inc (54)
Rnd 8-14 :
sc in all 54 st (54)
Rnd 15 :
(7 sc, dec) x 6 (48)
Rnd 16 :
(3 sc, inc) x 6, 24 sc (54)
Rnd 17 :
(4 sc, inc) x 6, 24 sc (60)
Rnd 18-24 :
sc in all 60 st (60)
Rnd 25 :
(8 sc, dec) x 6 (54)
Rnd 26 :
sc in all 54 st (54)
Info :
Place the safety eyes between rounds 15-16 with 9 stitches between them.
Info :
Start stuffing the head and continue stuffing as you work.
Rnd 27 :
(7 sc, dec) x 6 (48)
Rnd 28 :
sc in all 48 st (48)
Rnd 29 :
(6 sc, dec) x 6 (42)
Rnd 30 :
(5 sc, dec) x 6 (36)
Rnd 31 :
(4 sc, dec) x 6 (30)
Rnd 32 :
(3 sc, dec) x 6 (24)
Rnd 33 :
(2 sc, dec) x 6 (18)
Rnd 34 :
(1 sc, dec) x 6 (12)
Info :
Fasten off. With your yarn needle, weave the yarn tail through the front loop of each remaining stitch and pull tight to close. Don´t cut the yarn, leave a long tail, we will use it later.
Info :
Sew the eyebrows with black embroidery thread 3 rounds above each eye.
Info :
Sew the nostrils between rounds 6-8 with 12 stitches between them.
Info :
To make the eyes slightly closer take the leftover yarn tail of the head and insert the needle near the eye. Go back and forth between the two eyes several times and pull lightly.
— EARS (make 2) :
Inner ear Rnd 1 :
start 6 sc in a magic ring (6)
Inner ear Rnd 2 :
inc in all 6 st (12)
Inner ear Rnd 3 :
(1 sc, inc) x 6 (18)
Inner ear Rnd 4 :
(2 sc, inc) x 6 (24)
Info :
Make a slip stitch in the next stitch, fasten off and weave in the yarn end. (inner ear in cream yarn)
Outer ear Rnd 1 :
start 6 sc in a magic ring (6)
Outer ear Rnd 2 :
inc in all 6 st (12)
Outer ear Rnd 3 :
(1 sc, inc) x 6 (18)
Outer ear Rnd 4 :
(2 sc, inc) x 6 (24)
Info :
After completing the first grey outer ear, do not fasten off, instead, place the wrong side of the grey outer ear to the wrong side of the cream inner ear so they are back to back and the 'right' sides are facing outwards and complete Rnd 5: sc in all 24 st through both parts (24).
Info :
Make a slip stitch in the next stitch and fasten off, leaving a long tail for sewing. Fold the ear slightly and sew a few stitches of the ear together.
— BODY :
Rnd 1 :
start 6 sc in a magic ring (6)
Rnd 2 :
inc in all 6 st (12)
Rnd 3 :
(1 sc, inc) x 6 (18)
Rnd 4 :
(2 sc, inc) x 6 (24)
Rnd 5 :
(3 sc, inc) x 6 (30)
Rnd 6 :
(4 sc, inc) x 6 (36)
Rnd 7 :
(5 sc, inc) x 6 (42)
Rnd 8 :
(6 sc, inc) x 6 (48)
Rnd 9 :
(7 sc, inc) x 6 (54)
Rnd 10-13 :
sc in all 54 st (54)
With cream yarn Rnd 14 :
sc in all 54 st (54)
Rnd 15 :
BLO sc in all 54 st (54)
Rnd 16 :
(7 sc, dec) x 6 (48)
Rnd 17 :
sc in all 48 st (48)
With blue yarn Rnd 18 :
sc in all 48 st (48)
Rnd 19 :
(6 sc, dec) x 6 (42)
With cream yarn Rnd 20-22 :
sc in all 42 st (42)
Rnd 23 :
(5 sc, dec) x 6 (36)
With blue yarn Rnd 24-25 :
sc in all 36 st (36)
With cream yarn Rnd 26 :
sc in all 36 st (36)
Rnd 27 :
(4 sc, dec) x 6 (30)
Rnd 28-29 :
sc in all 30 st (30)
With blue yarn Rnd 30 :
sc in all 30 st (30)
Rnd 31 :
(3 sc, dec) x 6 (24)
With cream yarn Rnd 32-35 :
sc in all 24 st (24)
Info :
Make a slip stitch in the next stitch and fasten off, leaving a long tail for sewing. Stuff it.
Info :
Turn the body upside down and reattach cream yarn to round 15 where you completed stitches in the BLO. Insert your hook into the FLO of the first and last stitch of round 15 and chain 1. Continue to sc around and finish with a slip stitch in the first stitch where you started. Fasten off and weave in the yarn end.
— ARMS (make 2) :
Rnd 1 :
start 6 sc in a magic ring (6)
Rnd 2 :
inc in all 6 st (12)
Rnd 3 :
(1 sc, inc) x 6 (18)
Rnd 4 :
(2 sc, inc) x 6 (24)
Rnd 5 :
BLO sc in all 24 st (24)
Rnd 6 :
(6 sc, dec) x 3 (21)
Rnd 7-8 :
sc in all 21 st (21)
Rnd 9 :
(5 sc, dec) x 3 (18)
Rnd 10 :
sc in all 18 st (18)
With cream yarn Rnd 11 :
sc in all 18 st (18)
Rnd 12 :
BLO sc in all 18 st (18)
Rnd 13-14 :
sc in all 18 st (18)
With blue yarn Rnd 15 :
sc in all 18 st (18)
Rnd 16 :
(4 sc, dec) x 3 (15)
With cream yarn Rnd 17-20 :
sc in all 15 st (15)
With blue yarn Rnd 21 :
sc in all 15 st (15)
Rnd 22 :
(3 sc, dec) x 3 (12)
With cream yarn Rnd 23-26 :
sc in all 12 st (12)
With blue yarn Rnd 27 :
sc in all 12 st (12)
Rnd 28 :
(2 sc, dec) x 3 (9)
With cream yarn Rnd 29 :
sc in all 9 st (9)
Rnd 30 :
Flatten the top of the arm and sc through both layers to close. Fasten off, leaving a long tail for sewing.
Info :
Turn the arm upside down and reattach cream yarn to round 12 where you completed the stitches in Back Loops Only (BLO). Insert your hook into the Front Loops of the first and last stitch of round 12 and chain 1. Continue to sc around and finish with a slip stitch in the first stitch where you started. Fasten off and weave in the yarn end.
Info :
With cream yarn sew 4 hooves on each arm with 2 stitches between them.
— LEGS (make 2) :
Rnd 1 :
start 6 sc in a magic ring (6)
Rnd 2 :
inc in all 6 st (12)
Rnd 3 :
(1 sc, inc) x 6 (18)
Rnd 4 :
(2 sc, inc) x 6 (24)
Rnd 5 :
(3 sc, inc) x 6 (30)
Rnd 6 :
(4 sc, inc) x 6 (36)
Rnd 7 :
BLO sc in all 36 st (36)
Rnd 8-9 :
sc in all 36 st (36)
Rnd 10 :
(4 sc, dec) x 6 (30)
Rnd 11-13 :
sc in all 30 st (30)
Rnd 14 :
(3 sc, dec) x 6 (24)
Rnd 15-18 :
sc in all 24 st (24)
Rnd 19 :
(2 sc, dec) x 6 (18)
Rnd 20-23 :
sc in all 18 st (18)
Rnd 24 :
(1 sc, dec) x 6 (12)
Rnd 25-26 :
sc in all 12 st (12)
Info :
Stuff it, leaving the last cm (0.3 inches) unstuffed.
Rnd 27 :
Flatten the top of the leg and sc through both layers to close. Fasten off, leaving a long tail for sewing.
Info :
With cream yarn sew 4 hooves on each leg with 3 stitches between them.
— TAIL :
Rnd 1 :
start 6 sc in a magic ring (6)
Rnd 2-5 :
sc in all 6 st (6)
Info :
Make a slip stitch in the next stitch and fasten off, leaving a long tail for sewing. Don´t stuff it.
— HAT :
Rnd 1 :
start 6 sc in a magic ring (6)
Rnd 2 :
inc in all 6 st (12)
Rnd 3 :
(1 sc, inc) x 6 (18)
Rnd 4-8 :
sc in all 18 st (18)
Rnd 9 :
working in Front Loops Only (FLO) inc in all 18 st (36)
Rnd 10 :
sc in all 36 st (36)
Info :
Make a slip stitch in the next stitch and fasten off, leaving a long tail for sewing. Stuff the hat lightly and sew it to the head.
— ASSEMBLY :
Info :
Now we will join all parts together to finish the little hippo.
Info :
Sew the ears to the head between rounds 28-29 with 14 stitches between them.
Info :
Sew the body centered under the head on round 8 from the last round.
Info :
Sew the arms to both sides of the body 1 row below the head.
Info :
Sew the legs to the body on round 3 as shown in the photos.
Info :
Sew the tail to the body on round 4.
Info :
Finally, stuff the hat and sew it to the head. Weave in all ends and trim any excess yarn.
You did it — Bepo the little hippo is complete and full of charm! 🧶
This cuddly amigurumi brings together shaping, stripes and tiny details for a delightful finished toy. 🐾
Enjoy gifting or displaying your handmade hippo and share the joy of a tiny, handcrafted friend. ✨