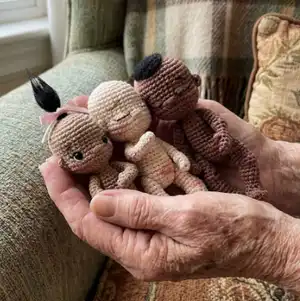
Make a sweet, pocket-sized baby doll with this detailed crochet pattern. Youll work with size 2 fingering yarn and a tiny 1.5mm hook to create a cuddly, articulate doll with open or closed eye options. The pattern includes full round-by-round instructions, photo tutorial notes, and finishing tips so you can sew and shape the doll like a pro. Perfect for gifting, keychains, or a collectible handmade friend.
Progress Tracker
0% Complete
— Head / Body :
Info :
Using Yarn Under (x-stitch). 1.5mm hook. Using skin tone yarn (of your choice).
Round 3 :
(1sc, INC) x6 (18)
Round 4 :
(1sc, INC, 1sc) x6 (24)
Round 5 :
(3sc, INC) x6 (30)
Round 6 :
(2sc, INC, 2sc) x6 (Fig. 1) (36)
Round 7-12 :
36sc (6 rounds) (Fig. 2) (36)
Round 13 :
8sc, inv DEC, 16sc, inv DEC, 8sc (34)
Round 14 :
10sc, (INC) x5, 4sc, (INC) x5, 10sc (44)
Round 15 :
2sc, inv DEC, 36sc, inv DEC, 2sc (Fig. 3) (42)
Round 16 :
7sc, inv DEC, 24sc, inv DEC, 7sc (40)
Round 17 :
(inv DEC, 4sc) x6, inv DEC, 2sc (33)
Round 18 :
(inv DEC, 2sc) x7, inv DEC, 3sc (25)
Info :
If using safety eyes (open eyes option), insert now. (Fig. 4) (See next page for tutorial photos.) For closed eyes option, continue with the next round.
Round 19 :
(1sc, inv DEC) x8, 1sc (17)
Info :
Stuff head firmly with fiber fill. (Fig. 5) Tip: Be sure to fill out the cheeks with fiber fill, stretching the increases.
Round 20 :
(inv DEC, 1sc) x5, 2sc (12) (Starting neck)
Round 21-22 :
12sc (2 rounds) (12)
Round 23 :
(INC) x12 (Fig. 6) (24) (Starting body)
Info :
For open eyes option, you will now make the indents for the eyes. (See next page for tutorial photos.) For closed eyes option, continue to the next round.
Round 24-26 :
24sc (3 rounds) (Fig. 7) (24)
Round 27 :
2sc, inv DEC, (4sc, inv DEC) x3, 2sc (20)
Round 28-29 :
20sc (2 rounds) (20)
Round 30 :
2sc, INC, (4sc, INC) x3, 2sc (24)
Info :
Note: The previous increase along with the next 3 increases will form the baby's bottom, and should be centered across the back of the baby.
Round 32 :
INC, 1sc, (INC) x2, 21sc (28)
Round 33-34 :
28sc (2 rounds) (Fig. 8) (28)
Round 35 :
(2sc, inv DEC) x7 (21) Stuff the body with fiber fill. (Fig. 9)
Round 36 :
(1sc, inv DEC) x7 (14)
Round 37 :
(inv DEC) x7 (7)
Info :
Close hole, leaving a long tail.
Item Name (Making Baby\'s Bottom) :
Thread tail onto a tapestry needle, *(insert into the closing hole, and bring out through the center of the back around Rnd 29 or 30.) Repeat from * 2 more times so that the yarn is doubled, pull yarn tight to indent and sew in end. (See photos below.)
Infos :
Inserting Safety Eyes: Find center between Row 13 and 14. Safety eyes will go 4 stitches out from the center for each eye. Use a larger hook to widen the hole and poke safety eye through and fasten the back.
Info :
Making Eye Indents: Thread a tapestry needle with a length of skin tone colored yarn. Needle goes in through the neck and out at the bottom of the eye. Insert needle back in at top of the eye. Bring needle out at the top of the other eye. Insert needle back in at the bottom of the eye and out through the neck. Help the yarn go to the outside edge of the eyes. Pull on yarn ends until the yarn slips under the safety eyes. Pull yarn to make indents under the safety eyes. Knot yarn ends and hide inside fiber fill.
Info :
Creating the Face - Open Eyes Option: Insert a tapestry needle (threaded with white yarn) under chin, bring up at the bottom of the eye. Insert needle at the top of the same eye, and bring through the top of the other eye. Insert needle into bottom of the same eye and out the original hole under the chin. Get a little craft glue on your tapestry needle. Place some glue on the outer edge of the eye to keep the yarn in place. Finished whites of eyes.
Info :
Placement guide: for black eye line, and brown eyebrow, both are approximately 3 sts in length and 1 st in height. Thin some black yarn to 2 strands and thread a tapestry needle. Insert needle into the back of head, and bring through outside of eye (one stitch from side of safety eye) to begin eye line and stitch details.
Info :
Creating the Face - Closed Eyes Option: Find the center of the face between the cheeks and between Row 13 and 14. Eyes will be placed 2 sts from the center, and will be 3 sts in width. Thread your needle with skin colored yarn, insert into back of head, coming out at the outside corner of where the closed eye will be made. Insert needle to make the eye 3 sts in width, and continue passing over the 3 sts until you have 5 overlapping stitches neatly lying. On the last time, bring needle through to the inside of the second eye (about 4 sts between eyes). Continue in the same way for the second eye. After finishing second eyebrow, bring the needle back out the original entry point in the back of the head.
Info :
Nose: Insert needle threaded with skin colored yarn under the chin to make the nose which is 4-5 sts in width, centered, and in line with the bottom of the safety eyes. Knot each set of ends and hide inside the doll. Trim excess yarn, poke short end back into the doll.
— Belly Button :
Info :
Ch 3, join into circle and leave tail. Pull tight forming a knot. Insert each tail (using a tapestry needle) through body to the back (about 1 stitch apart), (see photos for placement) then pull from the back to indent belly button. Tie ends into knot, sew them in, and hide inside body with a hook or tapestry needle.
— Ears :
Info :
Do not join. Leave tail and position approximately 2-3sc away from corners of eyes. Sew to head in a LYING FLAT POSITION, sewing down the front half of the ear, keeping rounded side less attached (like a real ear.)
— Left Leg :
Info :
Note: Additional Photo Tutorial for Rnds 1-4 on pgs. 18-20. Start with Ch 5.
Round 1 :
Starting in 2nd ch from hook, 2sc, INC, 3sc in next ch (across end of row of chains), (now working opposite side) 2sc, INC (Fig. 10) (11)
Round 2 :
5sc in next st, 9sc, 1slst (Note: heel will start to form) (Fig. 11) (15)
Round 3 :
Note: place a marker in the back loops of each of the next 2 stitches you will be working into (these are stitches from the previous round), to make finding them easier in the next step (Fig. 12), [FLO - (1hdc, 1slst) in next stitch] x2 (Fig. 13), Bobble stitch (Fig. 14), 1sc* (tacks down the bobble) (Fig. 15), 9sc, inv DEC (Fig. 16) (16)
Info :
Bobble stitch: *[Yarn over (YO) and insert hook into stitch (as if doing a double crochet). Yarn under (YU) and pull up a loop. YO and pull through first 2 loops on hook.] Repeat 3 more times from *. You should have 5 loops on your hook. YO and pull through all 5 loops.
Round 4 :
(Skipping toes and working on the inside of the foot) (1sc in next marked back loop) x2 (Fig. 17), 1sc (working into stitch just past the bobble), 1sc, inv DEC, 7sc (Fig. 18) (12)
Round 5 :
(inv DEC) x2, 8sc (Fig. 19) (10)
Round 6 :
inv DEC, 8sc (Fig. 20) (9)
Round 7 :
4sc, INC, 4sc (Fig. 21) (10)
Round 8 :
6sc, INC, 3sc (Fig. 22) (11)
Round 9 :
5sc, INC, 5sc (Fig. 23) (12)
Round 10 :
4sc, INC, 2sc, inv DEC, 1sc, inv DEC (Fig. 24) (11)
Round 11 :
4sc, BLO - (5sc), 2sc (Fig. 25) (11)
Round 12 :
(INC) x2, 2sc, 5slst, 2sc (Fig. 26) (13) (Note: the 5slst will end up hidden inside the leg)
Round 13 :
6sc, 5sc in front loops from Rnd 11 (from BLO sts) (see Fig. 25, 27), 2sc (back on current row) (Fig. 28, 29) (13)
Round 14 :
1sc, (inv DEC) x2, 3sc, inv DEC, 3sc (Fig. 30) (10)
Round 15 :
1sc, INC, 5sc, INC, 2sc (12)
Round 16 :
7sc, INC, 1sc, INC, 2sc (Fig. 31) (14)
Round 17 :
INC, 3sc, INC, 9sc (Fig. 32) (16)
Round 18-19 :
16sc (2 rounds) (Fig. 33) (16)
Info :
Stuff leg lightly with fiber fill (keeping its shape and not over stretching). (Fig. 34)
Round 20 :
(2sc, inv DEC) x4 (12)
Round 21 :
(1sc, inv DEC) x4 (Fig. 35) (8)
Info :
Close hole (whip stitch through front loops). (Fig. 36) Leave a long tail and set aside.
Assembly Instructions
- Insert safety eyes between Rows 13 and 14, centered and 4 stitches out from center for each eye; secure backs and make eye indents with skin tone yarn, then stuff the head and body before closing.
- Sew ears to the head approximately 2-3 single crochet away from the corner of each eye in a lying flat position, sewing the front half of the ear down while keeping the rounded side slightly free.
- Attach the left and right legs to the bottom of the body by positioning the leg openings at the base, sew securely using the long tail with a whipstitch, and shape the baby\'s bottom by threading the tail through the back and pulling tight to indent.
- Embroider or create eye whites and black eye lines as instructed: bring the needle through the head and place stitches to form eye whites, secure with glue if needed, then add black eye line and brown eyebrow stitches for facial expression.
- Add the belly button by pulling the two tails from a chained knot through the body and back out to indent, tie ends into a knot, sew them in, and hide inside the body.
- Pin all parts in place before finishing final sewing to ensure symmetry; sew parts securely and weave in all ends inside the doll to hide yarn tails.
Important Notes
- 💡Use stitch markers or a paper clip to mark the last stitch of each round when working in continuous rounds to keep track of your progress.
- 💡Stuff the doll firmly in the head and cheeks but avoid overstuffing the legs and limbs; stuffing lightly in limbs helps maintain shape and posability.
- 💡Follow the eye placement guide exactly: center between Rows 13 and 14 and place safety eyes 4 stitches out from center for the open eye look.
- 💡Work with consistent tension and the recommended 1.5mm hook for size 2 yarn to achieve the same finished size and shaping as shown in photos.
- 💡Sew and construct as you go if you prefer; the pattern is written in the order the author likes to assemble the doll but you may crochet all parts first then assemble.
This Mini Baby Doll pattern is designed to be sweet, compact, and full of charm for crafters who love making tiny friends. The pattern includes step-by-step rounds, photo tutorials for eyes and facial features, and handy finishing tips so you can personalize each doll. Make a collection in different skin tones or tiny outfits — these pocket dolls make thoughtful handmade gifts and keepsakes. 🧶🤱✨
What size will the finished piece be?
The finished amigurumi measures approximately 5 inches (around 12 cm) long when using size 2 fingering yarn and a 1.5mm hook, as shown in the pattern photos.
Can I use different yarn weights for this pattern?
Yes, you can change yarn weight and hook size, but this will affect the final size significantly; for a larger doll use worsted weight (#4) and a 3.25mm hook, and adjust stitch counts if necessary.
Do I need prior crochet experience for this pattern?
This pattern is rated intermediate because it uses small hooks, tight tension, bobble stitch, and shaping techniques; basic knowledge of single crochet, increases, decreases, and working in rounds is recommended.
How long does this project typically take to complete?
Most crocheters complete this project in 5-7 hours, though time may vary by experience level, customization, and how much finishing and embroidery you add.
Stay in the Loop!
Get notified when we release new free crochet patterns and join our crafting community!