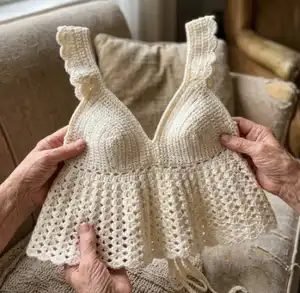
Make a flattering made-to-measure Hyacinth Top with a lacy empire silhouette that suits many body shapes. This beginner-friendly pattern uses basic stitches and two hook sizes to create a structured cup and a flowing lace body. You will get clear step-by-step instructions for cups, back ties, body and straps so you can customise the fit. Perfect for a weekend make and for adapting to different yarns and sizes.
Progress Tracker
0% Complete
— Part I. Cups :
Intro :
For this part, it is important to use a small hook especially if you have a loose tension to make sure that there will be enough coverage for your breast area.
Step 1 :
Make a ch with a length equal to measurement A then add ch2. Dc on the 3rd ch from the hook, dc until you reach the end of the row. For reference, I chained 18 + 2.
Step 2 :
Ch2, flip your work. Dc on each st until you reach the end of the row.
Step 3 :
Repeat Step 2 until the height of your work is equal to measurement B. For reference, I made 8 rows.
Step 4 :
Once you reach measurement B, add 2 more dc on the last st. This means that you should have a total of 3 dc on your last st. Continue adding dc to the side of your work. Put 2 dc on each dc post until you reach the last dc post.
Step 5 :
Ch2, flip your work. Dc on each st until you reach the end of the row.
Step 6 :
Repeat Step 5 until you reach Measurement C. Make sure your last row ends up on the top of the cup. If the last row equal to measurement C ends up on the bottom of the cup, I suggest doing one less row to make sure you end up on top of the cup.
Step 7 :
Mark the 8th st from the bottom of your cup. Ch2, flip your work, dc on each st until you reach the st marker. Remove the marker. Hdc on each of the next 3 sts, sc on the last 5 sts.
Step 8 :
Ch1, flip your work. Sc on the 1st 5 sts. Hdc on the next 3 sts, dc on the next st. 2dc on the next st. Dc on each of the next sts until you reach the end of the row.
Step 9 :
Repeat Steps 7-8 until you reach measurement D. Ch 1, cut the yarn and fasten off. For reference, I added 2 rows after Step 6. (1 row Step 7, 1 row Step 8)
Info :
Repeat Steps 1 to 9 for the other cup.
Info :
Once you have created the other cup, connect them together by adding sc on the wrong side. The wrong side means the side of the top that will be inside when you wear it. You can choose which side it will be. How much sc you add will depend on how much coverage you want. You can also skip this step if you want to have a deep neckline. For reference, I made 8 sc.
— Part II. Back Ties :
Step 1 :
Turn your cups upside down. Work facing the wrong side of the top. Insert your hook at the bottom of the dc post at the 3rd row, make a sl st. Now that you have connected your yarn, make a ch with a length equal to measurement E then add ch2. Dc on the 3rd ch from the hook, dc until you reach the end of the row. Sl st into the dc post of the cup. For reference, I chained 130 + 2. Note: For those with fuller breasts who want more support and coverage, you can add more rows but make sure you have an odd number of rows (This pattern proposes only 3 rows that's why we started at the 3rd row).
Step 2 :
Sl st again into the dc post on top. Flip your work. Dc on each st until you reach the end of the row.
Step 3 :
Ch2, flip your work. Dc on each st until you reach the end of the row.
Step 4 :
Now you have reached the bottom of your cups, sc on each st of the cups. Once you reach the part of the cups with dc posts, add 2 sc per dc post. Continue until you reach the sc post, add 1 sc on each sc post. Continue until you reach the end of the other cup.
Step 5 :
Make a ch with a number equal to what you did in Step 1 including the additional ch2. Dc on the 3rd ch from the hook, dc until you reach the end of the row. Sl st into the dc post of the cup (just like what you did on the other side).
Step 6 :
Sl st again into the dc post on top. Flip your work. Dc on each st until you reach the end of the row.
Step 7 :
Ch2, flip your work. Dc on each st until you reach the end of the row. Sl st into the dc post of the cup. Ch1, cut the yarn and fasten off.
— Part III. Body :
Info :
Before starting, you need to check how your work fits so far. Tie your cups around your body. Make sure you tie it in the middle but not too tight (just like how you would wear it). Mark the dc next to the knot on both sides. Remove the top and check where you placed the st markers. It should be symmetrical. To ensure the symmetry, count the number of sts from the center (start counting from the st after the sc join in the cups) to the st marker on both sides. You should get an equal number of sts. If not, choose which st marker you want to adjust until you get an equal number of sts from both sides. The total number of sts from both sides must be a multiple of 2. Just to make sure, I recommend checking the fit again by tying it one more time with the st markers on. The st markers should be placed just outside the knot. For reference, I marked the 69th st on each side, total of 136 sts in between the 2 markers since I will not be working on the sts where I attached the st marker.
Step 1 :
Insert your yarn into the st next to the st marker. Ch2, dc on each st until you reach the other st marker.
Step 2 :
Ch 2. Flip your work, dc on the 1st st. *Ch1, skip 1 st, dc on the next 2 sts*. Repeat ** until you reach the end of the row.
Info :
From this point on, you will be working with hook 5.0 (or your preferred bigger hook size) to make the lace impression. I find the lace effect better if you use a relatively larger hook. Take note also that all ch2 at the beginning of each row counts as a dc.
Step 3 :
Ch2, flip your work. For this row, you will be making a dc V-st on each ch1 sp by making a dc-ch1-dc cluster on each ch1 sp until you reach the end of the row. Dc on the last st.
Step 4 :
Ch2, flip your work. For this row, you will be making an Iris st on each ch1 sp by making a dc-dc-ch1-dc-dc cluster on each ch1 sp until you reach the end of the row. Dc on the last st.
Step 5 :
Repeat Step 4 until you reach your desired length. Ch1, cut the yarn and fasten off.
— Part IV. Straps :
Intro :
Before starting, mark the part of the back ties that is 1" away from the 1st st and last dc of the body of the top. You will attach your straps here later. Fit the top and check the length of the strap needed to connect the tip of your cups to the marked st. We will call this measurement Z. For reference, my measurement Z is 14 inches.
Step 1 :
Insert your yarn into the topmost st of your cup. Make a ch with a length equal to measurement Z in multiples of 3 + 1. Make sure that you consider yarn stretch when making the chain. Sl st into the st next to the marker. Make sure the ch is not twisted when you make the ch and connect it to the back. Keep in mind that the strap is worked away from the 1-inch gap.
Step 2 :
Sl st into the next 2 sts. Flip your work. Dc on each st until you reach the cups. 2dc on each dc post until you reach the end of the cup. Sl st into the ch that matches the height of your dc. At this point since most yarn stretches, I suggest you check the fit of the straps if it is too short, too long or just right. Note: In my version, I only made 1 row of dc for the straps but for those with fuller breasts who need more support, you can repeat this step once more before proceeding to Step 3.
Step 3 :
Sl st into the next 2 sts. Flip your work, dc on the 1st st. *Ch1, skip 1 st, dc on the next 2 sts*. Repeat ** until you reach the end of the row. Sl st into the ch that matches the height of your dc.
Info :
From this point on, you will be working with hook 5.0 (or your preferred bigger hook size) to make the lace impression. You may still use the smaller hook size when doing a sl st at the beginning and end of each row as you may find it difficult to make a sl st with a bigger hook size. Before you continue, mark the 3rd ch1 sp from the tip of your cup. The actual position of your ch1 sp maybe different as compared to that in the photo but start counting from the ch1 sp closest to the tip of your cup. You may adjust the position of the st marker depending on where you want the lacey part of your strap to end.
Step 4 :
Sl st into the next 2 sts. Flip your work. Dc on the 1st st. For the next sts, you will be making a dc V-st on each ch1 sp by making a dc-ch1-dc cluster on each ch1 sp until you reach the second to the last ch1 sp before the marker. For the second to the last ch1 sp, make an hdc-ch1-hdc cluster then sl st on the last ch1 sp.
Step 5 :
Ch1. Flip your work. Sc on the next ch1 sp. For the next sts, you will be making an Iris st on each ch1 sp by making a dc-dc-ch1-dc-dc cluster on each ch1 sp until you reach the end of the row. Dc on the last st. Sl st into the ch that matches the height of your dc.
Step 6 :
Sl st into the next 2 sts. Flip your work. Dc on the 1st st. For the next sts, you will be making an Iris st on each ch1 sp by making a dc-dc-ch1-dc-dc cluster on each ch1 sp until you reach the last ch1 sp. For the last ch1 sp, sl st. Ch1, cut the yarn and fasten off. Note: In my version, I ended at this row but for those who want thicker straps, you may repeat this step until you reach your desired strap thickness before cutting your yarn.
Info :
Repeat Steps 1-6 for the other strap.
Finished :
Congratulations! You have finished creating the Hyacinth top. Weave in ends and block lightly if desired. Fit and adjust ties and straps to your comfort.
Thank you for making the Hyacinth Top — a custom-fit crochet project that blends structure and lace for a flattering everyday piece. I hope this pattern inspired you to make a top that fits and flatters your measurements perfectly. Share your finished photos and tag @sunshinesandcrafts so I can see your beautiful makes! 🧶✨