🧢 Beautiful ✨ Detailed πŸ’ Adorable

Mini Whale Amigurumi Pattern

Mini Whale Amigurumi Pattern
4.8β˜… Rating
1-2 Hours Time Needed
3.6K Made This
βœ‚οΈ

Beginner Friendly Level

Perfect for those just starting their crochet journey, with clear instructions and simple techniques

⏱️

Quick Make

Complete in under 2 hoursβ€”lightning fast fun for instant gratification and quick gifts.

🎁

Tiny Treasure

Small, sweet, and gift-worthy creations that fit perfectly in the palm of your hand with detailed charm.

About This Mini Whale Amigurumi Pattern

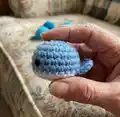
This pattern shows you how to crochet a mini whale amigurumi using worsted weight yarn and safety eyes. It focuses on simple rounds and small assembly for a fast, satisfying project. The finished whale is compact and cute, perfect for gifts, decorations, or amigurumi collections.

Mini Whale Amigurumi Pattern crochet pattern - detailed view of completed project

Youll work in continuous rounds to form the body, add a contrasting belly, and make a tiny tail. Clear abbreviations and short rounds make this an excellent quick project.

Why You'll Love This Mini Whale Amigurumi Pattern

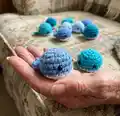
I absolutely love this pattern because it transforms basic stitches into an irresistibly cute mini whale in just minutes. I enjoy how portable and quick this project isβ€”perfect for using up small yarn scraps. I appreciate the simple assembly that still gives the whale a polished, finished look. I also love making a rainbow of colors to create a whole pod to display or gift.

Mini Whale Amigurumi Pattern step 1 - construction progress Mini Whale Amigurumi Pattern step 2 - assembly progress Mini Whale Amigurumi Pattern step 3 - details and accessories Mini Whale Amigurumi Pattern step 4 - final assembly and finishing

Switch Things Up

I love swapping yarn colors to create a whole pod of matching or mismatched whales.

You can change yarn weight and hook size to make tiny keychain versions or larger plush whales.

I often add tiny embroidered smiles or blush spots to personalize each whale.

Try using variegated yarn for a fun textured look without changing colors manually.

I sometimes substitute safety eyes with French knots or embroidered eyes for a baby-safe option.

Want a keychain? Attach a small metal ring to the top before finishing the final weave-in.

Make a matching set of bellies in contrasting colors to make the whales pop visually.

I like to add little felt fins glued or sewn on for a different style of tail and fins.

Try stuffing with lavender sachet bits for a scented mini whale that makes a lovely drawer freshener.

I occasionally combine two mini whales with a chain and beads to make a decorative garland.

If you want a sturdier toy, use embroidery thread for the mouth and secure eyes with extra washers on safety eyes.

Experiment with metallic or sparkly yarn for a festive or themed whale version.

Common Mistakes & How to Fix Them

βœ— Skipping the stitch count check often leads to an incorrect size; count your stitches at the end of each round to ensure you have the correct stitch total. βœ— Attaching safety eyes too late can make placement difficult; insert and secure eyes between the 5th and 6th rounds, four stitches apart before stuffing the body. βœ— Overstuffing the body causes a distorted shape and stretched stitches; stuff gradually and moderately to keep the whale smooth and rounded. βœ— Failing to leave long tails for sewing prevents neat assembly; fasten off with long tails for the belly and tail to make sewing secure and easy.

Mini Whale Amigurumi Pattern

Create a tiny, adorable crochet whale perfect for gifts, keychains, or a playful collection. This pattern uses simple amigurumi techniques and basic stitches to make a charming mini whale in just a short crafting session. You will enjoy quick results and a satisfying finish with clear, step-by-step instructions. Ideal for making multiple whales in different colors to brighten any space.

Beginner Friendly 1-2 Hours

Materials Needed for Mini Whale Amigurumi Pattern

β€” Main Fabric

  • 01
    Worsted weight yarn (Red Heart Soft Yarn was used for these)
  • 02
    One pair of 6mm safety eyes
  • 03
    Polyfil stuffing

β€” Tools Required

  • 01
    6mm safety eyes (pair)
  • 02
    Polyfil stuffing
  • 03
    Yarn needle for sewing pieces together
  • 04
    Scissors
  • 05
    Crochet hook suitable for worsted weight yarn (not specified in pattern)
  • 06
    Stitch marker (helpful for marking rounds)

Progress Tracker

0% Complete

β€” Body :

Round 1 :

Using the color for the body, ch 2. Sc 6 into 2nd ch from hook. (6)

Round 2 :

Inc in each st around. (12)

Round 3 :

*Sc in next st, inc. Repeat from * around. (18)

Round 4 :

Sc in each st around. (18)

Round 5-6 :

Repeat Round 4. F/o, weave in ends. (18)

Info :

Attach safety eyes in between the 5th and 6th rows, 4 st apart.

β€” Belly :

Round 1 :

Using the color for the belly, ch 2. Sc 6 into 2nd ch from hook. (6)

Round 2 :

Inc in each st around. (12)

Round 3 :

*Sc in next st, inc. Repeat from * around. (18)

Info :

F/o and leave long tail for sewing.

β€” Tail :

Item Name (Tail) :

Ch 3. Turn, sc into 2nd ch from hook. Sc in next st. Ch 3, sc in 3rd st from hook, sl st into the side of the next st. Ch 3, sc in 3rd st from hook, and sl st into the next st. Continue making sl st until you reach the bottom of your very first st. F/o and leave tail for sewing.

β€” Assembly :

Info :

Sew the belly to the body, begin stuffing about half-way through. Weave in ends.

Info :

Sew the tail in the 6th row of the body, directly behind the two eyes on the opposite side of the whale.

Info :

Enjoy! Follow us on Instagram @crocheting or find our etsy shop "The Crocheting" for more!

Assembly Instructions

  • Attach safety eyes between the 5th and 6th rounds, spacing them 4 stitches apart and secure according to manufacturers instructions.
  • Sew the belly to the underside of the body, aligning it with the body rounds so edges meet evenly, and begin stuffing about halfway through the belly attachment.
  • Stuff the body gradually while sewing the belly closed, adding small amounts of polyfil to achieve a smooth, rounded shape before finishing the seam.
  • Weave in all ends securely after sewing to prevent unraveling and to keep a neat finish on the whale.
  • Sew the tail into the 6th row of the body, directly behind the two eyes on the opposite side of the whale, and secure with several stitches for stability.

Important Notes

  • πŸ’‘Attach safety eyes before stuffing to ensure correct placement and secure attachment.
  • πŸ’‘Weave in ends as you go to avoid long loose tails and make finishing faster and neater.
  • πŸ’‘Stuff gradually and evenly; overstuffing can distort the whale’s shape and under-stuffing can make seams look loose.

This mini whale is a playful and pocket-sized project thats perfect for gifting or collecting. Create a little pod of whales in varying shades to brighten any shelf or desk. Enjoy the quick, satisfying finish and share your creations with others. πŸ§ΆπŸ‹βœ¨

You ask,

we answer.

FAQs

What size will the finished piece be?

The finished mini whale measures approximately 3-4 cm wide and about 2-3 cm tall when using worsted weight yarn and standard 3.5-4.0 mm hook sizes.

Can I use different yarn weights for this pattern?

Yes, you can use different yarn weights but the final size will change; choose an appropriate hook size for your chosen yarn and adjust stuffing accordingly.

Do I need prior crochet experience for this pattern?

This pattern is rated beginner friendly, so basic knowledge of single crochet, increases, and slip stitches is sufficient to complete it.

How long does this project typically take to complete?

Most crocheters finish a single mini whale in under 2 hours depending on experience and pace; making a small collection may take longer.