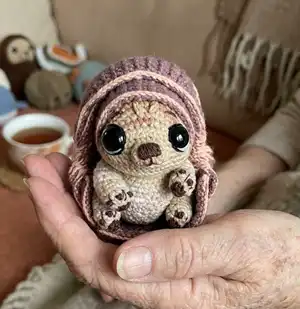
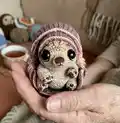
Make your own adorable Tuk Tuk armadillo amigurumi with this step-by-step crochet pattern. You will find detailed rounds, color-change tips, and clear assembly instructions so you can create a cuddly little rolled-up friend. Perfect as a gift or a sweet desk companion, this pattern includes materials list and helpful photos to guide you.
Progress Tracker
0% Complete
— TUMMY (Yarn A) :
Round 1 :
2 loops, 6sc in 2nd loop from hook (amigurumi ring) (6l)
Round 3 :
[sc, inc]x6 (18l)
Round 4 :
[2sc, inc]x6 (24l)
Round 5 :
[3sc, inc]x6 (30l)
Round 6 :
[4sc, inc]x6 (36l)
Round 7 :
[5sc, inc]x6 (42l)
Round 8 :
[6sc, inc]x6 (48l)
Info :
Cut and fix the thread. The pin marking the beginning of the round will be the place where the tummy connects to the head.
— MUZZLE (Yarn A) :
Round 1 :
6 loops, turning, 5sc (starting from the 2nd loop from the hook), 5sc (from the back of the chain) (10l)
Round 2 :
[4sc, inc]x2 (12l)
Round 3 :
12sc, sl st in the 1st sc (12l)
Info :
Cut and fix the thread, leaving a long end for sewing. Using yarn needle to embroider the nose with brown thread floss. Divide the floss in half and embroider the mouth (see photos).
— HEAD (Yarn A) :
Round 1 :
10 loops, turning, 9sc (starting from the 2nd loop from the hook), 9sc (from the back of the chain) (18l)
Round 2 :
3sc in the next loop, 7sc, 3sc in the next loop, 3sc, inc, sc, inc, 3sc (24l)
Round 3 :
sc, 3sc in the next loop, 9sc, 3sc in the next loop, 5sc, inc, 2sc, inc, 3sc (30l)
Round 4 :
2sc, 3sc in the next loop, 11sc, 3sc in the next loop, 7sc, inc, 3sc, inc, 3sc (36l)
Round 5 :
3sc, 3sc in the next loop, 13sc, 3sc in the next loop, 9sc, inc, 4sc, inc, 3sc (42l)
Round 6 :
4sc, 3sc in the next loop, 15sc, 3sc in the next loop, 11sc, inc, 5sc, inc, 3sc (48l)
Info :
Insert safety eyes between the rounds 3 and 4, the distance between them is approximately 15 stitches, don't fix yet. Use white thread floss in two folds for highlights and black thread floss for outlines and lower lash, separate one thread to fasten for detail. Press eye to the embroidered line and fasten it. Sew the muzzle to the face. Divide brown threads floss in half, embroider the eyebrows.
Round 10 :
4sc, {sc3tog}, 15sc, {sc3tog}, 11sc, dec, 5sc, dec, 3sc (42l)
Info :
*{sc3tog} – sc next 3 stitches together (single crochet decrease, see photos 25-27). Continue crocheting as indicated.
Round 11 (incomplete round) :
Crochet 8sc along the head, crochet 12sc of the head together with 12sc of the tummy, crochet 22sc along the head (see photo 34)
Round 12 :
Crochet 8sc on the head, crochet 36sc on the tummy, crochet 22sc on the head (66l)
Round 13 :
8sc – don't crochet this round to the end. Don't trim the thread. Move the pin marking the beginning of the round to the 9th loop to the left. Count 30 loops counter-clockwise from the beginning of the round and hang up the extra pin - this pin will be the place where the head connects to the inner armor.
— INNER ARMOR (Yarn B) :
Round 1 :
2 loops, turning, inc (starting from the 2nd loop from the hook) (2l)
Round 2 :
1 loop, turning, inc, sc (3l)
Round 3 :
1 loop, turning, sc, inc, sc (4l)
Round 4 :
1 loop, turning, sc, inc, 2sc (5l)
Round 5 :
1 loop, turning, 2sc, inc, 2sc (6l)
Round 6-11 :
1 loop, turning, 6sc (6l)
Round 12 :
1 loop, turning, 2sc, inc, 3sc (7l)
Round 13 :
1 loop, turning, 7sc (7l)
Round 14 :
1 loop, turning, 3sc, inc, 3sc (8l)
Round 15-16 :
1 loop, turning, 8sc (8l)
Round 17 :
1 loop, turning, 3sc, dec, 3sc (7l)
Round 18 :
1 loop, turning, 7sc (7l)
Round 19 :
1 loop, turning, 2sc, dec, 3sc (6l)
Round 20-25 :
1 loop, turning, 6sc (6l)
Round 26 :
1 loop, turning, 2sc, dec, 2sc (5l)
Round 27 :
1 loop, turning, sc, dec, 2sc (4l)
Round 28 :
1 loop, turning, sc, dec, sc (3l)
Round 29 :
1 loop, turning, dec, sc (2l)
Round 30 :
1 loop, turning, dec (1l)
Info :
To get a beautiful line when changing color in the next round crochet part of the sc in this way - half of the sc with brown thread, and the other half with pink (Yarn B + Yarn C).
Round 31 :
Crochet 30sc down the side (Yarn B + Yarn C). Next attach the armor to the head and crochet 30 sc of the armor together with 30 sc of the head with Yarn B only.
Round 32 :
Crochet 36sc on the tummy (Yarn A + Yarn B), 30sc on the armor (Yarn B) (66l)
Round 36 :
[9sc, dec]x6 (60l)
Round 37 :
[8sc, dec]x6 (54l)
Round 38 :
[7sc, dec]x6 (48l)
Round 39 :
[6sc, dec]x6 (42l)
Round 40 :
[5sc, dec]x6 (36l)
Round 41 :
[4sc, dec]x6 (30l)
Info :
Start stuffing the body with synthepus.
Round 42 :
[3sc, dec]x6 (24l)
Round 43 :
[2sc, dec]x6 (18l)
Round 44 :
[sc, dec]x6 (12l)
Info :
Sew the holes between the head and the tummy using extra thread. Completely fill the body. Tip: Cut out a circle of brown felt slightly larger than the resulting hole and insert it to keep stuffing from clinging to the hook during closing.
Info :
Trim the thread. Pass the thread through all the loops using a yarn needle. Tighten and secure.
— LEGS, 4 pcs (Yarn A) :
Round 1 :
4 loops, turning, 3sc (starting from the 2nd loop from the hook), 3sc (from the back of the chain) (6l)
Round 4 :
3 sl st, 6sc, 3 sl st (12l)
Round 5 :
[dec]x2, sc, [inc]x2, sc, [dec]x2 (10l)
Info :
Start stuffing the hand with synthepus.
Round 8 :
inc, 8sc, inc (12l)
Info :
Completely fill the hand.
Info :
Trim the thread. Pass the thread through all the loops using a yarn needle. Tighten and secure (see photo 52).
— SPOT (Brown threads floss) :
Round 1 :
4 loops, turning, 3sc (starting from the 2nd loop from the hook), 3sc (from the back of the chain) (6l)
Info :
Cut and fix the thread, leaving a very long end for sewing. Sew the spot to the foot (see photo 53). Don't cut the thread, but move upward diagonally from the spot. Make 3 French knots. Divide the threads floss in half, embroider 4 stripes (see photos 54-57).
— ASSEMBLAGE :
Info :
Sew your crocheted legs to the body with a threaded bracing (use round-nosed pliers to make it easier to pull the needle). Attach the legs using needles for cutting: front legs between rounds 9 and 10 of body, distance approx 15 stitches; back legs 8 stitches lower than the front ones. Detach the legs without removing needles and insert other needles for cutting in their place (see photos 58-60).
Info :
Insert the needle through the back into the front leg attachment point leaving the loose end of the thread outside (see photo 63,64). Thread needle through two loops on inner surface of leg (needle for cutting must be in middle) see photo 65. Insert needle into body at leg attachment point and pull out at point for attachment of opposite back leg (see photo 69). Repeat passes as described, sew body and legs two more times for strength, tie knots and hide thread (see photos 66-75).
— ANTENNAS 2 pcs (Yarn A) :
Info :
Divide the thread of Yarn A in half. Antennas are crocheted in the form of a cord of two threads at once with 1.5 mm hook. At the beginning leave the long end of the thread. Make 2 loops. Put the end of the thread on the hook, then grab the working thread and pull it through two loops on the hook. Crochet 4 more loops in the same way. Sew antennas to the head (see photos 76-78).
— OUTER ARMOR (Yarn B) :
Info :
The outer armor consists of 8 parts and is crocheted along rows.
Detail 1 - Round 1 :
6 loops, turning, 5sc (starting from the 2nd loop from the hook) (5l)
Detail 1 - Round 2 :
1 loop, turning, 5sc (5l)
Detail 1 - Round 3 :
1 loop, turning, sc, {sc3tog}, sc (3l)
Detail 1 - Round 4-6 :
1 loop, turning, 3sc (3l)
Detail 1 - Round 7 :
1 loop, turning, inc, sc, inc (5l)
Info :
To get a beautiful line when changing color in the next round crochet part of the sc this way - half of the sc with brown thread, and the other half with pink (Yarn B + Yarn C). Crochet the detail around the perimeter in a counter-clockwise direction from the point "Start" (see photos).
Details 2-8 - Round 1 :
8 loops, turning, 7sc (starting from the 2nd loop from the hook) (7l)
Details 2-8 - Round 2 :
1 loop, turning, 7sc (7l)
Details 2-8 - Round 3 :
1 loop, turning, 2sc, {sc3tog}, 2sc (5l)
Details 2-8 - Round 4-6 :
1 loop, turning, 5sc (5l)
Details 2-8 - Round 7 :
1 loop, turning, inc, 3sc, inc (7l)
Info :
Details 3-8 are crocheted and joined in the same way as detail 2; when connecting details ensure that the line with decreases on previous detail is on the left side (see photo references). Finish armor details and assemble them around the body following photos for placement and orientation.
You made it to the end — congratulations on creating Tuk Tuk the armadillo! 🎉 This little amigurumi is packed with character and a removable armor that makes it extra-special and playful. Keep this pattern handy to make more in different colorways or to gift to friends and family. 🧶 Happy crocheting and enjoy your tiny rolling friend! 🧵