🧢 Beautiful ✨ Detailed πŸ’ Adorable

Pumpkin for Halloween Amigurumi Pattern

Pumpkin for Halloween Amigurumi Pattern
4.4β˜… Rating
2-4 Hours Time Needed
3.6K Made This
βœ‚οΈ

Intermediate Level

Ideal for those with basic crochet experience, featuring slightly more advanced stitches and techniques to expand your skills.

⏱️

Bite-Sized Project

Finishes in 2-4 hoursβ€”perfect for an afternoon of creative relaxation.

🧸

Cute Companion

An adorable friend to cherish, handcrafted with love to bring comfort and joy for years to come.

About This Pumpkin for Halloween Amigurumi Pattern

This pattern teaches you how to crochet a small amigurumi pumpkin with a carved-face look and a drip top detail. You will make a stuffed pumpkin body, add the drip decoration and sew on a curled stalk for a finished look. The instructions include color change tips and step-by-step photos to ensure success.

Pumpkin for Halloween Amigurumi Pattern crochet pattern - detailed view of completed project

Suitable for crafters who know basic stitches, the pattern uses sport weight yarn and a fine hook for a neat, compact pumpkin. The finished pumpkin measures about 3.94 inches (10 cm) tall when using the recommended hook.

Why You'll Love This Pumpkin for Halloween Amigurumi Pattern

I absolutely love this pattern because it combines simple amigurumi shaping with a playful Halloween vibe that is easy to customize. I enjoy how the drip detail adds personality without complicated techniques. I love that the project is quick to make, so I can whip up several for seasonal decorations or gifts. I also appreciate that the pattern uses basic stitches but teaches shaping and finishing tips that make each pumpkin look professional.

Pumpkin for Halloween Amigurumi Pattern step 1 - construction progress Pumpkin for Halloween Amigurumi Pattern step 2 - assembly progress Pumpkin for Halloween Amigurumi Pattern step 3 - details and accessories Pumpkin for Halloween Amigurumi Pattern step 4 - final assembly and finishing

Switch Things Up

I love experimenting with color combinations to change the mood of this pumpkin: try pastels for a soft look or deep jewel tones for a dramatic shelf piece.

You can make the pumpkin larger or smaller simply by changing yarn weight and hook size; bulky yarn with a larger hook will give a chunky decorative pumpkin while thinner yarn creates minis perfect for keychains.

I often replace the stitched face with felt pieces glued on for a different texture, or embroider facial expressions for more character.

Try adding a small loop at the top to hang the pumpkin as an ornament, or sew on a ribbon for a cute gift tag attachment.

To make a set, vary the number of drip loops or the stalk height so each pumpkin has its own personality when grouped together.

If you want posable stems, try inserting a thin floral wire inside the stalk before closing and shaping it carefully with stuffing.

I sometimes stuff the body more firmly for a squatter pumpkin, or less firmly for a softer, squishier toyβ€”adjust until you get the silhouette you like.

For eyes and nose variations, experiment with embroidered eyelashes, tiny buttons, or safety eyes (if making for an adult decor piece rather than a child’s toy).

I like to add a tiny crocheted leaf in green at the base of the stalk for a seasonal touch or a small tag with a name if gifting to someone special.

Finally, try combining yarn texturesβ€”use a slightly fuzzy yarn for the body and a smooth yarn for the drip to create contrast and visual interest.

Common Mistakes & How to Fix Them

βœ— Skipping stitch markers when changing rounds can make it hard to find the start of the round; place a marker at the first stitch of every round to keep your count accurate. βœ— Not stuffing gradually leads to lumps or an oddly shaped pumpkin; fill a little at a time from the center outward and adjust the fiberfill as you shape. βœ— Changing color without securing ends can cause loose tails and unraveling; fasten off and weave in ends or carry the yarn neatly at the back when changing colors. βœ— Crocheting too tightly with a small hook can make seaming and stuffing difficult; maintain consistent, moderately relaxed tension for even stitches and easier assembly.

Pumpkin for Halloween Amigurumi Pattern

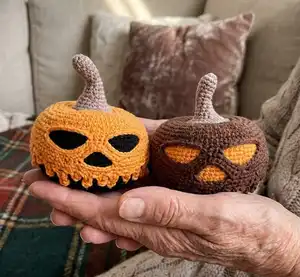
Make a spooky, squishy pumpkin amigurumi you can display or gift for Halloween. This pattern guides you step-by-step through crocheting the pumpkin body, the dripping top detail and a curled stalk. Clear photos and stitch notes help you get neat results even when shaping the face and adding the drip details.

Intermediate 2-4 Hours

Materials Needed for Pumpkin for Halloween Amigurumi Pattern

β€” Main Fabric

  • 01
    Sport weight / 4-ply yarn (Yarn Art Jeans or similar) 50g/160m in Orange - main color
  • 02
    Sport weight / 4-ply yarn (Yarn Art Jeans or similar) 50g/160m in Brown - contrast color for top/drip
  • 03
    Sport weight / 4-ply yarn (Yarn Art Jeans or similar) 50g/160m in Light Brown - stalk color
  • 04
    Small amounts of Black or very dark yarn for facial details (optional)

β€” Tools Required

  • 01
    Crochet hook size 1.75 mm (or any type you prefer)
  • 02
    Fiberfill stuffing
  • 03
    Scissors
  • 04
    Needle for embroidery and sewing pieces (yarn needle)
  • 05
    Pins for attaching details while sewing
  • 06
    Stitch markers

Progress Tracker

0% Complete

β€” Materials and tools :

Info :

Sport weight/4ply yarn Yarn Art Jeans (50g/160m) Of Orange, brown, light brown colors. crochet hook - 1.75 mm or any type you prefer. fiberfill. scissors. needle for embroidery and sewing pieces. pins for attaching details. markers

β€” Abbreviations :

Infos :

MR - Magic ring. sc - single crochet. hdc - half double crochet. inc - increase. dec - decrease. sl st - slip stitch. ch - chain. BLO - back loops only. FLO - front loops only. *6 - number of repeats. (12) - total number of stitches in a round.

β€” Pumpkin :

Info :

Start crocheting with brown thread.

Round 1 :

8 sc in MR

Round 2 :

8 inc (16)

Round 3 :

(1 sc, inc) * 8 (24)

Round 4 :

1 sc, inc, (2 sc, inc) * 7, 1 sc (32)

Round 5 :

(3 sc, inc) * 8 (40)

Round 6 :

2 sc, inc, (4 sc, inc) * 7, 2 sc (48)

Round 7 :

(5 sc, inc) * 8 (56)

Round 8 :

3 sc, inc, (6 sc, inc) * 7, 3 sc (64)

Round 9 :

(7 sc, inc) * 8 (72)

Round 10-12 :

72 sc (3 rounds) (photo 1)

Info :

Change color to orange.

Round 13 :

BLO: 72 sc (photo 2, 3)

Round 14-27 :

72 sc (14 rounds) (photo 4)

Round 28 :

(7 sc, dec) * 8 (64)

Round 29 :

3 sc, dec, (6 sc, dec) * 7, 3 sc (56)

Round 30 :

(5 sc, dec) * 8 (48)

Round 31 :

2 sc, dec, (4 sc, dec) * 7, 2 sc (40)

Round 32 :

(3 sc, dec) * 8 (32)

Info :

Stuff the toy, spread the fiberfill inside from the center to the sides. Then add fiberfill if you need.

Round 33 :

1 sc, dec, (2 sc, dec) * 7, 1 sc (24)

Round 34 :

(1 sc, dec) * 8 (16)

Round 35 :

8 dec (8)

Info :

Fasten off, leaving a long thread for the pumpkin lift. (photo 5, 6)

Info :

Insert the thread into the needle. Insert the needle into the base of the pumpkin and exit from the opposite side, tighten the thread. (photo 7, 8)

Info :

Again insert the needle into the base of the pumpkin and exit from the opposite side, tighten the thread. (photo 9-12)

Info :

Repeat twice. Fasten off, hide the yarn tail. (photo 13)

Info :

Go back to the 12th round, continue to sc on FLO using the brown thread (the tip of the hook is pointing down):

Round A1 :

72 sc (photo 14, 15)

Round A2 :

26 sc, make chain 12, skip 8 sc, 4 sc, make chain 12, skip 8 sc, 26 sc (80) (photo 16-18)

Round A3 :

26 sc, 12 sc on the chain, 4 sc, 12 sc on the chain, 26 sc (80) (photo 19)

Round A4 :

80 sc

Round A5 :

37 sc, make chain 7, skip 8 sc, 35 sc (79)

Round A6 :

37 sc, 7 sc on the chain, 35 sc (79) (photo 20)

Info :

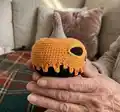
Do not cut the thread. Next, we will crochet the drip on the pumpkin. Make chain 5, start to crochet on the second chain from the hook: 4 hdc, sl st to the next one, 2 sc. (photo 21, 22)

Info :

Make chain 6, start to crochet on the second chain from the hook: 5 hdc, sl st to the next one, 2 sc. (photo 23)

Info :

Continue crocheting in a circle, alternating chains of different lengths from 3 to 7 ch. Fasten off, leaving a long thread for sewing. (photo 24, 25)

Info :

Use pins to secure the eyes, the nose and the drips on the pumpkin and sew. (photo 26-29)

β€” Pumpkin stalk :

Info :

Start crocheting with light brown thread.

Round S1 :

6 sc in MR

Round S2 :

(1 sc, inc) * 3 (9)

Round S3-6 :

9 sc (4 rounds)

Round S7 :

4 sl st, 5 sc (9)

Round S8 :

9 sc

Round S9 :

4 sl st, 5 sc (9)

Round S10 :

9 sc

Round S11 :

(2 sc, inc) * 3 (12)

Round S12 :

12 sc

Round S13 :

(1 sc, inc) * 6 (18)

Round S14 :

18 sc

Round S15 :

(2 sc, inc) * 6 (24)

Round S16 :

24 sc (photo 30)

Info :

Fill in the stalk with fiberfill.

Info :

Fasten off, leaving a long thread for sewing.

Info :

Sew the stalk to the pumpkin. (photo 31, 32)

β€” Finishing & Assembly :

Info :

Use pins to secure the eyes, the nose and the drips on the pumpkin, then sew them in place. Hide ends and trim excess tails. Shape and adjust stuffing if needed for an even silhouette.

Assembly Instructions

  • Pin the orange inner face pieces (eyes and nose) in place from inside the pumpkin and sew them securely through both layers so the face sits flush with the brown FLO panel.
  • Position the drip pieces evenly around the join between brown top and orange body, pin each drip and sew using a yarn needle, securing each drip at its base for durability.
  • Insert the stalk into the opening at the top center of the pumpkin, sew through the base of the stalk and through the top rounds of the pumpkin, securing tightly and hiding the thread tails inside.
  • Fasten off and weave in all ends on the inside of the pumpkin so seams are neat and no tails are visible on the outside.
  • Use pins to check symmetry of face and drips before final sewing to ensure accurate placement and a balanced finished look.

Important Notes

  • πŸ’‘Use stitch markers to mark the beginning of rounds, especially when working BLO or FLO to avoid losing your place.
  • πŸ’‘Stuff gradually and evenly from the center outward to avoid lumps and maintain a round shape.
  • πŸ’‘Keep the same yarn tension throughout to ensure the pumpkin shape and the fit of the top drip panel align correctly.
  • πŸ’‘When changing colors, carry or weave ends as instructed to avoid bulky joins and to keep the inside tidy.

This pumpkin amigurumi pattern brings a touch of Halloween charm to your handmade collection. Perfect as a spooky shelf accent or a small gift, each pumpkin is quick to make and endlessly customizable. Have fun choosing colors and adding drips, faces, or tiny accessories to make your pumpkins unique. πŸŽƒπŸ§Ά

You ask,

we answer.

FAQs

What size will the finished piece be?

The finished amigurumi measures approximately 3.94 inches (10 cm) in height when made with sport weight yarn and a 1.75 mm hook as recommended.

Can I use a different yarn weight or hook size?

Yes, you can use different yarn weights, but using a thicker yarn or larger hook will create a bigger, looser pumpkin and may require adjustment to stuffing and stitch tension.

Do I need advanced skills to make this pumpkin?

This pattern is rated intermediate; you should be comfortable with single crochet, increases and decreases, and working BLO/FLO, but the step-by-step photos make the process approachable.

How long does this project typically take?

Most crafters complete this pumpkin in 2-4 hours, depending on experience, attention to finishing, and whether you make additional decorative details.