About This Circular Coasters Pattern
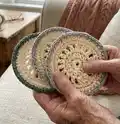
This pattern teaches you how to crochet a neat circular coaster using simple stitches and a pretty edge. It uses 100% cotton yarn for absorbency and a sturdy finish. The design is quick to make and ideal for beginners looking to practice increases and stitch placement.

You will make a small round coaster approximately 10 cm in diameter using basic stitches. The pattern includes clear row-by-row instructions and a materials list for an easy finish.
Why You'll Love This Circular Coasters Pattern
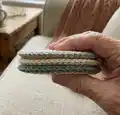
I absolutely love this pattern because it turns a few basic stitches into a beautiful, functional accessory you can use every day. I enjoy the balance of simple construction and the pretty edged finish that gives each coaster personality. It is quick to make, so I can whip up a matching set in an afternoon and still feel like I created something special. Making these coasters reminds me how satisfying small projects can be — they are perfect gifts and practice pieces alike.
Switch Things Up
I love changing the border colour to give each coaster a different mood; try pastel shades for a soft set or deep tones for contrast.
I often make the coaster larger by adding an extra increase round to reach a bigger cup or small bowl size.
I like using sport or fingering weight yarn with a smaller hook to create delicate mini coasters perfect for espresso cups.
I sometimes use a chunky cotton yarn and a bigger hook for a thick, absorbent coaster that doubles as a trivet.
I add embroidered details in the centre for a personalised touch — initials or tiny motifs stand out beautifully on cotton.
I experiment with different edge finishes like picot or scallop to give the coaster a lace-like border.
I pair matching napkins or placemats by adapting the same increase pattern to make coordinating sets.
I sometimes insert a thin layer of cork or interfacing between two coasters and sew them together for extra insulation and stability.
I mix and match AC1 and AC2 placement to create striped or ringed colour patterns along the edge.
I encourage trying variegated yarns for the main colour to create subtle, one-of-a-kind texture and colour shifts.
Common Mistakes & How to Fix Them
✗ Forgetting to join the starting chain into a ring can leave you with an open centre; always join the last chain to the first chain with a slip stitch to create a neat ring.
✗ Not counting your stitches after increases will lead to uneven rounds; count stitches at the end of every round to ensure the correct stitch total is maintained.
✗ Pulling your yarn too tightly when switching colours will pucker the edge; keep a relaxed tension when attaching AC1 or AC2 and weave in ends gently.
✗ Skipping the slip stitch join at the end of a row creates messy joins and uneven edges; always slip stitch to the top of the turning chain as instructed for a clean finish.