🧶 Beautiful ✨ Detailed 💝 Adorable

Pixie pocket Pouch Pattern

Pixie pocket Pouch Pattern
4.5★ Rating
2-3 Hours Time Needed
2.4K Made This
✂️

Beginner Friendly Level

Perfect for those just starting their crochet journey, with clear instructions and simple techniques

⏱️

Bite-Sized Project

Finishes in 2-4 hours—perfect for an afternoon of creative relaxation.

Stylish Touch

An elegant detail to elevate any look, combining traditional techniques with contemporary design sensibilities.

About This Pixie pocket Pouch Pattern

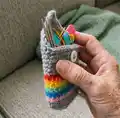
This compact Pixie Pocket Pouch pattern teaches you how to crochet a small joined-round pouch with colourful stripe rounds and a simple flap closure. It uses fingering weight yarn and a small hook to make a neat, pocket-sized case ideal for tools and small items. The pattern is worked from the bottom up with joined rounds, then switched to a continuous spiral and finishes with a small flap worked in rows.

Pixie pocket Pouch Pattern crochet pattern - detailed view of completed project

The pouch measures approximately 6.5 cm long by 6 cm wide and is great for using up scrap yarn. A small button and a few simple finishing steps complete the design for a polished look.

Why You'll Love This Pixie pocket Pouch Pattern

I absolutely love this pattern because it turns tiny scraps of yarn into a colourful, useful pouch that brightens up your project bag. I enjoy working small projects between larger ones, and this pouch is the perfect quick make that still feels special. The design is simple but allows for creative colour choices, so each pouch you make can be completely unique. Sewing on the little button and seeing the finished flap fit perfectly is one of my favourite satisfying finishing moments.

Pixie pocket Pouch Pattern step 1 - construction progress Pixie pocket Pouch Pattern step 2 - assembly progress Pixie pocket Pouch Pattern step 3 - details and accessories Pixie pocket Pouch Pattern step 4 - final assembly and finishing

Switch Things Up

I love experimenting with colour sequences in this pattern; try switching the stripe order, using pastels for a softer look, or a monochrome gradient for subtle elegance.

To make a larger pouch, I switch to a DK or worsted weight yarn and increase the starting chain and rounds proportionally, keeping the shaping sequence similar.

For a tiny keychain version, I use a lighter-weight hook and thinner yarn and stop after fewer rounds to make a palm-sized pouch perfect for charms.

I often replace the button with a small snap or magnetic closure for a sleeker finish — just make sure placement matches the flap opening.

Want a more structured pouch? I add a small fabric lining cut to size and whipstitched in place for extra stiffness and a neat interior finish.

I sometimes embroider a small motif or initials onto the front before sewing on the button to personalise each pouch for gifts.

Try adding a short crocheted strap or loop at the side to clip the pouch to a bag or project caddy for convenience.

If you like texture, swap some stripe rounds for a round of puff or bobble stitches, then switch back to single crochet for the rest of the pouch.

I also enjoy making matching sets by coordinating the pouch colours with other small accessories like needle cases or coaster sets.

Finally, don’t be afraid to mix yarn fibres — a metallic or sparkly strand held together with your main yarn can add a fun pop to a stripe round.

Common Mistakes & How to Fix Them

✗ Skipping the note about joined rounds and spiral switching will disrupt shaping; follow the instruction to work joined rounds until round 10, then switch to a continuous spiral so your pouch measures correctly. ✗ Counting stitches only occasionally can lead to uneven edges and mismatched corners; count your stitches at the end of each round to ensure the correct stitch count and shape. ✗ Missing the BLO instruction for round 3 will change the stripe texture and cause uneven colour definition; make sure to work round 3 in the back loops only as specified. ✗ Placing the flap on the wrong side makes the pouch front/back reversed; follow the note about ending on the corner before the side you want as the front and pin the flap position before sewing the button.

Pixie pocket Pouch Pattern

Create a tiny, colorful Pixie Pocket Pouch that's perfect for holding stitch markers, small notions or coins. This pattern uses simple single crochet stitches and small colour changes to create cheerful rainbow stripes. You'll love how quickly this little pouch comes together and how satisfying it is to personalise with different colours and a small button closure.

Beginner Friendly 2-3 Hours

Materials Needed for Pixie pocket Pouch Pattern

— Main Fabric

  • 01
    Approximately 23 yards (21 m) of fingering weight yarn in your main color (Cream or Grey suggested)
  • 02
    Scrap amounts in 6 colours for stripes: Red - small amount, Orange - small amount, Yellow - small amount, Green - small amount, Blue - small amount, Pink - small amount
  • 03
    Main colours used in samples: Cream and Grey (small amounts as above)

— Tools Required

  • 01
    A 2.5 mm hook
  • 02
    1 small button
  • 03
    Darning needle
  • 04
    Measuring tape
  • 05
    Scissors

Progress Tracker

0% Complete

— Pattern Notes :

Info :

This pattern is written in US terms. This pouch is worked from the bottom up, and worked in joined rounds until round 10, after which you begin working in a continuous spiral. The cover flap is then worked last, in rows. The chain one at the beginning of each row / round does not count as a stitch.

— Abbreviations :

Info :

Ch - chain. Sc - single crochet. Sc dec - Single crochet decrease. St - stitch. Sl st - slip stitch. Blo - Back loop only. Sk - skip.

— Pattern :

Info :

Beginning with your main colour, ch 8

— Base :

Round 1 :

3 sc in second chain from hook, 1 sc in next 5 chains, 5 sc in last chain. Continuing to work on the other side of the chains, sc in the next 5 chains. 2 sc in last chain. Sl st to first sc to join. (20 sc)

Round 2 :

Ch 1 (does not count as a stitch). 2 sc in each of the first 3 sts. Sc 5. 2 sc in each of the next 5 sts. Sc 5. 2 sc in each of the last 2 sts. Sl st to join. (30 sc)

— Body :

Round 3 :

Ch 1 (does not count as a stitch). Working in the BLO, sc around. (30 sc in blo)

Round 4 :

Ch 1 (does not count as a stitch). Sc in each st around. Fasten off. (30 sc)

Round 5 - 10 :

Repeat round 4, using a new colour on each round. I worked in the sequence - pink, blue, green, yellow, orange, red, but feel free to get as creative with your colours as you wish.

Info :

Reattach your main colour and begin to sc around in a continuous spiral without joining, until your pouch measures 6 cm (2.4 in). End on a stitch at the CORNER of your pouch.

Info :

(Note: The side of the pouch that the flap is worked on will become the back, so I suggest ending on the corner right BEFORE the side you would like to be the front)

— Cover Flap :

Info :

Ch 1 and turn

Row 1 :

sc in the next 15 sts. Ch 1 and turn (15 sc)

Row 2 - 3 :

Repeat Row 1

Row 4 :

Sc dec, 11 sc, sc dec. Ch 1 and turn (13 sts)

Row 5 :

Sc dec, 9 sc, sc dec, Ch 1 and turn (11 sts)

Row 6 :

Sc dec, 1 sc, chain 4, sk the next 5 sts, 1 sc, sc dec. Ch 1 and turn (4 sts and 4 chs)

Row 7 :

1 sc in each of the 1st 2 sts. 3 sc around chain. 1 sc in each of the last 2 sts. Ch 1 and turn (7 sts)

Row 8 :

Sc dec, 3 sc, sc dec. Ch 1 and turn (5 sts)

Row 9 :

Sc dec, 1 sc, sc dec. Ch 1 and turn (3 sts)

Row 10 :

3 sc. Fasten off

— Finishing :

Info :

Sew on the button on the front of the pouch approximately 1.5 cm (0.6 in) from the top and 3 cm (1.1 in) from the side. (I recommend holding / pinning the button in place first to check that it is in the right position to fit in the hole made in the flap and making any positioning adjustments if needed).

Info :

Weave in your ends and you’re all done!

Info :

I hope you love your finished pouches. Please tag me in your photos on Instagram and Facebook @therookiehooker and use the hashtags #pixiepocketpouch and #therookiehooker so I can see all your wonderful creations.

Info :

You are free to sell items made from this pattern but please give credit to the original designer.

Assembly Instructions

  • End your spiral body on the corner right BEFORE the side you want to be the front so the flap will be worked on the back side.
  • Pin the cover flap into position before sewing to check placement and fit; the flap should align to create a neat buttonhole when folded.
  • Sew the button onto the front of the pouch approximately 1.5 cm (0.6 in) from the top and 3 cm (1.1 in) from the side, adjusting as needed to fit the flap hole.
  • Weave in all yarn ends securely and trim excess yarn for a tidy finish before using the pouch.

Important Notes

  • 💡This pouch is worked from the bottom up in joined rounds until round 10, then in a continuous spiral—follow this to get the correct shape.
  • 💡The chain one at the beginning of each row or round does not count as a stitch—do not treat it as a stitch when counting.
  • 💡Round 3 is worked in the back loop only (BLO) to create the stripe texture—ensure you work BLO on that round for the intended effect.

This Pixie Pocket Pouch is a delightful little project that makes a perfect gift or handy notions case. It uses small amounts of yarn and comes together quickly, making it ideal for using up scraps and experimenting with rainbow stripes. Have fun choosing colour combinations and finishing details to make each pouch your own! 🧶✨

You ask,

we answer.

FAQs

What size will the finished piece be?

The finished pouch measures approximately 6.5 cm (2.6 in) in length and 6 cm (2.4 in) in width when worked with the recommended yarn and hook size.

Can I use different yarn weights for this pattern?

Yes, you can use different yarn weights but the final size will change; choose an appropriate hook for your yarn and be prepared for a smaller or larger pouch.

Do I need prior crochet experience for this pattern?

This pattern is rated beginner friendly and uses basic single crochet and simple decreases, so basic crochet experience is recommended for best results.

How long does this project typically take to complete?

Most crocheters finish this bite-sized pouch in about 2-3 hours, though time may vary depending on experience and colour changes.