🧢 Beautiful ✨ Detailed πŸ’ Adorable

Mini Cherry Bakewell Amigurumi Pattern

Mini Cherry Bakewell Amigurumi Pattern
4.6β˜… Rating
2-3 Hours Time Needed
1.2K Made This
βœ‚οΈ

Beginner Friendly Level

Perfect for those just starting their crochet journey, with clear instructions and simple techniques

⏱️

Bite-Sized Project

Finishes in 2-4 hoursβ€”perfect for an afternoon of creative relaxation.

🎁

Tiny Treasure

Small, sweet, and gift-worthy creations that fit perfectly in the palm of your hand with detailed charm.

About This Mini Cherry Bakewell Amigurumi Pattern

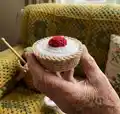
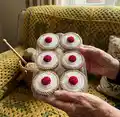
This pattern makes a realistic mini Cherry Bakewell: a small pastry base, a flat iced top and a tiny red cherry. The design uses Paintbox Simply DK yarn and basic double crochet shaping for a neat, circular finish. I included a stuffing tip to help you achieve a flat icing surface and crisp edges.

Mini Cherry Bakewell Amigurumi Pattern crochet pattern - detailed view of completed project

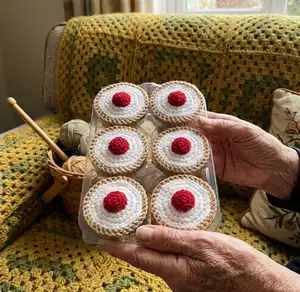
Perfect for creating a set of sweet pastries for gifts or display, each mini measures about 6.5cm across. The pattern is written in UK terminology and includes full finishing and sewing instructions.

Why You'll Love This Mini Cherry Bakewell Amigurumi Pattern

I absolutely love this pattern because it captures the charm of a classic bakewell in such a tiny, satisfying project. I enjoy how quickly each pastry comes together, making it ideal for gifts or for making a matching set. The flat iced top technique gives such a professional finish, and the little cherry really brings the piece to life. I also love offering a stuffing tip that helps achieve a beautifully flat surface, which makes the finished items look polished and display-ready.

Mini Cherry Bakewell Amigurumi Pattern step 1 - construction progress Mini Cherry Bakewell Amigurumi Pattern step 2 - assembly progress Mini Cherry Bakewell Amigurumi Pattern step 3 - details and accessories Mini Cherry Bakewell Amigurumi Pattern step 4 - final assembly and finishing

Switch Things Up

I love customizing this mini pastry by changing the icing color β€” try pale pink or lemon for different flavor vibes.

You can make a whole box of assorted pastries by swapping the cherry color to bright pink or deep burgundy for variety.

To make the bakewell bigger, use a bulkier yarn and a larger hook; for a tiny keychain version, use thinner yarn and a smaller hook.

I often add embroidered jam on the top before sewing the cherry to suggest a jam centre for more detail.

Try using cotton yarn for a slightly firmer finish if you want less stretch and a crisper edge on the pastry base.

I sometimes glue a small felt circle inside the base before stuffing to keep the bottom extra flat and stable for display pieces.

For a heirloom-style set, use neutral tones and add a tiny crocheted doily underneath each pastry as a decorative touch.

I like to package these as gifts in small clear boxes with tissue paper and a ribbon β€” they make adorable stocking stuffers and party favors.

Experiment with different stuffing: quilt batting layers give the flattest iced top, while polyester stuffing gives a softer, puffier look.

I recommend trying different hook tensions to see how the edge scallop changes; a slightly tighter tension will produce a crisper crust effect.

Common Mistakes & How to Fix Them

βœ— Not keeping consistent tension throughout shaping can lead to mismatched top and base sizes; maintain steady tension and check your rounds often to ensure both pieces match before joining. βœ— Skipping stitch counts during increase rounds results in incorrect circumference and shaping; count stitches at the end of each round, especially after increases, to stay on track. βœ— Overstuffing the pastry before joining the top and base can cause bulging and distorted edges; stuff gradually and only fill about two-thirds before closing to allow shaping as you finish. βœ— Cutting the cherry tail too short makes sewing it securely difficult; leave a long tail for attaching the cherry, then push the tail into the dome instead of stuffing to maintain the smooth shape. βœ— Using a much larger hook than recommended will create gaps where stuffing shows through; if you must change yarn, try a slightly smaller hook than the yarn recommendation to keep stitches neat and tight.

Mini Cherry Bakewell Amigurumi Pattern

Make a delightful mini Cherry Bakewell with this charming crochet pattern. Youll create a realistic pastry with a flat iced top and a tiny cherry on top using simple double crochet rounds. This pattern is ideal for gifting, decorating, or creating a sweet set for display. Follow clear step-by-step instructions and finish with neat assembly for a beautiful result.

Beginner Friendly 2-3 Hours

Materials Needed for Mini Cherry Bakewell Amigurumi Pattern

β€” Main Fabric

  • 01
    Paintbox Yarns Simply DK (100% Acrylic; 276m/302yds per 100g ball)
  • 02
    Color A: Paper White - 5g (for iced top)
  • 03
    Color B: Pillar Red - 5g (for cherry)
  • 04
    Color C: Light Caramel - 10g (for pastry base)
  • 05
    Note: yarn amounts are for ONE mini bakewell; make a set you will need more yarn

β€” Tools Required

  • 01
    Crochet hook size 3.5mm (E/4)
  • 02
    Stuffing (polyester fiberfill) or quilt padding for flat top
  • 03
    Tapestry needle for sewing in ends
  • 04
    Scissors

Progress Tracker

0% Complete

β€” Iced top :

Round 1 :

with A dc7 into magic circle, join with ss to 1st dc (7).

Round 2 :

ch1, 2dc into same st, 2dc into each st around, join with ss to 1st dc (14).

Round 3 :

ch1, dc into same st, 2dc in next st, *dc, 2dc in next st* repeat from * to * 6 times, join with ss to 1st dc (21).

Round 4 :

ch1, dc into same st, dc, 2dc in next st, *dc2, 2dc in next st* repeat from * to * 6 times, join with ss to 1st dc (28).

Round 5 :

ch1, dc into same st, dc2, 2dc in next st, *dc3, 2dc in next st* repeat from * to * 6 times, join with ss to 1st dc (35). Fasten off and sew in ends.

β€” Cherry :

Round 1 :

with B dc5 into magic circle, join with ss to 1st dc (5).

Round 2 :

ch1, 2dc into same st, 2dc into each st around, join with ss to 1st dc (10).

Round 3 :

ch1, dc into same st, dc into each st around, join with ss to 1st dc (10). Fasten off and cut a tail long enough to sew the cherry to the iced top. Sew in the tail from the magic circle, but instead of cutting the yarn just push it inside the dome of the cherry (instead of using stuffing). Sew the cherry onto the iced top, fasten off and sew in ends.

β€” Pastry base :

Round 1 :

with C dc7 into magic circle, join with ss to 1st dc (7).

Round 2 :

ch1, 2dc into same st, 2dc into each st around, join with ss to 1st dc (14).

Round 3 :

ch1, dc into same st, 2dc in next st, *dc, 2dc in next st* repeat from * to * 6 times, join with ss to 1st dc (21).

Round 4 :

ch1, dc into same st, dc, 2dc in next st, *dc2, 2dc in next st* repeat from * to * 6 times, join with ss to 1st dc (28).

Round 5 :

ch1, dc into back loop only of same st, dc into back loop only of each stitch around, join with ss to 1st dc (28).

Round 6 :

ch1, dc into same st, dc into each st around, join with ss to 1st dc (28).

Round 7 :

ch1, dc into same st, dc2, 2dc in next st, *dc3, 2dc in next st* repeat from * to * 6 times, join with ss to 1st dc (35).

Round 8 :

ch1, dc into same st, dc into each st around, join with ss to 1st dc (35).

Round 9 :

join top and base together: with iced top and pastry base held together, right sides out, ch1 and dc into same st of base as well as through back loop only of top. Join base and top by working dc around the edge, making sure to hook through both loops of each base stitch and back loop only of each stich around the top. When you have joined about 2/3, stuff before completing to close. Join with ss to 1st dc, fasten off and sew in ends.

Info :

Stuffing Tip: instead of regular toy stuffing, you could use quilt padding cut into small circles and layered to fill your pastry. This will give really straight edges, and a beautifully flat iced top!

Assembly Instructions

  • Join the iced top and pastry base together by holding right sides out, ch1 and dc through the base stitch and back loop only of the top, working dc around the edge until about two-thirds joined.
  • Stuff the pastry when approximately two-thirds of the seam is joined, then finish joining the remaining stitches, join with ss to 1st dc, fasten off and sew in ends.
  • Sew the cherry to the iced top using the long tail left from the magic circle; push the tail inside the cherry dome instead of adding stuffing for a smooth finish, then sew the cherry onto the iced top and fasten off.
  • For a nicely flat iced top, layer quilt padding cut into small circles inside the pastry before closing, stacking until you reach the desired flatness.
  • Weave in all yarn ends securely with a tapestry needle and trim excess, ensuring no loose tails are left visible on the finished pastry.

Important Notes

  • πŸ’‘Specific tension is not too important as long as it is consistent so your top and base sections are the same size.
  • πŸ’‘If using different yarn, use a slightly smaller hook than the yarn suggests to avoid gaps where stuffing could show through.
  • πŸ’‘Yarn amounts listed are for ONE mini bakewell; if you plan to make a set, you will need more yarn.

This adorable Mini Cherry Bakewell pattern captures the charm of a classic pastry in crochet form, perfect for gifts or display. Create a matching set or hand one as a thoughtful handmade treat, each with a neat flat iced top and tiny cherry. Happy crocheting and enjoy making these sweet little treasures! 🧁🧢

You ask,

we answer.

FAQs

What size will the finished piece be?

The Mini Cherry Bakewell measures approximately 6.5cm diameter, and 3cm high when made with the recommended yarn and hook size.

Can I use different yarn weights for this pattern?

Yes, you can use different yarn weights, but I recommend using a slightly smaller hook than the yarn suggests to keep stitches tight and avoid gaps; this will change the final size.

Do I need prior crochet experience for this pattern?

This pattern is beginner friendly and uses basic double crochet rounds, but familiarity with working in the round and increases will help you follow the shaping easily.

How long does this project typically take to complete?

Most crocheters finish one mini bakewell in about 2-3 hours, though time may vary depending on experience and finishing preferences.