🧢 Beautiful ✨ Detailed πŸ’ Adorable

Canadian Maple Leaf Pattern

Canadian Maple Leaf Pattern
4.5β˜… Rating
2-3 Hours Time Needed
3.3K Made This
βœ‚οΈ

Intermediate Level

Ideal for those with basic crochet experience, featuring slightly more advanced stitches and techniques to expand your skills.

⏱️

Bite-Sized Project

Finishes in 2-4 hoursβ€”perfect for an afternoon of creative relaxation.

🏑

Cozy Accent

A warm touch for your space that transforms ordinary corners into inviting nooks filled with handmade charm.

About This Canadian Maple Leaf Pattern

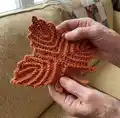
This pattern teaches you how to crochet a decorative Canadian Maple Leaf coaster or applique9 using worsted weight yarn and textured post stitches. You will make three small leaves, join them at the center, and add a stalk to finish. The design includes diagrams, photo tips, and wet-blocking instructions to shape crisp edges.

Canadian Maple Leaf Pattern crochet pattern - detailed view of completed project

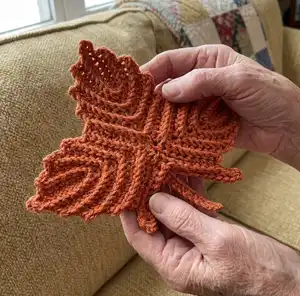
Perfect for gifting or seasonal decor, the finished leaf has lovely ridged texture from front and back post single crochets. The pattern includes detailed finishing steps and optional blocking advice to give professional results.

Why You'll Love This Canadian Maple Leaf Pattern

I absolutely love this pattern because it turns simple stitches into a detailed, textured leaf that looks much more intricate than it actually is. I enjoy how the post stitches create a natural vein effect that gives each leaf beautiful definition and depth. The project is satisfying and quick to make, so I can whip up several for coasters, garlands, or applique9s in an afternoon. I also appreciate that wet-blocking is included, because it helps the leaf hold its shape and makes the finished piece look polished.

Canadian Maple Leaf Pattern step 1 - construction progress Canadian Maple Leaf Pattern step 2 - assembly progress Canadian Maple Leaf Pattern step 3 - details and accessories Canadian Maple Leaf Pattern step 4 - final assembly and finishing

Switch Things Up

I love how easy it is to customize this maple leaf pattern with color choices and yarn weights.

I often use variegated yarn for a multi-tonal leaf that looks like changing autumn foliage.

For a delicate motif, I switch to sport weight yarn and a smaller hook to create mini leaves perfect for garlands.

I sometimes make the leaf larger by using bulky yarn and a larger hook to create a chunky coaster with bold texture.

I like adding a small embroidered vein or French knots at the leaf center for extra detail and personality.

I also experiment with metallic or sparkly yarn for a festive holiday version that shines on a mantel.

I recommend trying different joining techniques like slip-stitch join or invisible mattress stitch instead of whip stitch to change the center finish.

I occasionally stiffen the leaf with a lightweight fabric stiffener for ornaments or seasonal displays that need structure.

I enjoy making sets in tonal gradients for table settingsβ€”three leaves in light, medium, and dark shades make a lovely grouping.

I sometimes add a small button or bead at the leaf center for contrast and to hide the join when I want a decorative focal point.

Common Mistakes & How to Fix Them

βœ— Skipping the foundation chain bottom stitches will distort shaping; be sure to work across the bottom of the foundation chain as instructed to achieve the correct stitch count. βœ— Not placing or removing the center marker correctly can misalign the leaves during assembly; place the marker in the 9th stitch as directed and remove only the marker called out while keeping the center marker. βœ— Working post stitches loosely makes the veins look limp; maintain consistent tension and insert the hook correctly for bpsc/fpsc to keep ridges firm and defined. βœ— Forgetting to weave in ends on the wrong side can leave visible tails; weave in ends on the WS as you finish each piece to ensure a neat right side.

Canadian Maple Leaf Pattern

Create a gorgeous Canadian Maple Leaf coaster or applique9 with this approachable crochet pattern. Youe28099ll make three small leaves, join them, and add a stem for a charming handmade accent. Clear row-by-row instructions, special stitch guidance, and wet-blocking tips help you achieve crisp, professional edges.

Intermediate 2-3 Hours

Materials Needed for Canadian Maple Leaf Pattern

β€” Main Fabric

  • 01
    Red Heart Super Saver Yarn or any other worsted weight yarn (Medium / 4) - small amount for one coaster (use less than one skein)
  • 02
    Option: Thinner yarn or thread for a smaller leaf if desired (use smaller hook accordingly)

β€” Tools Required

  • 01
    Crochet hook size 4.5 mm (G)
  • 02
    Tapestry needle
  • 03
    Straight pins
  • 04
    Stitch markers
  • 05
    Blocking board or interlocking play mat
  • 06
    Scissors

Progress Tracker

0% Complete

β€” Special Stitches :

Info :

Whip stitch.

Info :

Sc2(4)tog - [insert hook in next st, yo & pull up a lp] 2(4) times; yo & pull through all lps on hook. 1(3) sts decreased.

Info :

Back post single crochet (Bpsc) - insert hook from back to front to back around post of next st, yo & pull up a lp; yo & pull yarn through 2 lps on hook.

Info :

Front post single crochet (Fpsc) - insert hook from front to back to front around post of next st, yo & pull up a lp; yo & pull yarn through 2 lps on hook.

β€” Small Leaf :

Info :

Make 3 small leaves to complete 1 Maple leaf (diagram 1). Work in rows.

Row 1 :

To beg: ch 10. (RS) sc in second ch from hook; sc in next 7 chs; 5 sc in last ch; work across the bottom of foundation ch --> sc in next 6 chs; turn = 19 sts.

Row 2 :

(WS) ch 1 (do not count as a st here & throughout); [fpsc around post of next st] 17 times (photos a-1 & a-2, page 4); turn = 17 sts.

Row 3 :

(RS) ch 1; sc in next 8 sts; 5 sc in next st; sc in next 6 sts; turn = 19 sts.

Rows 4-7 :

Repeat 2 more times rows 2 & 3.

Row 8 :

Same as Row 2.

Info :

Finishing: Fasten off, leaving a long tail for sewing; weave in the end from the beg. Turn & place a MARKER in 9th st from finishing (photo a-3).

β€” Assembling Maple Leaf :

Info :

Place all small leaves next to each other, with the markers meeting in the center (photo b-1).

Info :

With WS facing you, whip stitch the leaves together across 9 sts on the sides (photo b-2). Remove markers as you go from the left and right leaves, but keep the middle MARKER. Weave in the ends on WS.

β€” Leaf Stalk :

Info :

Make 1 stalk (diagram 2, page 7).

To beg :

Holding the leaf with RS facing you & with the center marker facing up, work ch 4 (photo c-1).

Row 1 :

(RS) work across the top 9 sts of right small leaf --> sc in first st on the right (photo c-2), sc in next 6 sts, sc2tog; skip st with MARKER & remove the MARKER (photo c-3); work across the top 9 sts of left small leaf --> sc2tog, sc in next 7 sts, ch 5 (photo c-4); turn = 16 sts & 2 chs on each side.

Row 2 :

(WS) sc in second ch from hook; sc in next 3 chs; sc in next 6 sts; sc4tog; sc in next 6 sts; sc in next 4 chs (photo c-5, page 6); turn = 21 sts.

Row 3 :

(RS) ch 1 (do not count as a st); [bpsc around post of next st] 10 times; ch 10 (photo c-6, page 6); sc in second ch from hook, sc in next 8 chs (photo c-7, page 6); [bpsc around post of next st] 10 times; sl st in last st (photo c-8, page 6) = 30 sts.

Info :

Finishing: Fasten off & weave in all the ends on WS.

β€” Wet Blocking :

Info :

Wet blocking is optional, but recommended. Blocking removes creases & adjusts the shape of crochet pieces. 1. Soak the leaves in warm water; 2. Squeeze excess moisture out; 3. Lay the leaves flat on a blocking board (or interlocking play mat); 4. Shape & pin around the edges (photo d-1); 5. Let the leaves dry.

β€” Diagram Notes :

Info :

Refer to Diagram 1 (small leaf chart) and Diagram 2 (full maple leaf assembly) for stitch placement and direction indicators. Each row on the diagram is highlighted in different colors to help you follow the sequence.

Assembly Instructions

  • Place all three small leaves next to each other with the center markers meeting in the middle to align the pieces accurately before sewing.
  • With the wrong sides facing you, whip stitch the adjacent leaves together across 9 stitches on each side, removing side markers as you go but keeping the center marker in place.
  • After joining the three leaves, attach the stalk by chaining 4 at the center marker and working Row 1 across the top stitches of the right leaf and left leaf as instructed, removing the center marker when indicated.
  • Fasten off and weave in all ends on the wrong side to keep the right side neat and free of visible tails.
  • Wet block the finished leaf by soaking, shaping on a blocking board, pinning around the edges to create crisp points, and allowing it to dry completely for a professional finish.

Important Notes

  • πŸ’‘Use stitch markers to mark the center and key stitches; these help align pieces accurately during assembly.
  • πŸ’‘Weave in ends on the wrong side (WS) as you go to keep the right side tidy and avoid bulky tails at the center.
  • πŸ’‘Wet blocking is optional but recommended to remove creases and shape the leaf for crisp points and defined ridges.
  • πŸ’‘The gauge is not critical for this coaster; finished size may vary slightly depending on yarn and tension.

This Canadian Maple Leaf pattern brings a bit of handmade autumn charm to your home with textured veins and crisp points. Whether used as a coaster, applique9, or seasonal decoration, each leaf is tactile and full of detail. Make several in varying colors for a festive garland or a set of coasters. 🧢🍁

You ask,

we answer.

FAQs

What size will the finished piece be?

The finished maple leaf measures approximately 8BD" (21.6 cm) from side to side and 7BD" (19 cm) from top to bottom when using the recommended yarn and 4.5 mm hook.

Can I use different yarn weights for this pattern?

Yes, you can use different yarn weights, but this will change the final size and texture; use a smaller hook for thinner yarn or a larger hook for bulkier yarn and adjust expectations for finished dimensions.

Do I need prior crochet experience for this pattern?

This pattern is rated intermediate and uses front and back post stitches and join-as-you-go style assembly; basic knowledge of single crochet and working in rows is recommended.

How long does this project typically take to complete?

Most crocheters complete one maple leaf in about 2-3 hours; time will vary by experience and whether you block the piece.

Is wet blocking necessary?

Wet blocking is optional but recommended to achieve crisp leaf points and even shaping; it helps the ridges and seams lay flat and look professional.