🧶 Beautiful ✨ Detailed 💝 Adorable

Magikarp Amigurumi Pattern

Magikarp Amigurumi Pattern
4.0★ Rating
2-4 Hours Time Needed
2.6K Made This
✂️

Beginner Friendly Level

Perfect for those just starting their crochet journey, with clear instructions and simple techniques

⏱️

Bite-Sized Project

Finishes in 2-4 hours—perfect for an afternoon of creative relaxation.

🧸

Cute Companion

An adorable friend to cherish, handcrafted with love to bring comfort and joy for years to come.

About This Magikarp Amigurumi Pattern

This pattern teaches you how to crochet a cute Magikarp amigurumi using basic single crochet rounds and small rowed pieces for fins. You will make a small stuffed fish with a mouth, tail, backfin, belly fin, pectoral fins, and knotted feelers. It uses simple shaping and assembly so you can finish a charming toy in a single session.

Magikarp Amigurumi Pattern crochet pattern - detailed view of completed project

The instructions are written round-by-round and include clear notes for finishing and embroidery details. All materials, abbreviations, and step-by-step assembly tips are included to help you complete the project.

Why You'll Love This Magikarp Amigurumi Pattern

I absolutely love this pattern because it turns simple stitches into a whimsical, recognizable character with personality. I enjoy how quick it is to make yet how satisfying the small finishing details feel when attached. I appreciate that the fins are worked in rows, offering variety from the rounds and adding a fun construction step. I also love that the final piece is lightweight, giftable, and a lovely display of handmade charm.

Magikarp Amigurumi Pattern step 1 - construction progress Magikarp Amigurumi Pattern step 2 - assembly progress Magikarp Amigurumi Pattern step 3 - details and accessories Magikarp Amigurumi Pattern step 4 - final assembly and finishing

Switch Things Up

I love customizing this Magikarp by experimenting with yarn color for a fun twist; try pastel orange and cream for a softer version.

I sometimes make a tiny keychain version by using thinner yarn and a smaller hook to create a miniature Magikarp perfect for bags.

I often change the eye style by embroidering eyes instead of using safety eyes if the toy is for a small child or baby.

For a more dramatic look, I add metallic or sparkly yarn accents along the tail rim for a shimmering effect.

I also swap the yellow fins to a different color to coordinate with themed collections or to make a custom colorway for gifts.

If I want a sturdier piece, I use a slightly smaller hook than the yarn recommends to create tighter stitches and reduce stuffing show-through.

To make a poseable Magikarp, I sometimes insert a short piece of floral wire into the fins so they can be gently shaped after assembly.

I like to add tiny felt cheeks or a little embroidered smile to give each Magikarp its own personality and expression.

For display sets, I create several Magikarps in graduated sizes by changing yarn weight and hook size to form a family of fish.

I also enjoy adding small accessories like a mini crown or scarf to make seasonal or themed versions that are fun to gift and display.

Common Mistakes & How to Fix Them

✗ Forgetting to leave a tail when finishing small parts makes sewing difficult; always leave a long tail for sewing and weaving in ends. ✗ Overstuffing the body will prevent the Magikarp from flattening into the correct shape; stuff gently and shape as you go to achieve the right profile. ✗ Skipping count checks after increases or decreases can lead to incorrect stitch counts; count your stitches at the end of each round to ensure accuracy. ✗ Working the fins as rounds instead of rows will give the wrong shape; follow the instructions carefully and work the backfin, bellyfin, and pectoral fins in rows as written. ✗ Not anchoring the feeler knot securely can cause it to pull through the fabric; make a large knot, insert it with a needle, and leave the knot inside the body for stability.

Magikarp Amigurumi Pattern

Create an adorable Magikarp amigurumi with this friendly crochet pattern. Follow clear round-by-round instructions to crochet the body, tail, fins, mouth, and feelers. Perfect as a handmade gift or a cute desk companion, this pattern guides you through assembly and finishing touches. Enjoy a fun, crafty project that brings a little Pokémon magic to your hooks.

Beginner Friendly 2-4 Hours

Materials Needed for Magikarp Amigurumi Pattern

— Main Fabric

  • 01
    Orange yarn - for the main body (use amount as needed)
  • 02
    White yarn - for eyes, tail edging, and pectoral fins
  • 03
    Yellow yarn - for backfin and belly fin
  • 04
    Pink yarn - for lips (attach to round 16 of the body)
  • 05
    Black yarn - for mouth embroidery and fin detailing
  • 06
    4.5mm safety eyes (as listed with materials)
  • 07
    Stuffing (polyester stuffing or similar, amount as needed)

— Tools Required

  • 01
    4.5mm safety eyes (2 pieces)
  • 02
    Polyester stuffing
  • 03
    Tapestry or sewing needle (for sewing pieces and threading feelers)
  • 04
    Scissors

Progress Tracker

0% Complete

— Eyes :

Info :

Eyes (make 2). With white yarn, ch2

Round 1 :

4sc in second chain from the hook (4)

Round 2 :

2sc in every st around (8)

Info :

Fo, leaving a tail of yarn to sew the eyes to the body.

— Body :

Info :

With orange yarn, ch2

Round 1 :

6sc in second chain from the hook (6)

Round 2 :

2sc in every st around (12)

Round 3 :

1sc in every st around (12)

Round 4 :

*1sc in first st, 2sc in next st* repeat ** 5 times (18)

Round 5-6 :

(2 rounds): 1sc in every st around (18)

Round 7 :

*1sc in first 2st, 2sc in next st* repeat ** 5 times (24)

Round 8-11 :

(4 rounds): 1sc in every st (24)

Round 12 :

*1sc in first 2st, dec1* repeat ** 5 times (18)

Round 13-14 :

(2 rounds): 1sc in every st (18)

Round 15 :

*1sc in first st, dec1* repeat ** 5 times (12)

Round 16 :

1sc in every st around, front loops only! (12)

Info :

Fo, attach the eyes and stuff the body. Make sure not to stuff too tightly, since the body needs to be flattened a bit to get the right shape.

— Mouth :

Info :

To make the mouth, attach black (or in this case, dark grey) yarn to round 16 of the body, back loops only!

Round 1 :

1sc in every st around (12)

Round 2 :

dec6 (6)

Info :

Fo and weave in the ends, closing the gap with an end of yarn.

Info :

Then, you attach pink yarn to round 16 of the body and sc1 all around (12) this gives you the lips. Fo and weave in the ends.

— Tail :

Info :

With white yarn, ch2

Round 1 :

6sc in second chain from the hook (6)

Round 2 :

2sc in every st around (12)

Round 3 :

*1sc in first st, 2sc in next st* repeat ** 5 times (18)

Round 4 :

*1sc in first 2st, 2sc in next st* repeat ** 5 times (24)

Round 5 :

*1sc in first 3st, 2sc in next st* repeat ** 5 times (30)

Info :

Switch to orange yarn, fold your work and crochet together with about 15sc. Fo, leave an end of yarn to sew the tail to the body. With black yarn, embroider two lines down the tail.

— Backfin :

Info :

With yellow yarn (these are worked in rows)

Row 1 :

ch4, turn

Row 2 :

starting from the second chain from the hook sc in every ch, ch1, turn (3)

Row 3 :

1sc in every st, ch3, turn

Row 4 :

starting from the second chain from the hook sc5, ch1, turn (5)

Row 5 :

sc2, ch2 turn

Row 6 :

starting from the second chain from the hook sc3, fo and leave an end of yarn to sew the backfin on top of the body.

Info :

Your end result should look like this:

— Bellyfin :

Info :

With yellow yarn

Row 1 :

ch3, turn

Row 2 :

starting from second chain from the hook, sc2, ch1, turn

Row 3 :

sc1, ch2, turn

Row 4 :

sc2, ch1, turn

Row 5 :

sc1, ch3, turn

Row 6 :

sc3, ch1 but don't turn

Row 7 :

work a row of sc along the side of your work. Fo and leave a tail of yarn to attach the belly fin to the underside of the body.

Info :

Your end result should look like this:

— Pectoral Fins :

Info :

Pectoral Fins (make 2). With white yarn

Row 1 :

ch7, turn

Row 2 :

sc6, ch1, turn

Row 3 :

sc4, ch3, turn

Row 4 :

sc6, fo.

Info :

Attach orange yarn to the side of the fin and ss around the side and top of the fin. Fo and leave a tail of yarn to attach the fins to the sides of the body. using black yarn, embroider two lines across the fins.

Info :

Make sure you make a right and a left fin, by ss across a different side for each fin. Or else, the orange rim will be at the bottom of one of the fins!

Info :

The end result should look like this:

— Feelers :

Info :

For the feelers, cut a length of yellow yarn and make a nice big knot at the end. Thread it in a needle and insert the yarn through a gap between stitches. Make it come out through a stitch just below the eyes, so that the knot at the end stays firmly inside. Do the same on the other side and cut the ends to be the desired length.

Info :

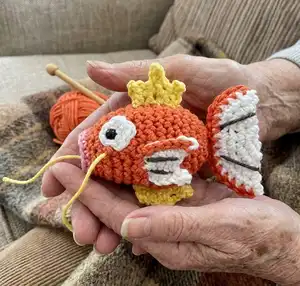
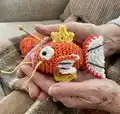
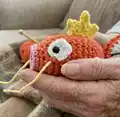
Tadaa~, your very own Magikarp is done!

Assembly Instructions

  • Attach the eyes to the body using the tails left from the eye pieces, positioning them on the body where the head shape is widest and sewing securely with a tapestry needle.
  • Sew the tail to the back opening of the body using the long tail left after joining the tail; align the orange rim and embroider two black lines down the tail as indicated.
  • Sew the backfin on top of the body using the long tail left from Row 6 of the backfin, centering it along the dorsal ridge.
  • Attach the belly fin to the underside of the body using the tail left from the bellyfin and sew along the edges to secure it in place.
  • Attach the two pectoral fins to each side of the body using the tails left from the fins, ensuring one is mirrored as a right fin and the other as a left fin so the orange rim sits correctly.
  • Insert the knotted yellow feelers using a needle so the knot stays inside the head; trim the feeler ends to the desired length and secure any loose yarn.

Important Notes

  • 💡Use the tail left from each piece when finishing so you have enough yarn to sew pieces together securely.
  • 💡Do not overstuff the body; it should be slightly flattened for the correct Magikarp profile and shape.
  • 💡The fins are worked in rows, not rounds, so follow row instructions carefully to get the correct shape and orientation.
  • 💡Make a left and a right pectoral fin by slip-stitching the orange rim on opposite sides to avoid the orange rim being on the wrong edge.

This delightful Magikarp amigurumi is a playful and cheerful project that adds a splash of color to your handmade collection. It combines easy rounds with simple row work for fins, making it a fun stitch-and-sew experience for new crocheters. Perfect as a gift or a pocket-sized keepsake to celebrate your love of Pokémon. 🧶🐟

You ask,

we answer.

FAQs

What size will the finished piece be?

The finished amigurumi size is not specified in the pattern, but using typical DK/worsted yarn and the suggested details will produce a small, palm-sized Magikarp around a few inches long.

Can I use different yarn weights for this pattern?

Yes, you can use different yarn weights, but this will change the final size; choose an appropriate hook and adjust stuffing accordingly for best results.

Do I need prior crochet experience for this pattern?

This pattern is beginner friendly, so basic knowledge of single crochet, increases, and decreases is helpful, and row work is used for the fins.

How long does this project typically take to complete?

Most crocheters finish this Magikarp in 2-4 hours depending on experience and how much time is spent on embroidery and assembly.