About This Cute Plushies Ghost Amigurumi Pattern
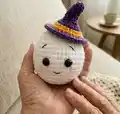
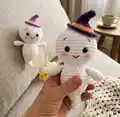
This pattern teaches you how to crochet an adorable plush ghost using soft plush yarn and simple amigurumi techniques. You will make arms, a joined body, a stuffed head, a removable witch hat and add facial details with embroidery. The doll finishes at about 25 cm (10") without the hat when using the recommended materials. US terminology is used throughout and basic stitches are assumed.

The design is beginner friendly with clear round-by-round instructions and helpful photos for reference. Use the suggested yarns and 4.00 mm hook for best results.
Why You'll Love This Cute Plushies Ghost Amigurumi Pattern
I absolutely love this pattern because it turns simple stitches into a sweet, expressive plush that feels like a little friend. The soft plush yarn makes the ghost irresistibly cuddly and the removable hat adds playful personality. I enjoy that the pattern is clear and approachable for newer crocheters while still producing a charming finished piece. Sewing the hat tilted and embroidering the tiny face always gives me joy and makes each ghost unique.
Switch Things Up
I love to experiment with color when making this ghost, so I often swap the purple and orange hat colours for pastel tones to create a softer look.
If you want a smaller keychain version, I change to a finer plush yarn and a smaller hook to reduce the overall size and make it portable.
I sometimes embroider different facial expressions: try a surprised 'O' mouth or a sleepy smile by adjusting the placement during embroidery.
To make a standing display, you can slightly flatten the body bottom and add a small felt base sewn inside to help it stand upright.
I like to add tiny crocheted accessories like a broom, bow or scarf to give each ghost a unique character and personality.
For more texture, try using the hat brim in the front loops only as written, or work extra rounds to make a wider brim for a dramatic effect.
If you prefer eyes without safety eyes, embroider larger eyes with black thread or sew on felt circles for a softer, baby-safe toy.
I sometimes add a little wire inside the hat tip to make it posable and hold creative shapes for seasonal displays.
Experiment with blush placement and intensity to change the mood of the face — heavier blush gives a more playful look, while subtle blush keeps it sweet and simple.
Finally, don't be afraid to mix yarn textures: use a fluffy chenille for the body and a smoother yarn for the hat for a delightful contrast.
Common Mistakes & How to Fix Them
✗ Forgetting to stuff gradually while shaping the body; stuff a little at a time to maintain smooth, even shape and avoid lumps.
✗ Skipping the stitch count check after increases or decreases; always count your stitches at the end of each round to keep the correct shape.
✗ Placing safety eyes too close together without measuring; insert the eyes between rounds 6 and 7 with 8 stitches between them to match the pattern proportions.
✗ Not flattening and crocheting through both sides of the arm opening; flatten the arm and crochet 4 sc through both sides to close and shape the hand properly.
✗ Overstuffing the head before closing the final rounds; stuff firmly but gradually so the head keeps its round shape and closes neatly.