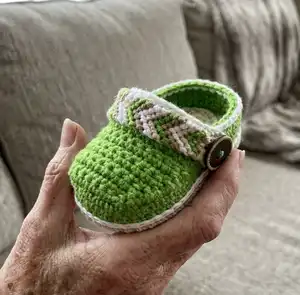
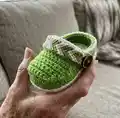
Make a cute pair of tribal-inspired baby clogs with a textured macrame strap and cozy crochet body. This pattern guides you step-by-step through soles, body shaping, edging and the knotted chevron straps so you can create a polished finished shoe. Perfect for handmade gifts, these shoes combine simple crochet stitches with a pretty macrame detail for a unique look. Grab your sport-weight yarn and 3.0 mm hook and follow along.
Progress Tracker
0% Complete
— Pattern Guide Part 1: Soles :
Info :
Use CC1 yarn color with a C/2 (3.0 mm) crochet hook. Make 4 soles. Note: Crochet continuously & do not join at the end of every round. The photo illustrations in Part 1 are for Size 1.
Round 1 :
Ch 13 (14, 16, 18). Sc in the 2nd ch from the hook. Sc in the next 10 (11, 13, 15) sts. 3 sc in the next st. Sc in the next 10 (11, 13, 15) sts. 2 sc in the next st. [Total sts: 26 (28, 32, 36)]
Round 2 :
2 sc in the next st. Sc in the next 10 (11, 13, 15) sts. 2 sc in the next 3 sts. Sc in the next 10 (11, 13, 15) sts. 2 sc in the next 2 sts. [Total sts: 32 (34, 38, 42)]
Round 3 :
2 hdc in the next 2 sts. Hdc in the next 10 (11, 12, 12) sts. Dc in the next 0 (0, 1, 3) sts. 2 hdc in the next 6 (6, 0, 0) sts. 2 dc in the next 0 (0, 6, 6) sts. Dc in the next 0 (0, 1, 3) sts. Hdc in the next 10 (11, 12, 12) sts. (2 hdc in the next st. Hdc in the next st) x 2. [Total sts: 42 (44, 48, 52)]
Round 4 :
2 sc in the next 3 sts. Sc in the next 6 (7, 8, 4) sts. Hdc in the next 3 (3, 3, 8) sts. Dc in the next 2 (2, 3, 4) sts. (2 dc in the next st. Dc in the next st) x 6. Dc in the next 2 (2, 3, 4) sts. Hdc in the next 3 (3, 3, 8) sts. Sc in the next 6 (7, 8, 4) sts. 2 sc in the next st. Sc in the next st. 2 sc in the next st. Cut the yarn leaving a short tail. Thread the yarn to a tapestry needle. Sk 1 st. Sew an inv sl st to the top of the next st. Hide the yarn tail end. [Total sts: 52 (54, 58, 62); including inv sl st]
Info :
Mark the 1st sc of Round 4 for both soles. Place the soles together with their WS facing each other.
Join Both Soles :
Starting in the marked sts, use CC2 yarn color to crochet both layers together with 52 (54, 58, 62) sl sts around the soles. Do not sl st back into the beginning point. Cut the yarn leaving a short tail. Thread the yarn to a tapestry needle & neatly sew the last sl st as shown in Reference #8. [Total sts: 53 (55, 59, 63)]
Round 6 :
Ch 1. Sc2tog starting in the same st base as the ch. Sc in the next 49 (51, 55, 59) sts. Sc2tog in the last 2 sts. Sl st to the top of beg sc2tog. Cut the yarn short & FO.
— Pattern Guide Part 2: Main Body :
Round 5 :
Identify the mid-heel. Using MC yarn color & a C/2 (3.0 mm) crochet hook, make a standing sc in the back loop of the sl st from the previous round (at the marked mid-heel; as pointed out in Photo 5.0). Sc blo in the next 52 (54, 58, 62) sts around the soles. Sl st to the top of beg standing sc blo. [Total sts: 51 (55, 59, 63)]
Row 1 :
With the toe portion facing you, attach MC yarn to the recently marked 24th (25th, 27th, 29th) st. Sc in the next 3 sts. 2 sc in the next st. Sc in the next 3 sts. Turn. [Total sts: 8 (8, 8, 8)]
Row 2 :
Sc in the next 8 sts. Then sc into the next 2 side sts. Turn. See Reference #5 to understand what the term 'side st' means. [Total sts: 10 (10, 10, 10)]
Row 3 - 4 :
Sk the 1st & 2nd sts. Sc in the next 8 sts. Sc in the next 2 side sts. Turn. Do this for 2 rounds. [Total sts: 10 (10, 10, 10)]
Row 5 :
Sk the 1st st. Sc in the next 9 sts. Sc in the next 2 side sts. Turn. [Total sts: 11 (11, 11, 11)]
Row 6 :
Sk the 1st & 2nd sts. Sc in the next 9 sts. Sc in the next 2 side sts. Turn. [Total sts: 11 (11, 11, 11)]
Row 7 :
Sk the 1st st. Sc in the next 10 sts. Sc in the next 2 side sts. Turn. [Total sts: 12 (12, 12, 12)]
Row 8 :
Sk the 1st st. Sc in the next 11 sts. Sc in the next 2 side sts. Turn. [Total sts: 13 (13, 13, 13)]
Row 9 :
Row 9 (9 - 10, 9 -11, 9 -11) Sk the 1st & 2nd sts. Sc in the next 11 sts. Sc in the next 2 side sts. Turn. Do this for 1 (2, 3, 3) rounds. [Total sts: 13 (13, 13, 13)]
Row 10 :
Row 10 (11, 12, 12) Sk the 1st st. Sc in the next 12 sts. Sc in the next 2 side sts. Turn. [Total sts: 14 (14, 14, 14)]
Row 11 :
Row 11 (12, 13, 13) Sk the 1st & 2nd sts. Sc in the next 12 sts. Sc in the next 2 side sts. Turn. [Total sts: 14 (14, 14, 14)]
For Size 1, 2 & 3 only -> Row 12 :
Row 12 (13, 14) Sk the 1st st. Sc in the next 13 sts. Sc in the next 4 side sts. Turn. [Total sts: 17 (17, 17)]
For Size 1, 2 & 3 only -> Row 13 :
Row 13 (14, 15) Sk the 1st st. Sc in the next 16 sts. Now crochet along the side sts to the mid heel & all the way back to the starting point of this round. Sc in the next 20 (20, 22) sts. Cut the yarn leaving a short tail & thread it to a tapestry needle. Inv sl st to the top of the 2nd beg sc. Hide the yarn tail end. [Total sts: 35 (36, 36)]
For Size 4 only -> Row 14 :
Sk the 1st st. Sc in the next 13 sts. Sc in the next 2 side sts. Turn. [Total sts: 15]
For Size 4 only -> Row 15 :
Sk the 1st st. Sc in the next 14 sts. Sc in the next 4 side sts. Turn. [Total sts: 18]
For Size 4 only -> Row 16 :
Sk the 1st st. Sc in the next 17 sts. Now crochet along the next 13 side sts. Sc2tog at the mid heel. Sc in the next 9 sts; moving all the way back to the starting point of this round. Cut the yarn leaving a short tail & thread it to a tapestry needle. Inv sl st to the top of the 2nd beg sc. Hide the yarn tail end. [Total sts: 39]
Edging for All Sizes :
Using CC2 yarn color, crochet 36 (36, 36, 39) sl sts around the top edge. End the sl st neatly. Cut the yarn short & hide the yarn tail ends. Tip: It is best to start at the mid-front of the shoe as it would be easier to hide the yarn tail ends behind the sts for a neat finish. [Total sts: 36 (36, 36, 39)]
— Pattern Guide Part 3: Shoe Strap :
Info :
The shoe straps are constructed with a macrame pattern called 'Knotted Chevron'. The green shoes' straps were made with light brown, white, dark brown, green (sport weight) yarn. The photo tutorial uses the following color sequence for illustration purposes only: brown > yellow > blue > white. First, cut 4 different colored yarns of your choice (about 130 cm long each except for 1 color which should be longer than the rest – about 150 cm long). The longest yarn (in this photo: white) will be used to make the button loops. Make 2 straps.
Groups :
The yarns should be according to the intended color sequence & divided into 2 groups: Group 1: Brown > Yellow > Blue > White. Group 2: White < Blue < Yellow < Brown. To divide them into 2 groups, fold the yarn strands in equal length & tie a loose knot (or stick adhesive tape) in the middle. Pin the mid-knot to a cushion or tape the mid-length to an immovable surface.
Button Loop :
Place the white yarn over the other 3 colors from Group 1 (as if forming the shape of a flipped number '4'). Yarn goes under all 3 other yarns & back up the loop. Pull white yarn tightly all the way up (to the tape). Repeat until you get the desired button loop length (just enough to fit your button through). If you are using a 2 cm diameter button, make the button loop twice the button's diameter - 4 cm (since the loop will be folded into half). When completed, untie the mid-knot if any, remove pins/tape & bend the loop. Pin/stick the bended loop onto the surface again.
Knitting Sequence - Section 1 :
The knotting sequence for Macramé Section 1 is summarized as below. Knot twice (2x) for every step. 1. G2Br over G1Y (knot 2x) 2. G1Y over G1Br (knot 2x) 3. G2Y over G2Br (knot 2x) 4. G2Y over G1Y (knot 2x) 5. G1Bl over G1Br (knot 2x) 6. G1Bl over G1Y (knot 2x) 7. G2Bl over G2Br (knot 2x) 8. G2Bl over G2Y (knot 2x) 9. G2Bl over G1Bl (knot 2x) 10. G1W over G1Br (knot 2x) 11. G1W over G1Y (knot 2x) 12. G2W over G2Br (knot 2x) 13. G2W over G2Y (knot 2x) 14. G2W over G1W (knot 2x) 15. G2W over G2Bl (knot 2x) 16. G2W over G1W (knot 2x)
Step 1 :
Start by working with the middle yarns (brown). Place Group 2 Brown (G2Br) yarn over Group 1 Brown (G1Br) yarn (as if forming the shape of a flipped number '4'). G2B goes under G1B & back up into the loop. Pull tightly until the tape. Knot twice.
Step 2 :
Place Group 1 Yellow (G1Y) yarn over Group 1 Brown (G1Br) yarn (as if forming the shape of the number '4'). G1Y goes under G1Br & back up into the loop. Pull tightly all the way up. Knot twice.
Step 3 :
Place Group 2 Yellow (G2Y) yarn over Group 2 Brown (G2Br) yarn (as if forming the shape of a flipped number '4'). G2Y goes under G2Br & back up into the loop. Pull tightly all the way up. Knot twice.
Step 4 :
Place Group 2 Yellow (G2Y) yarn over Group 1 Yellow (G1Y) yarn (as if forming the shape of a flipped number '4'). G2Y goes under G1Y & back up into the loop. Pull tightly all the way up. Knot twice.
Step 5 :
Place Group 1 Blue (G1Bl) yarn over Group 1 Brown (G1Br) yarn (as if forming the shape of the number '4'). G1Bl goes under G1Br & back up into the loop. Pull tightly all the way up. Knot twice.
Step 6 :
Place Group 1 Blue (G1Bl) yarn over Group 1 Yellow (G1Y) yarn (as if forming the shape of the number '4'). G1Bl goes under G1Y & back up into the loop. Pull tightly all the way up. Knot twice.
Step 7 :
Place Group 2 Blue (G2Bl) yarn over Group 2 Brown (G2Br) yarn (as if forming the shape of a flipped number '4'). G2Bl goes under G2Br & back up into the loop. Pull tightly all the way up. Knot twice.
Step 8 :
Place Group 2 Blue (G2Bl) yarn over Group 2 Yellow (G2Y) yarn (as if forming the shape of a flipped number '4'). G2Bl goes under G2Y & back up into the loop. Pull tightly all the way up. Knot twice.
Step 9 :
Place Group 2 Blue (G2Bl) yarn over Group 1 Blue (G1Bl) yarn (as if forming the shape of a flipped number '4'). G2Bl goes under G1Bl & back up into the loop. Pull tightly until the tape. Knot twice.
Step 10 :
Place Group 1 White (G1W) yarn over Group 1 Brown (G1Br) yarn (as if forming the shape of the number '4'). G1W goes under G1Br & back up into the loop. Pull tightly all the way up. Knot twice.
Step 11 :
Place Group 1 White (G1W) yarn over Group 1 Yellow (G1Y) yarn (as if forming the shape of the number '4'). G1W goes under G1Y & back up into the loop. Pull tightly all the way up. Knot twice.
Step 12 :
Place Group 1 White (G1W) yarn over Group 1 Blue (G1Bl) yarn (as if forming the shape of the number '4'). G1W goes under G1Bl & back up into the loop. Pull tightly all the way up. Knot twice.
Step 13 :
Place Group 2 White (G2W) yarn over Group 2 Brown (G2Br) yarn (as if forming the shape of a flipped number '4'). G2W goes under G2Br & back up into the loop. Pull tightly all the way up. Knot twice.
Step 14 :
Place Group 2 White (G2W) yarn over Group 2 Yellow (G2Y) yarn (as if forming the shape of a flipped number '4'). G2W goes under G2Y & back up into the loop. Pull tightly all the way up. Knot twice.
Step 15 :
Place Group 2 White (G2W) yarn over Group 2 Blue (G2Bl) yarn (as if forming the shape of a flipped number '4'). G2W goes under G2Bl & back up into the loop. Pull tightly all the way up. Knot twice.
Step 16 :
Place Group 2 White (G2W) yarn over Group 1 White (G1W) yarn (as if forming the shape of a flipped number '4'). G2W goes under G1W & back up into the loop. Pull tightly all the way up. Knot twice. You have completed Section 1.
Info :
At the start of Section 3, the brown yarn has moved to the middle and the yellow yarns are now at the sides. Carry on knotting from side to middle for each group & color sequence until you get the desired strap length.
— Pattern Guide Part 4: Assembly :
Attach Strap :
After you have made 2 straps, carefully position the strap across the shoe's body. The arrows should be pointing in opposite directions for both straps. Simply turn one of the straps counter-clockwise to mirror them. Thread the strap's yarn tails to a tapestry needle & sew them into the inner sides of the shoes. See Photo A-02.
Hide Tails :
Next, hide the yarn tails in between the double soles so that they will not show. Run the needle through several stitches as in Photo A-05. Knot the yarns to secure the strap in place and hide ends inside the shoe. See Photo A-03 and Photo A-04.
Sew Button :
Lastly, sew the button onto the opposite side of the shoe. For the right shoe, sew the button on the right side. For the left shoe, sew the button on the left side. Ensure the button lines up with the button loop. See Photo A-06.
— Pattern Guide Part 5: Blocking :
Blocking :
This step is optional. Wet some tissues and squeeze out excess water leaving it neither too wet nor dry. Stuff it around inside the shoe and shape accordingly. Leave them to dry under a fan or sun for a day. When the shoes have dried up, remove the tissues and the shoes are done. Congratulations! You have completed a pair of Tribal Baby Clogs!
These Tribal Baby Clogs are a heartfelt handmade gift that blend crochet and macrame for a unique look. The pattern includes full-size options, step-by-step photos and a clear knotting sequence for the chevron strap. Create beautiful, wearable baby shoes with pretty finishing details and share them with love. 🧶✨