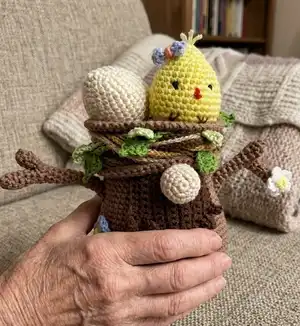
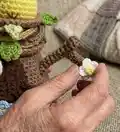
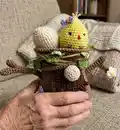
Make a charming Tree Gnome complete with a nest hat, grass details, a tiny egg and chick, and floral accents. This pattern guides you through shaping the hat, body, beard, arms (as sticks), and decorative chains step-by-step. You will learn simple shaping, working in BLO/FLO, and small accessory assembly to create a delightful display piece.
Progress Tracker
0% Complete
— Hat+Body :
Info :
Use a contrast thread to mark every beginning of rounds, do not remove it until the item is completed
Round 1 :
Light brown: 6SC in magic ring [6] tighten the ring
Round 2 :
INC in each of next 6sts [12]
Round 3 :
*(SC in next st, INC in next st) from*rep x6 [18]
Round 4 :
*(SC in next st, INC in next st, SC in next st) from*rep x6 [24]
Round 5 :
*(SC in next 3sts, INC in next st) from*rep x6 [30]
Round 6 :
*(SC in next 2sts, INC in next st, SC in next 2sts) from*rep x6 [36]
Round 7 :
*(SC in next 5sts, INC in next st) from*rep x6 [42]
Round 8 :
*(SC in next 3sts, INC in next st, SC in next 3sts)from*rep x6 [48] (pic 1)
Info :
Place a stitch marker into the last st of this round
Round 9 :
BPsc in each st around [48] (pic 2)
Round 10-13 :
SC in each st around [48] (pic 3)
Round 14 :
*(SC in next 7sts, INC in next st) from*rep x6 [54]
Round 15-16 :
SC in each st around [54]
Round 17 :
*(Ch1, sl st in next st) from*rep to end [54]
— Body :
Info :
Grab the nest base upside-down and with Light brown: start from a stitch marker work into stitches BLO
Round 1-2 :
SC BLO in each st around [48] (pic 4)
Round 3 :
SC in next 19sts, SC BLO in next 10sts (we will attach the beard to these sts), SC in next 19 sts [48] (pic 5)
Round 4-6 :
SC in each st around [48]
Round 7 :
SC in next 11sts, SC BLO in next 3 sts (we will attach the 'arm' to these sts), SC in next 20sts, SC BLO in next 3sts (we will attach the 'arm' to these sts), SC in next 11sts [48]
Round 8 :
SC in each st around [48]
Round 9 :
*(SC in next 7sts, INC in next st) from*rep x6 [54]
Round 10-11 :
SC in each st around [54] (pic 6)
Round 12 :
*(SC in next 4sts, INC in next st, SC in next 4sts)from*rep x6 [60]
Round 13 :
SC in each st around [60]
Round 14 :
*(SC in next 7sts, INC in next st, SC in next 7sts)from*rep x4 [64]
Round 15-17 :
SC in each st around [64]
Round 18 :
*(SC in next 3sts, SC2tog, SC in next 3sts) from*rep x8 [56]
Round 19-20 :
SC in each st around [56] Change to Grass Green in last st. Cut off Light brown
Round 21 :
Green grass: in this round we are going to imitate a grass. To make this you need to work SC around and make stitches of different length and lean stitches in different sides in a chaotic manner as it's shown in the pic [56]
Round 22 :
*(SC in next 5sts, SC2tog) from*rep x8 [48]
Round 23-24 :
SC in each st around [48]
Round 25 :
SC BLO in each st around [48]
Round 26 :
*(SC in next 2sts, SC2tog, SC in next 2sts) from*rep x8 [40]
Round 27 :
*(SC in next 3sts, SC2tog) from*rep x8 [32]
Round 28 :
*(SC in next st, SC2tog, SC in next st) from*rep x8 [24]
Round 29 :
*(SC in next sts, SC2tog)from*rep x8 [16]
Info :
Cut off thread and sew the opening
— Hat Brim :
Round 1 :
Light brown: Grab the detail upside-down and work into stitches FLO of the Rd 1 of the body starting from the beginning of rd: *(SC FLO in next 11 sts, INC FLO in next st) from*rep x4 [52]
Round 2 :
*(SC in next 6 sts, INC in next st, SC in next 6 sts) from*rep x4 [56]
Round 3 :
*(SC in next 13 sts, INC in next st) from*rep x4 [60]
— Stand :
Round 1 :
Green grass: Grab the item upside-down and work into stitches FLO of Rd 24 of the body starting from the beginning of rd: SC FLO in each st around
— Beard :
Info :
Dark brown: Chain 10
Row 1 :
SC in 2nd st from hook, SC in next 8sts, [9], Ch1 (turning chain), Turn
Row 2 :
SC in next 6sts [12], Ch6, Turn
Row 3 :
SC in 2nd st from hook, SC in next 10sts [11], Ch1, Turn
Row 4 :
SC in next 7sts, Ch6 [13], Turn
Row 5 :
SC in 2nd st from hook, SC in next 11sts [12], Ch1, Turn
Row 6 :
SC in next 8sts, Ch7 [19], Turn
Row 7 :
SC in 2nd st from hook, SC in next 13sts [14], Ch1, Turn
Row 8 :
SC in next 8sts, Ch5 [13], Turn
Row 9 :
SC in 2nd st from hook, SC in next 11sts [12], Ch1, Turn
Row 10 :
SC in next 7sts, Ch5 [12], Turn
Row 11 :
SC in 2nd st from hook, SC in next 10sts [11], Ch1, Turn
Row 12 :
SC in next 6sts, Ch5 [11], Turn
Row 13 :
SC in 2nd st from hook, SC in next 9sts [10]
Info :
Cut off the leaving a long tail for sewing
— Nose :
Round 1 :
Wheat: 6SC in magic ring [6] tighten the ring
Round 2 :
INC in each st around [12]
Round 3 :
*(SC in next st, INC in next st) from*rep x6 [18]
Round 4-5 :
SC in each st around [18]
Round 6 :
*(SC in next st, SC2tog) from*rep x6 [12]
Info :
Cut off thread leaving a long tail for sewing. Stuff the nose a bit. Attach (sew or glue) the nose to the beard
— Arms - Sticks :
Step 1 Long Stick - Round 1 :
Light brown: 6SC in magic ring [6] tighten the ring
Step 1 Long Stick - Round 2-6 :
SC in each st around [6]
Info :
For the second arm repeat the pattern Rd 1-5, cut off thread and go to STEP 2
Step 1 Long Stick - Round 7 :
SC in each st around, sl st [6]
Step 2 Short Stick - Round 1 :
Light brown: 6SC in magic ring [6] tighten the ring
Step 2 Short Stick - Round 2-3 :
SC in each st around [6] Do not cut off thread. Go to STEP 3
Step 3 Continue - Assemble :
1. Arrange together the long and the short sticks as illustrated in the image
Step 3 Continue - Assemble :
2. Insert your hook through stitches of both fabrics and make SC
Step 3 Continue - Assemble :
3. Make SC in next 3 stitches the same way
Step 3 Continue - Assemble :
4. Continue crocheting SC in next 3 stitches of the stick that is above and continue working SC in next 6 stitches of the edge make 10 rounds. For the second arm make 12 rounds
Info :
Sew the beard with the nose on the body under the hat brim in front (10 stitches FLO). Attach sticks to the body (3 stitches FLO on sides under the hat brim)
— Arms - Chains & Leaves :
Info :
Dark brown: Crochet two chains - 60 cm and 30 cm length. Light brown: Crochet a chain - 60 cm length. Wheat: Crochet a chain - 30 cm length. Honey Caramel: Crochet two chains - 60 cm and 30 cm length. Beige: Crochet two chains - 60 cm and 30 cm length
Info :
Make one chain with leaves with Light green and one chain with Dark green
Leaf Pattern :
*(Chain15, 2 unfinished DC into 5th st from hook (3 loops on hook) Yarn over and draw through all loops on your hook, Ch2, sl st in 2nd st from hook, Ch3, sl st in same st as prev DCs). The first leaf is completed from*rep x7, sl st in next st of a chain to fix the thread. Make one more chain with leaves with Light Green but make 10 repeats
Info :
Arrange chains all together and twist. Pin to the hat on the back
Info :
Wrap around the hat, take out and spreading green leaves if they are hidden
Info :
Fix in place all chains with a sewing thread (brown) and a sewing needle
— Egg :
Round 1 :
Off-white: 6SC in magic ring [6] tighten the ring
Round 2 :
INC in each st around [12]
Round 3 :
*(SC in next st, INC in next st)from*rep x6 [18]
Round 4 :
SC in each st around [18]
Round 5 :
*(SC in next st, INC in next st, SC in next st)from*rep x6 [24]
Round 6-7 :
SC in each st around [24]
Round 8 :
*(SC in next 3 sts, INC in next st)from*rep x6 [30]
Round 9-14 :
SC in each st around [30]
Round 15 :
*(SC in next 3sts, SC2tog) from*rep x6 [24]
Round 17 :
*(SC in next st, SC2tog, SC in next st)from*rep x6 [18]
Round 18 :
*(SC in next st, SC2tog) from*rep x6 [12]
Info :
Stuff, pull the thread through the edge stitches, and tighten the opening
— Chick :
Info :
Light Yellow: repeat the egg pattern. Dark brown: Embroider eyes. Light Brown: embroider legs. Red: embroider a beak
— Bow :
Row 1 :
SC in 2nd st from hook, SC in next 4sts [5], Ch1, Turn
Row 2 :
SC in each st around [5]
Info :
Cut off thread leaving a long tail for assembling. Tie the middle of the item and attach(sew or glue) the bow to the chick's head
— Flower Pattern :
Info :
With a required color: in magic ring: *(Ch2, 3DC, Ch2, sl st)from*rep x5 Tighten the ring. Cut off thread with the yarn and sewing needle embroider Bullion Knot:
Info :
1. (pic on next page) Bring the needle out through A and put the needle through B at the desired length.
Info :
2. Now, bring the needle out through A again. Then, wind the thread around the needle as shown. The distance of the wound thread should measure the same as the distance between A and B. Too few wraps will spoil the stitch.
Info :
3. Then, hold the wrapped thread with your fingers and pull the needle out with the other finger. Keep pulling the needle completely in an upward direction till the wraps lay on the fabric as shown above. Adjust and straighten the wraps if required and put in the needle back through B.
Info :
4. The finished bullion stitch would look like this.
This Tree Gnome is a whimsical, nature-inspired amigurumi that brings a little forest charm to your home. The nest hat, tiny chick and egg, and braided chains with leaves make it a handcrafted delight you will enjoy displaying. Make one as a gift or a seasonal centerpiece — crochet happiness in every stitch! 🧶🌿