About This The Little Sheep Amigurumi Pattern
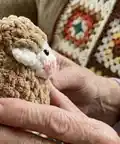
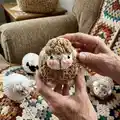
This pattern teaches you how to crochet a small fluffy sheep using chunky velvet-style yarn and bobble stitches for texture. It includes step-by-step round instructions for the body and head plus finishing tips for the face and assembly. The finished toy is compact, cuddly, and perfect as a gift or cute home accent.

Detailed abbreviations and notes are provided to help you master the bobble and invisible decrease techniques. Video links are included to show key steps like weaving the yarn tail and sewing the head in place.
Why You'll Love This The Little Sheep Amigurumi Pattern
I absolutely love this pattern because it turns simple stitches into a charming, tactile toy that brings a smile. I enjoy how quickly the sheep takes shape when using velvet yarn—the texture makes the piece look professionally finished with minimal effort. I also love that the pattern includes video links and clear notes, which makes tricky steps much easier to learn. Sharing this pattern lets me pack a lot of cute detail into a small project that makes perfect gifts.
Switch Things Up
I love how easy it is to customize this little sheep by changing yarn colors; for a playful look try pastel combinations or bold brights for a modern toy.
If you want a larger version, use a thicker bulky yarn and a bigger hook; this will make a plush, cuddly sheep perfect for toddlers or pillows.
To make a tiny keychain, use thinner yarn and a smaller hook, attach a keyring to the top of the head before finishing, and adjust the stuffing level to be firm.
I often experiment with different bobble stitch sizes to vary the texture; try bo2 and bo4 strategically to create contrasting wool patterns.
For a more realistic sheep, embroider small details like eyebrows or ear creases, and use darker yarn to add shading under the chin and around the eyes.
I like to create mini outfit accessories — a tiny scarf or flower crown — crocheted separately and sewn on for seasonal themes or gifting.
You can add wire to the legs for posability if you want a standing display piece; make sure to encase the wire well and secure it inside the stuffing.
If you prefer felt over embroidery for facial features, cut small felt shapes for the muzzle and glue or sew them in place for a different look.
Swap safety eyes for embroidered eyes if the toy is for very young children to make it fully soft and safe; use French knot or satin stitch for expressive results.
I recommend trying different blush methods — powder, pastel chalk, or embroidery floss — to experiment with facial expressions and character.
Common Mistakes & How to Fix Them
✗ Skipping stitch markers during rounds can cause you to lose the beginning of the round; place a stitch marker at the first stitch and move it each round.
✗ Not stuffing gradually results in lumps and poor shaping; add small amounts of fiberfill while checking shape frequently for even filling.
✗ Pulling your tension too tight when using velvet yarn makes stitches difficult to work; keep a relaxed, even tension to preserve the yarn texture.
✗ Forgetting to count stitches after increases or decreases leads to uneven shaping; count at the end of each round to ensure correct stitch numbers.