🧢 Beautiful ✨ Detailed πŸ’ Adorable

Stripy Shell Stitches Crochet Hat Pattern

Stripy Shell Stitches Crochet Hat Pattern
4.4β˜… Rating
2-3 Hours Time Needed
1.7K Made This
βœ‚οΈ

Beginner Friendly Level

Perfect for those just starting their crochet journey, with clear instructions and simple techniques

⏱️

Bite-Sized Project

Finishes in 2-4 hoursβ€”perfect for an afternoon of creative relaxation.

πŸ‘•

Casual Chic

Relaxed style with a modern twist, perfect for everyday wear while maintaining that handcrafted uniqueness.

About This Stripy Shell Stitches Crochet Hat Pattern

This pattern creates a striped shell-stitch adult hat featuring a folded ribbed brim and a decorative shell body. It uses Red Heart Super Saver Stripes for an easy striped effect without frequent color changes. The pattern includes instructions for the ribbing, shell stitch rounds, shaping the top, and making a pompom to finish.
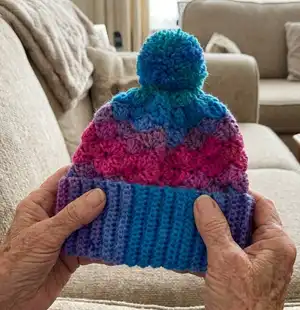
Stripy Shell Stitches Crochet Hat Pattern crochet pattern - detailed view of completed project

Designed for ease and a beautiful textured finish, the hat is constructed in the round after making a sideways ribbing foundation. The pattern includes gauge info and tips so you can adjust sizing if needed.

Why You'll Love This Stripy Shell Stitches Crochet Hat Pattern

I absolutely love this pattern because the striped self-striping yarn creates beautiful color transitions with no extra effort. I adore the shell stitch texture β€” it adds personality and depth to a simple beanie. The folded ribbing gives a snug, polished finish that stays in place and looks great with the shells above. Making the pompom is the perfect joyful finishing step that really brings the hat together and makes it gift-ready.

Stripy Shell Stitches Crochet Hat Pattern step 1 - construction progress Stripy Shell Stitches Crochet Hat Pattern step 2 - assembly progress Stripy Shell Stitches Crochet Hat Pattern step 3 - details and accessories Stripy Shell Stitches Crochet Hat Pattern step 4 - final assembly and finishing

Switch Things Up

I love customizing this hat by switching yarn colors or weights to create different looks; try variegated yarn for subtle stripes or solid colors for a bolder shell effect.

You can make a smaller or larger version by changing yarn weight and hook size; use a DK yarn with a smaller hook for a sleeker hat or bulky yarn for a chunky, speedy version.

I often add a faux fur pompom or mix yarn types for the pompom for a luxe finish; you can also make the pompom larger or smaller to suit your style.

Try alternating solid rounds between stripe sections if you want more defined color blocks instead of continuous striping from self-striping yarn.

For extra warmth, sew a thin fleece lining inside the hat; it helps retain heat without altering the outside look and keeps seams comfortable against the skin.

Adjust the brim depth by working fewer or more ribbing rows before joining; a shorter brim makes a slouchier hat and a deeper brim gives more ear coverage.

I sometimes substitute front post or back post ribbing for a different texture on the brim; this changes the look but keeps the overall construction the same.

Embroider a small motif or add a crocheted flower to the brim for a personalized touch that makes the hat a unique gift.

To make a child-sized hat, reduce the number of foundation stitches and measure as you go; maintain shell repeat multiples and measure against the intended head circumference.

Consider adding a lining band or decorative buttons on the brim for a contemporary twist and to secure the folded brim in place more permanently.

Common Mistakes & How to Fix Them

βœ— Not checking gauge before starting can result in a hat thats too large or too small; make a 4" (10 cm) swatch of 13 sc and 16 rows and adjust hook size to match the gauge. βœ— Skipping the instruction to fold the ribbing in half before sewing can leave the brim floppy; fold the ribbing to the RS and sew the two layers together securely for a neat turned brim. βœ— Joining the ribbing on the wrong side or working through only one layer will distort the edge; when joining, work with WS facing and stitch through both thicknesses of the foundation chain and the last row. βœ— Forgetting to keep consistent tension during shell rounds causes uneven shells and mismatched stripes; work at an even, relaxed tension and count stitches at the end of each repeat to ensure consistency. βœ— Not leaving a long tail when fastening off the shell rounds makes finishing difficult; leave a long end when fastening off so you can thread and secure the top neatly when closing.
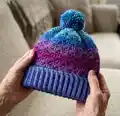
Stripy Shell Stitches Crochet Hat Pattern

Make a cozy, colorful Stripy Shell Stitches hat with this easy crochet pattern. Youll work simple ribbing and a shell stitch body to create a textured, striped beanie thats perfect for gifts or everyday wear. Clear instructions guide you from foundation chain to finishing touches, including making and attaching a fluffy pompom.

Beginner Friendly 2-3 Hours

Materials Needed for Stripy Shell Stitches Crochet Hat Pattern

β€” Main Fabric

  • 01
    Red Heart Super Saver Stripes (5 oz/141 g; 236 yds/215 m) Polo Stripe (4960) - 2 balls (approx 299 yds / 273.5 m total)
  • 02
    Use self-striping yarn for the pictured effect or substitute a worsted weight (#4) yarn in 200-300 yds total

β€” Tools Required

  • 01
    Crochet hook size U.S. H/8 (5 mm) Susan Bates Silvalume crochet hook or size needed to obtain gauge
  • 02
    Susan Bates yarn needle
  • 03
    Scissors (for pompom and trimming)
  • 04
    Your fingers for winding pompom

Progress Tracker

0% Complete

β€” Abbreviations :

Infos :

Approx = Approximately. Beg = Beginning. Ch = Chain(s). Dc = Double crochet. Hdc = Half double crochet. Pat = Pattern. Rem = Remaining. Rep = Repeat. Rnd(s) = Round(s). RS = Right side. Sc = Single crochet. Scbl = Single crochet through back loop. Sl st = Slip stitch. Sp(s) = Space(s). St(s) = Stitch(es). WS = Wrong side.

β€” Size & Gauge :

Info :

Size: One size to fit Adult.

Info :

Gauge: 13 sc and 16 rows = 4" [10 cm].

Info :

Note: Ch 3 at beg of rnd counts as dc.

β€” Ribbing :

Round 1 :

Ch 21. 1 sc in 2nd ch from hook and each ch to end of chain. Turn. 20 sc.

Round 2 :

Ch 1. 1 scbl in each st to end of row. Turn.

Round 3 :

Rep last row until work, when slightly stretched, measures 19Β½" [49.5 cm], ending on a RS row. Do not fasten off.

Info :

Join ribbing: With WS facing, working through both thicknesses of foundation ch and last row of ribbing, work 1 sc in each sc to end of row. Do not fasten off. Turn Ribbing sideways and work 72 sc evenly around long edge of Ribbing. Join with sl st to first sc.

β€” Shell Pattern :

Round 1 :

Ch 1. 1 sc in same sp as sl st. *Skip next 2 sc. 5 dc in next sc. Skip next 2 sc. 1 sc in next sc. Rep from * to last 5 dc. Skip next 2 dc. 1 sc in next dc. Skip next 2 dc. 2 dc in first sc. Join with sl st to top of ch 3.

Round 2 :

Ch 3. 2 dc in same sp as sl st. *Skip next 2 dc. 1 sc in next dc. Skip next 2 dc. 5 dc in next sc. Skip next 2 dc. 1 sc in next dc. Skip next dc. 3 dc in next sc. Rep from * to last 3 dc. Skip next 2 dc. 1 sc in next dc. Skip next dc. 1 dc in first sc. Join with sl st to top of ch 3.

Round 3 :

Ch 1. 1 sc in same sp as sl st. *Skip next 2 dc. 1 hdc in next sc. Skip next dc. 1 sc in next dc. Rep from * to last sc and dc. Skip next dc. 1 hdc in next sc. Skip next dc. Join with sl st to first sc. 28 sts.

Info :

Rep 2nd and 3rd rnds for Shell St Pat until work from first rnd of sc after Ribbing measures approx 6Β½" [16.5 cm], ending on 2nd rnd.

Round 4 :

Ch 1. 1 sc in each st around. Join with sl st to first sc. Fasten off, leaving long end. Thread end through front loops of rem sts. Pull tightly. Fasten securely. Fold Ribbing in half to RS.

β€” Shape top :

Round 1 :

Ch 1. 1 sc in same sp as sl st. *Skip next 2 dc. 3 dc in next sc. Skip next 2 dc. 1 sc in next dc. Rep from * to last sc and 2 dc. Skip next 2 dc. 3 dc in next sc. Skip next 2 dc. Join with sl st to first sc. 50 sts.

Round 2 :

Ch 3. 1 dc in same sp as sl st. *Skip next dc. 1 sc in next dc. Skip next dc. 3 dc in next sc. Skip next 2 dc. 1 sc in next dc. Rep from * to last 3 dc. Skip next dc. 1 sc in next dc. Skip next dc. 1 dc in first sc. Join with sl st to top of ch 3.

Round 3 :

Ch 1. 1 sc in same sp as sl st. *Skip next 2 dc. 1 hdc in next sc. Skip next dc. 1 sc in next dc. Rep from * to last sc and dc. Join with sl st to first sc. (Continue shaping as established until top is shaped and hole is closed.)

β€” Finish & Pompom :

Info :

Fasten off leaving long tail if needed to pull remaining stitches closed and secure. Thread end through rem sts, pull tightly, and fasten securely. Fold Ribbing in half to RS if not already done and adjust brim.

Item Name (P1) :

Pompom: Wind yarn around 3 fingers 100 times. Tie tightly in the middle and leave a long end for attaching to Hat. Cut loops at both ends and trim to smooth round shape. Sew securely to top of Hat.

Assembly Instructions

  • Join ribbing: With WS facing, work 1 sc through both thicknesses of foundation chain and last row of ribbing across, then do not fasten off; turn ribbing sideways and work 72 sc evenly around long edge, join with sl st to first sc.
  • Fold the ribbing in half to the RS and align the fold to create the turned brim, then whipstitch or mattress stitch the back seam closed neatly.
  • Proceed to work the Shell Stitch pattern in the round from the 72 sc foundation; work the required number of shell repeats until the shell section measures approximately 6Β½" [16.5 cm] from the first rnd of sc after the ribbing.
  • Shape the top by following the Shape top rounds exactly, then pull the remaining stitches together using the long tail and secure firmly to close the crown.
  • Sew the pompom to the center top of the hat using the long end left from the pompom tie, knot securely on the inside of the hat, and weave in all ends.

Important Notes

  • πŸ’‘Use stitch markers to mark the beginning of each round and the center of repeats for easy counting and consistent shell placement.
  • πŸ’‘Do not fasten off at points indicated; leaving a long tail for finishing helps close the top and secure your work properly.
  • πŸ’‘Fold the ribbing to the right side before final finishing so the brim sits neatly when worn and the stripes continue evenly.
  • πŸ’‘Work the joining step with the wrong side facing and stitch through both layers of the ribbing foundation to create a stable base for the shell rounds.

This Stripy Shell Stitches Crochet Hat is a quick, colorful project youll love making and gifting. The self-striping yarn creates effortless color transitions while the shell stitch adds playful texture. Add a big fluffy pompom to finish, and youve got a cozy, stylish beanie ready to wear! 🧢✨

You ask,

we answer.

FAQs

What size will the finished piece be?

The finished hat is one size to fit an adult; gauge and finished measurements are provided so you can adjust hook size or yarn to fit larger or smaller heads.

Can I use different yarn weights for this pattern?

Yes, you can substitute yarn weights but this will affect the final size; be sure to make a gauge swatch and adjust hook size to achieve 13 sc and 16 rows = 4" (10 cm).

Do I need prior crochet experience for this pattern?

This pattern is rated beginner friendly and uses basic stitches like single crochet, double crochet, and half double crochet, so basic crochet knowledge is recommended.

How long does this project typically take to complete?

Most crocheters complete this hat in a couple of hours; typical completion time is around 2-3 hours, depending on experience and pace.