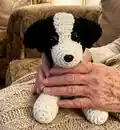
🧢 Beautiful ✨ Detailed πŸ’ Adorable

Tip The Border Collie Amigurumi Pattern

Tip The Border Collie Amigurumi Pattern
4.8β˜… Rating
5-7 Hours Time Needed
3.1K Made This
βœ‚οΈ

Beginner Friendly Level

Perfect for those just starting their crochet journey, with clear instructions and simple techniques

⏱️

Weekend Treat

Takes 5-7 hours, making it an enjoyable project to finish over a couple of days.

🧸

Cute Companion

An adorable friend to cherish, handcrafted with love to bring comfort and joy for years to come.

About This Tip The Border Collie Amigurumi Pattern

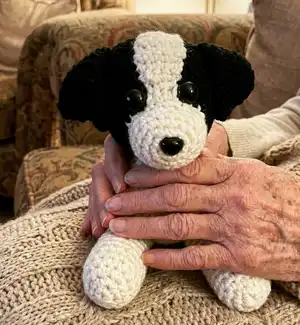
This pattern creates Tip, a small Border Collie amigurumi with a two-tone cream and black body, floppy ears, and a stitched muzzle. It includes complete round-by-round instructions for the head, muzzle, ears, body, legs and tail. The pattern uses basic single crochet techniques and an invisible single crochet decrease for shaping.

Tip The Border Collie Amigurumi Pattern crochet pattern - detailed view of completed project

Designed to be beginner friendly, it includes helpful placement notes for eyes, nose and sewn pieces. Finished toy measures approximately 9" long and 6" tall when lying flat.

Why You'll Love This Tip The Border Collie Amigurumi Pattern

I absolutely love this pattern because it captures the sweet personality of a Border Collie in a simple, approachable design. I enjoy how the contrasting cream and black colors create charming markings with minimal sewing. I also appreciate that the instructions are written clearly so crocheters of many levels can follow along and feel confident. Making Tip feels quick and rewarding, and I always find the finished toy brings smiles to both kids and adults.

Tip The Border Collie Amigurumi Pattern step 1 - construction progress Tip The Border Collie Amigurumi Pattern step 2 - assembly progress Tip The Border Collie Amigurumi Pattern step 3 - details and accessories Tip The Border Collie Amigurumi Pattern step 4 - final assembly and finishing

Switch Things Up

I love experimenting with color placement to make new personalities for Tip, so try swapping the cream and black areas for fun variations.

I sometimes change yarn weight and hook size to make a mini keychain version or a larger cuddle-sized dog; adjusting yarn and hook will change the finished size.

I add embroidered eyebrows or mouth lines for different facial expressions β€” small changes in eye placement or muzzle position can create big personality shifts.

I also enjoy adding tiny accessories like a crocheted scarf, collar, or bandana to add character and make a gift feel custom-made.

I recommend swapping safety eyes for embroidered eyes for a fully child-safe toy, especially for little ones under three.

I often vary ear shaping by folding and tacking differently before sewing to get perky or floppy ears as I prefer.

If I want a more rustic look I use a slightly fuzzier yarn or alpaca blend to create a soft, well-loved appearance.

I sometimes stuff less firmly for a softer, more floppy body or more firmly for a sturdier, poseable toy depending on how I plan to display it.

I like to mix in a small bell or rattle inside the stuffing for baby-friendly sensory projects β€” just make sure it is securely enclosed if used.

When making a set, I change nose and eye sizes slightly to vary expressions across a litter of pups; experimenting with tiny details makes each one unique.

Common Mistakes & How to Fix Them

βœ— Using a much larger hook than recommended will make the stitches too loose; use the suggested F (3.75 mm) hook to keep stitches tight and stuffing hidden. βœ— Skipping stitch markers while working continuously in rounds can cause you to lose count; mark the end of each round with a scrap yarn tail or marker and move it up as you work. βœ— Overstuffing the head or body distorts shaping and makes seams difficult to close; stuff gradually and evenly, adding small amounts until you reach the desired firmness. βœ— Attaching safety eyes too close or too far apart will change the expression; place eyes through the stitches of round 4 and keep them approximately 5 stitches apart as in the sample. βœ— Forgetting to leave long yarn tails for sewing makes assembly harder later; fasten off leaving longer lengths where the pattern instructs to make sewing and finishing easier.

Tip The Border Collie Amigurumi Pattern

Make a cuddly Tip the Border Collie with this easy amigurumi crochet pattern. You will find clear round-by-round instructions, a full materials list, and helpful assembly notes so you can create a lovable stuffed dog. This pattern celebrates the children's book Tip Counts to Ten and makes a perfect handmade gift for kids or collectors.

Beginner Friendly 5-7 Hours

Materials Needed for Tip The Border Collie Amigurumi Pattern

β€” Main Fabric

  • 01
    Worsted weight yarn (#4) - Black - approx. 110 yards
  • 02
    Worsted weight yarn (#4) - Cream - approx. 110 yards

β€” Tools Required

  • 01
    Crochet hook size F (3.75 mm)
  • 02
    16 mm safety eyes (2)
  • 03
    16 mm safety nose (1)
  • 04
    Stuffing (polyester fiberfill)
  • 05
    Yarn needle for sewing
  • 06
    Stitch markers or short length of contrasting yarn
  • 07
    Scissors

Progress Tracker

0% Complete

β€” Head :

Round 1 :

Beginning at front of head with black, make a magic ring, ch 1, 6 sc in ring. Pull yarn end to tighten ring. (6 sc) Do not join; Work continuously in rnds. Mark end of rnd with a short length of yarn in a contrasting color and move marker up as you work.

Round 2 :

2 sc in each sc around. (12 sc)

Round 3 :

(Sc in next sc, 2 sc in next sc) around. (18 sc)

Round 4 :

(Sc in next 2 sc, 2 sc in next sc) around. (24 sc)

Round 5 :

(Sc in next 3 sc, 2 sc in next sc) around. (30 sc)

Round 6 :

(Sc in next 4 sc, 2 sc in next sc) around. (36 sc)

Round 7-12 :

Sc in each sc around. (36 sc)

Round 13 :

(Sc in next 4 sc, sc dec) around. (30 sc)

Round 14 :

(Sc in next 3 sc, sc dec) around. (24 sc)

Round 15 :

(Sc in next 2 sc, sc dec) around. (18 sc)

Info :

Attach safety eyes. Sample had eyes attached thru sts of rnd 4, 5 sts apart. Stuff head.

Round 16 :

(Sc in next sc, sc dec) around. (12 sc)

Round 17 :

(Sc dec) around. (6 sc)

Info :

Fasten off, leaving a longer length of yarn. Weave yarn end through remaining 6 sc and draw to a close. Pull yarn end to inside of head to hide. Set aside.

β€” Muzzle :

Round 1-3 :

Beginning at front of muzzle with cream, work as per rnds 1-3 of head. (18 sc)

Round 4-6 :

Sc in each sc around. (18 sc) At end of rnd 6, join with sl st to 1st sc.

Info :

Continue working in rows:

Row 1 :

Ch 1, sc in same sp and in next 2 sc. Turn. (3 sc) (There is intentionally no ch-1 at the end of these rows.)

Row 2-3 :

Sc in each sc across. Turn. (3 sc)

Row 4 :

2 sc in 1st sc, sc in next 2 sc. Turn. (4 sc)

Row 5-10 :

Sc in each sc across. Turn. (4 sc) Fasten off, leaving a longer length of yarn for sewing.

Info :

Attach safety nose at center front of muzzle.

Info :

Stuff muzzle and sew in place at front of head. The rnds of the muzzle are positioned directly below the eyes, with the rows positioned between the eyes, stretching up to the top of the head. Refer to photos for help with placement.

β€” Ears (make 2) :

Round 1 :

Beginning at tip of ear with black, make a magic ring, ch 1, 3 sc in ring. Pull yarn end to tighten ring. (3 sc) Do not join; Work continuously in rnds. Mark end of rnd with a short length of yarn in a contrasting color and move marker up as you work.

Round 2 :

2 sc in each sc around. (6 sc)

Round 3 :

Sc in each sc around. (6 sc)

Round 4 :

(Sc in next sc, 2 sc in next sc) around. (9 sc)

Round 5 :

Sc in each sc around. (9 sc)

Round 6 :

(Sc in next 2 sc, 2 sc in next sc) around. (12 sc)

Round 7 :

Sc in each sc around. (12 sc)

Round 8 :

(Sc in next 3 sc, 2 sc in next sc) around. (15 sc)

Round 9-11 :

Sc in each sc around. (15 sc)

Round 12 :

(Sc in next sc, sc dec) around. (10 sc)

Round 13 :

Sc in each sc around. (10 sc) Fasten off, leaving a longer length of yarn for sewing.

Info :

Flatten and sew ear closed through sts of rnd 13.

Info :

Sew ear in place at side of head, leaving approx. 3 black sts visible between ear and front of muzzle. Sew in place in line with top of muzzle. Fold ear down and tack in place at side of head in line with eyes. Sew in place securely, also tacking wider back part of folded ear to top and/or side of head to get desired look.

β€” Body – Part 1 :

Round 1-12 :

Beginning at front of body with cream, work as per rnds 1-12 of head. (36 sc) At end of rnd 12, join with sl st to 1st sc.

Info :

Continue working in rows:

Row 1 :

Ch 1, working in front loops only, sc in same sp and in next 8 sc. Turn. (9 sc) There is intentionally no ch-1 at the end of these rows.

Row 2-9 :

Working through both loops, sc in each sc across. Turn. (9 sc)

Row 10 :

Sc in 1st sc, sc dec, sc in each sc across to last 3 sc, sc dec, sc in last sc. Turn. (7 sc)

Row 11 :

Sc in each sc across. Turn. (7 sc)

Row 12 :

Repeat row 10. (5 sc)

Row 13-20 :

Sc in each sc across. Turn. (5 sc) Fasten off, leaving a longer length of yarn for sewing.

β€” Body – Part 2 :

Info :

Continue working in rnds – working into sts of rnd 12 of body – part 1.

Round 13 :

Join black with sc in 1st remaining back loop of rnd 12, sc in remaining back loop of next 8 sc of rnd 12, sc in both loops of next 27 sc of rnd 12. (36 sc)

Round 14-26 :

Sc in each sc around. (36 sc)

Round 27 :

(Sc in next 4 sc, sc dec) around. (30 sc)

Round 28 :

(Sc in next 3 sc, sc dec) around. (24 sc)

Round 29 :

(Sc in next 2 sc, sc dec) around. (18 sc)

Info :

Stuff body.

Round 30 :

(Sc in next sc, sc dec) around. (12 sc)

Round 31 :

(Sc dec) around. (6 sc) Fasten off, leaving a longer length of yarn. Weave yarn end through remaining 6 sc and draw to a close. Pull yarn end to inside of body to hide.

Info :

Sew cream underside of body – part 1 in place on top of black body – part 2. End of cream underside should be positioned at center back of body. Refer to photo.

β€” Front Legs (make 2) :

Round 1-2 :

With cream, work as per rnds 1-2 of head. (12 sc)

Round 3-12 :

Sc in each sc around. (12 sc) At end of rnd 12, join with sl st to 1st sc. Fasten off, leaving a longer length of yarn for sewing.

Info :

Stuff leg. Flatten end of leg and sew closed. Sew leg in place at front of body so that it can lay flat. Refer to photos for help with placement.

β€” Hind Legs (make 2) :

Round 1-5 :

With cream, work as per rnds 1-5 of front legs. (12 sc) At end of rnd 5, join with sl st to 1st sc. Fasten off.

Round 6 :

Join black with sc in any sc of rnd 5 and sc in each sc around. (12 sc)

Round 7-12 :

Sc in each sc around. (12 sc) At end of rnd 12, join with sl st to 1st sc. Fasten off, leaving a longer length of yarn for sewing.

Info :

Stuff leg. Flatten end of leg and sew closed. Sew leg in place at back of body so that it can lay flat. Refer to photos for help with placement.

β€” Tail :

Round 1 :

Beginning at tip of tail with cream, make a magic ring, ch 1, 3 sc in ring. Pull yarn end to tighten ring. (3 sc)

Round 2 :

2 sc in each sc around. (6 sc)

Round 3 :

Sc in each sc around. (6 sc) Join with sl st to 1st sc and fasten off.

Round 4 :

Join black with sc in any sc of rnd 3 and sc in each sc around. (6 sc)

Round 5 :

(Sc in next 2 sc, 2 sc in next sc) twice. (8 sc)

Round 6-7 :

Sc in each sc around. At end of last rnd, join with sl st to 1st sc.

Info :

Fasten off, leaving a longer length of yarn for sewing. Flatten top end of tail and sew closed. There is no need to stuff the tail unless you wish to stuff it lightly. Sew tail in place at top back of body.

Info :

Special Stitches: Invisible Single Crochet Decrease (sc dec) – Insert hook under front loop only of 1st sc, insert hook under front loop only of 2nd sc, yo, pull yarn through both sts, yo, pull through all loops on hook.

Assembly Instructions

  • Attach the muzzle to the front of the head so that the rnds of the muzzle sit directly below the eyes and the rows sit between the eyes, stretching up toward the top of the head; sew securely using the long yarn tail.
  • Sew ears to the sides of the head; leave approximately 3 black stitches visible between the ear and the front of the muzzle and fold the ear down, tacking the wider back part to the top or side of the head for the desired look.
  • Sew the cream underside (body – part 1) onto the black body (body – part 2), positioning the end of the cream underside at the center back of the body and matching edges as shown in the photos.
  • Position front legs at the front of the body and hind legs at the back so each leg lays flat; stuff legs, flatten ends and sew closed before attaching, using photos for spacing guidance.
  • Flatten tail top end and sew closed, then tack tail in place at the top back of the body; tail may be left unstuffed or lightly stuffed before sewing.

Important Notes

  • πŸ’‘Work continuously in rounds for pieces that instruct 'Do not join' and use a stitch marker or short scrap yarn to mark the end of each round and move it up as you work.
  • πŸ’‘Leave longer yarn tails where indicated for sewing pieces together to make assembly quicker and easier without needing to add extra yarn later.
  • πŸ’‘Refer to the photos for placement of eyes, muzzle, ears and legs; sample placement: eyes through stitches of round 4 and spaced about 5 stitches apart.

This sweet Tip the Border Collie amigurumi is a heartwarming project inspired by the children\'s book Tip Counts to Ten. It\'s a charming toy that makes a thoughtful handmade gift for kids and collectors alike. Enjoy creating cuddly memories as you crochet each delightful detail. 🧢🐢

You ask,

we answer.

FAQs

What size will the finished piece be?

The finished amigurumi measures approximately 9 inches long (nose to tip of tail) and about 6 inches tall lying flat using worsted weight yarn and a 3.75 mm hook.

Can I use different yarn weights for this pattern?

Yes, you can use different yarn weights but the final size will change; use an appropriate hook for your yarn and expect to adjust stuffing and placement accordingly.

Do I need prior crochet experience for this pattern?

This pattern is labeled easy and is beginner friendly, but you should be comfortable with single crochet, increases, decreases and working in rounds for best results.

How long does this project typically take to complete?

Most crocheters complete this project in 5-7 hours, though time may vary based on experience level and how much time you spend on assembly and finishing.