🧢 Beautiful ✨ Detailed πŸ’ Adorable

Seven Dwarfs Amigurumi Pattern

Seven Dwarfs Amigurumi Pattern
4.5β˜… Rating
5-7 Hours Time Needed
1.4K Made This
βœ‚οΈ

Intermediate Level

Ideal for those with basic crochet experience, featuring slightly more advanced stitches and techniques to expand your skills.

⏱️

Weekend Treat

Takes 5-7 hours, making it an enjoyable project to finish over a couple of days.

🧸

Cute Companion

An adorable friend to cherish, handcrafted with love to bring comfort and joy for years to come.

About This Seven Dwarfs Amigurumi Pattern

This pattern teaches you how to crochet a set of seven tiny dwarfs, each with a hat, beard option (short or long), nose, ears and embroidered faces. The pattern uses YarnArt Jeans yarn and includes bobble stitches for the textured beards. The instructions include all pieces and clear assembly photos to help you finish each dwarf beautifully.

Seven Dwarfs Amigurumi Pattern crochet pattern - detailed view of completed project

Make each dwarf unique by changing hat colors and facial embroidery β€” the pattern gives sample yarn colours and placement tips. Detailed parts and step-by-step rounds make it easy to follow for intermediate crocheters.

Why You'll Love This Seven Dwarfs Amigurumi Pattern

I absolutely love this pattern because it brings the classic dwarfs to life in a small, collectible format that is fun to crochet. I enjoy the playful personalities you can create with simple changes to eyes, eyebrows and blush. The textured beards (short and long) are one of my favourite details β€” they add so much character with bobble stitch work. Sewing and assembling each tiny piece is a satisfying finishing step that makes the set feel handmade and special.

Seven Dwarfs Amigurumi Pattern step 1 - construction progress Seven Dwarfs Amigurumi Pattern step 2 - assembly progress Seven Dwarfs Amigurumi Pattern step 3 - details and accessories Seven Dwarfs Amigurumi Pattern step 4 - final assembly and finishing

Switch Things Up

I love experimenting with colour combinations for each dwarf, so try pastel hats for a softer look or bright primaries for a playful set.

I often change the beard style β€” use the short beard for cuter, rounder faces and the long beard for dramatic, characterful dwarfs.

If you want a bigger dwarf, I change to a thicker yarn and larger hook; conversely use finer yarn and a smaller hook to make mini keychain versions.

I sometimes add tiny accessories like a crocheted flower, button belt or felt tools to make each dwarf unique and themed.

I adjust eye placement slightly to change expressions β€” move eyes closer for a shy look or further apart for a surprised expression.

I embroider different eyebrow shapes to express Sleepy, Grumpy, Bashful and more; a few stitches makes a big personality change.

I like combining yarn textures β€” try a fluffy yarn for the beard instead of bobble stitch for a softer effect.

For a more durable toy for kids, I swap safety eyes for embroidered eyes and secure all seams very tightly.

I sometimes add a tiny wire inside the hat tip to make it poseable and hold shape at an angle for whimsical displays.

Mix and match colour stripes on the body by changing yarn more frequently in the body rounds to create unique outfits for each dwarf.

Common Mistakes & How to Fix Them

βœ— Skipping stitch markers while joining legs to the body leads to misaligned seams; mark the join points and check counts before continuing. βœ— Overstuffing the head or body makes shaping awkward and distorts the finished silhouette; stuff gradually and test shape frequently. βœ— Forgetting to change colours exactly where indicated can break the striped effect on the body; note each color-change round and switch yarn at the specified stitch. βœ— Not inserting safety eyes correctly can result in uneven placement; place eyes between the 12th and 13th rounds and secure them on oval felt as directed. βœ— Rushing the bobble stitch rows causes inconsistent beard texture; take your time forming each bobble and keep tension even for a uniform look.

Seven Dwarfs Amigurumi Pattern

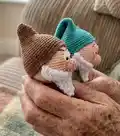
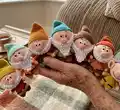
Bring classic charm to your crochet basket with this adorable Seven Dwarfs amigurumi pattern. You will create seven tiny, characterful dwarfs with hats, beards, and expressive faces using clear step-by-step instructions. Perfect for making a set to gift, display, or collect β€” each dwarf is customizable with color and facial details.

Intermediate 5-7 Hours

Materials Needed for Seven Dwarfs Amigurumi Pattern

β€” Main Fabric

  • 01
    Color A: skin color YarnArt Jeans 73 (50g, 160m)
  • 02
    Color B: light brown YarnArt Jeans 48 (50g, 160m)
  • 03
    Color C: dark brown YarnArt Jeans 70 (50g, 160m)
  • 04
    Color D: black YarnArt Jeans 53 (50g, 160m)
  • 05
    Color E: yellow YarnArt Jeans 35 (50g, 160m)
  • 06
    Color F: beige YarnArt Jeans 07 (50g, 160m)
  • 07
    Color G: light pink YarnArt Jeans 36 (50g, 160m)
  • 08
    Color H: white YarnArt Jeans 03 (50g, 160m)
  • 09
    Color I: orange YarnArt Jeans 85 (50g, 160m)

β€” Tools Required

  • 01
    Crochet hook size 2-2.5mm
  • 02
    Black safety eyes 6mm
  • 03
    White felt (for eye backing)
  • 04
    Tapestry needles
  • 05
    Pins for assembly
  • 06
    Stitch markers
  • 07
    Scissors
  • 08
    Polyester stuffing
  • 09
    Yarn needle for sewing pieces together

Progress Tracker

0% Complete

β€” Legs :

Round 1 :

sc 6 into a magic loop (6)

Round 2 :

[sc 1, inc] 3x (9)

Round 3 :

[sc 2, inc] 3x (12)

Round 4 :

[sc 3, inc] 3x (15)

Info :

Break the yarn, make the second leg in the same way, but don’t break the yarn this time. connect with 1 slst. Continue to crochet: sc 15 (leg 1) + sc 15 (leg 2) = 30. Move to the Body part, change to yarn C

β€” Body :

Round 1 :

[sc 4, inc] 6x (36)

Round 2-3 :

sc 36 (2 rows), change to yarn D (36)

Round 4 :

sc 16, change to yarn E, sc 3, change to yarn D, sc 17, change to yarn F (36)

Round 5-7 :

sc 36 (3 rows) (36)

Round 8 :

[sc 4, dec] 6x (30)

Round 9 :

sc 30 (30)

Round 10 :

[sc 3, dec] 6x (24)

Round 11 :

sc 24 (24)

Round 12 :

[sc 2, dec] 6x (18)

Round 13 :

sc 18 (18)

Info :

Break the yarn with a long rest. Stuff.

β€” Nose :

Round 1 :

sc 6 into a magic loop (6)

Round 2 :

inc 6 (12)

Round 3 :

[sc 1, inc] 6x (18)

Round 4-5 :

sc 18 (2 rows) (18)

Round 6 :

dec 9 (9)

Info :

Break the yarn with a long rest to sew later. Stuff slightly.

β€” Arms :

Round 1 :

sc 6 into a magic loop (6)

Round 2 :

[sc 1, inc] 3x (9)

Round 3 :

sc 9, change to yarn F (9)

Round 4-9 :

sc 9 (6 rows) (9)

Info :

Break the yarn with a long rest. Stuff slightly. Sew 2 edges together.

β€” Head :

Round 1 :

sc 6 into a magic loop (6)

Round 2 :

inc 6 (12)

Round 3 :

[sc 1, inc] 6x (18)

Round 4 :

sc 1, inc, [sc 2, inc] 5x, sc 1 (24)

Round 5 :

[sc 3, inc] 6x (30)

Round 6 :

sc 2, inc, [sc 4, inc] 5x, sc 2 (36)

Round 7 :

[sc 5, inc] 6x (42)

Round 8 :

sc 3, inc, [sc 6, inc] 5x, sc 3 (48)

Round 9 :

[sc 7, inc] 6x (54)

Round 10 :

sc 54 (54)

Round 11 :

sc 4, inc, [sc 8, inc] 5x, sc 4 (60)

Round 12-19 :

sc 60 (8 rows), insert 6mm safety eyes onto 2 oval white felts and place between the 12th & 13th rnd (60)

Round 20 :

[sc 8, dec] 6x (54)

Round 21 :

sc 54 (54)

Round 22 :

[sc 7, dec] 6x (48)

Round 23 :

[sc 6, dec] 6x (42)

Round 24 :

[sc 5, dec] 6x (36)

Round 25 :

[sc 4, dec] 6x (30)

Round 26 :

[sc 3, dec] 6x (24)

Round 27 :

[sc 2, dec] 6x (18)

Info :

Break the yarn with a long rest to sew later. Stuff.

β€” Hat :

Round 1 :

sc 6 into a magic loop (6)

Round 2 :

[sc 1, inc] 3x (9)

Round 3 :

[sc 2, inc] 3x (12)

Round 4 :

[sc 3, inc] 3x (15)

Round 5 :

[sc 4, inc] 3x (18)

Round 6 :

[sc 5, inc] 3x (21)

Round 7 :

[sc 6, inc] 3x (24)

Round 8 :

[sc 7, inc] 3x (27)

Round 9 :

[sc 8, inc] 3x (30)

Round 10 :

slst 15, sc 15 (30)

Round 11 :

[sc 9, inc] 3x (33)

Round 12 :

slst 17, sc 16 (33)

Round 13 :

[sc 10, inc] 3x (36)

Round 14 :

slst 19, sc 17 (36)

Round 15 :

[sc 11, inc] 3x (39)

Round 16 :

[sc 12, inc] 3x (42)

Round 17 :

[sc 13, inc] 3x (45)

Round 18 :

[sc 14, inc] 3x (48)

Round 19 :

[sc 15, inc] 3x (51)

Round 20 :

[sc 16, inc] 3x (54)

Round 21 :

[sc 17, inc] 3x (57)

Round 22 :

[sc 18, inc] 3x (60)

Round 23 :

[sc 19, inc] 3x (63)

Round 24-27 :

sc 63 (63)

Info :

Break the yarn with a long rest to sew later.

β€” Short Beard :

Round 1 :

ch 34, start on the 3rd stitch from the hook. [Bobble 1, hdc 1] 16x, turn (32)

Round 2 :

ch 1, [sc 6, dec 1] 4x, turn (28)

Round 3 :

ch 2, [Bobble 1, hdc 1] 14x, turn (28)

Info :

Break the yarn with a long rest to sew later.

β€” Long Beard :

Round 1-3 :

Crochet as 1-3 rnd of Short Beard (28)

Round 4 :

ch 1, [sc 5, dec 1] 4x, turn (24)

Round 5 :

slst 6, ch 2, [Bobble 1, hdc 1] 6x, turn (12)

Round 6 :

ch 1, dec 1, sc 8, dec 1, turn (10)

Round 7 :

ch 2, [Bobble 1, hdc 1] 5x, turn (10)

Round 8 :

ch 1, dec 1, sc 6, dec 1, turn (8)

Round 9 :

ch 2, [Bobble 1, hdc 1] 4x, turn (8)

Round 10 :

ch 1, dec 4, turn (4)

Round 11 :

ch 2, [Bobble 1, hdc 1] 2x (4)

Info :

Break the yarn with a long rest to sew later.

β€” Ears :

Round 1 :

sc 6 into a magic loop (6)

Round 2 :

[sc 1, inc] 3x (9)

Round 3 :

[sc 2, inc] 3x (12)

Round 4 :

[sc 3, inc] 3x (15)

Round 5 :

[sc 4, inc] 3x (18)

Round 6 :

[sc 2, inc] 6x (24)

Round 7-8 :

sc 24 (2 rows) (24)

Round 9 :

[sc 2, dec] 6x (18)

Round 10 :

[sc 1, dec] 6x (12)

Info :

Break the yarn, fold the ears in half and sew 2 edges together

Assembly Instructions

  • Attach the Body to the Head by placing the body opening against the bottom of the head and sewing securely with a yarn needle using the long tail.
  • Attach the Arms to the Body by positioning them on either side between the designated rounds, then sew the folded edges firmly to the body.
  • Attach the Hat to the Head and sew it to the head by needle, aligning the front brim just above the eyes for a natural fit.
  • Attach the Nose under the eyes and sew firmly; stuff the nose slightly before finishing to keep its round shape.
  • Use the tapestry needle to sew the Short Beard or Long Beard under the nose, positioning centers and edges to match the photos for correct placement.
  • Embroider eyebrows and add pink colour to the cheeks, then embroider each dwarf's face according to the sample photos (Sleepy, Doc, Dopey, Happy, Bashful, Grumpy).

Important Notes

  • πŸ’‘Insert 6mm safety eyes onto oval white felt and place them between the 12th and 13th rounds for even eye placement.
  • πŸ’‘Break the yarn and leave a long rest tail when instructed so you can sew pieces later and hide ends neatly after assembly.
  • πŸ’‘Stuff pieces gradually and test shape often; overstuffing will distort the amigurumi head and body shapes.
  • πŸ’‘Use stitch markers when changing rounds or joining legs to keep track of the start of each round and ensure symmetry.

Create a full set of seven charming dwarfs and give them unique personalities with colour and facial details. 🧢 Each dwarf is small, collectible, and perfect for gifting or displaying on a shelf. ✨ Follow the step-by-step instructions and assembly photos to finish beautiful, characterful toys you will be proud to make. 🎁

You ask,

we answer.

FAQs

What size will the finished piece be?

The finished amigurumi measures approximately 12 cm tall when using the recommended YarnArt Jeans and a 2-2.5mm hook; exact size may vary slightly with tension and yarn choice.

Can I use different yarn weights for this pattern?

Yes, you can use different yarn weights, but the finished size will change; use a larger hook with bulky yarn for a chunkier dwarf or a smaller hook with thinner yarn for minis.

Do I need prior crochet experience for this pattern?

This pattern is rated intermediate and uses bobble stitches and multiple small parts, so basic knowledge of single crochet, increases, decreases and working in the round is recommended.

How long does this project typically take to complete?

Most crocheters complete a single dwarf in about 5-7 hours for the full set items and finishing, though time may vary based on experience and customizing details.