🧢 Beautiful ✨ Detailed πŸ’ Adorable

Blue the Dumbo Octopus Amigurumi Pattern

Blue the Dumbo Octopus Amigurumi Pattern
4.8β˜… Rating
5-7 Hours Time Needed
2.1K Made This
βœ‚οΈ

Intermediate Level

Ideal for those with basic crochet experience, featuring slightly more advanced stitches and techniques to expand your skills.

⏱️

Weekend Treat

Takes 5-7 hours, making it an enjoyable project to finish over a couple of days.

🧸

Cute Companion

An adorable friend to cherish, handcrafted with love to bring comfort and joy for years to come.

About This Blue the Dumbo Octopus Amigurumi Pattern

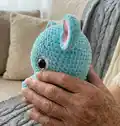
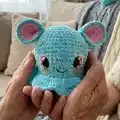
This pattern creates a soft, chunky Blue the Dumbo Octopus amigurumi worked from the top of the head down to the body using bulky weight yarn. It features large expressive safety eyes, a ruffled frill (tentacles), and removable/sewn ears for a Dumbo-inspired look. The instructions include how to place and secure the eyes for a sunken look and step-by-step assembly photos to guide finishing.

Blue the Dumbo Octopus Amigurumi Pattern crochet pattern - detailed view of completed project

Designed for intermediate crocheters, the pattern uses basic amigurumi shaping plus a few shaping techniques for the frill and ears. Complete material and abbreviation lists are included to help you follow along easily.

Why You'll Love This Blue the Dumbo Octopus Amigurumi Pattern

I absolutely love this pattern because it combines the squishy charm of bulky yarn with playful character details that make each octopus feel unique. I enjoy the tactile satisfaction of working with chunky yarn and watching the frill take shape row by row. The eye placement technique lets you personalize the expression β€” it is one of my favorite customization steps. Sewing and assembly are rewarding; seeing the octopus come together really makes me smile every time.

Blue the Dumbo Octopus Amigurumi Pattern step 1 - construction progress Blue the Dumbo Octopus Amigurumi Pattern step 2 - assembly progress Blue the Dumbo Octopus Amigurumi Pattern step 3 - details and accessories Blue the Dumbo Octopus Amigurumi Pattern step 4 - final assembly and finishing

Switch Things Up

I love how easily this pattern adapts to different colorways β€” I often use pastel shades to make a softer, nursery-friendly octopus and bold brights for playful gifts.

I sometimes change yarn weight and hook size to make mini or jumbo versions; a smaller hook and lighter yarn creates a tiny keychain friend while bulky yarn gives a plush, cuddle-sized toy.

I like to swap eye styles: safety eyes, embroidered eyes, or felt circles all change the expression dramatically, so try a few variations to see what you prefer.

For a more poseable octopus, I add a thin wire armature inside a few tentacles so they can hold shapes or curl around objects.

Try modifying the frill by adding extra rounds or different stitch patterns (like picots or shells) for more texture and volume.

I often embroider freckles, eyelashes, or small eyebrows to give the octopus personality β€” even slight changes make a big difference.

Mix and match yarn textures: combining a furry accent yarn for cheeks or ear trims gives a fun tactile contrast I enjoy.

Create themed octopuses by adding tiny crocheted accessories β€” a sailor hat, bow, or tiny scarf makes a delightful character set.

I sometimes attach a loop at the top to turn the octopus into a hanging ornament or mobile; it's perfect for decorating nurseries or bags.

If you want a sturdier toy, try sewing a small felt circle inside the head base for extra structure before closing and stuffing.

Common Mistakes & How to Fix Them

βœ— Skipping stitch markers during shaping can cause you to lose track of round starts and placement; use a marker at the beginning of each round to stay accurate. βœ— Placing safety eyes without measuring can result in uneven placement; count stitches and place eyes between the specified rounds with the correct number of stitches between them. βœ— Stuffing too little or too much will distort the shape of the head and frill; stuff gradually and evenly, adjusting stuffing as you progress for a smooth profile. βœ— Not securing eye backs or washers properly can cause eyes to shift or sink; remove some stuffing to add washers then restuff and firmly secure eyes and backings.

Blue the Dumbo Octopus Amigurumi Pattern

Create an adorable Blue the Dumbo Octopus amigurumi with this friendly intermediate crochet pattern. You will work from the top of the head down through the body using bulky weight yarn and a 6.00 mm hook, assembling the ears and frill for an irresistibly cute finish. The pattern includes step-by-step rounds, assembly instructions, and helpful tips for eye placement and finishing touches. Perfect for crocheters who enjoy charming characters and tactile, squishy toys.

Intermediate 5-7 Hours

Materials Needed for Blue the Dumbo Octopus Amigurumi Pattern

β€” Main Fabric

  • 01
    Bulky weight yarn (#6), approximately 100g main color (Color A: Blue)
  • 02
    Accent yarn approximately 25g (Color B: Pink)
  • 03
    Exact colors used: Blue - Premier Parfait Chunky Turquoise (approx. 100g)
  • 04
    Pink - Premier Parfait Chunky Bubblegum (approx. 25g)
  • 05
    30 mm safety eyes (pair)

β€” Tools Required

  • 01
    Crochet hook size J / 6.00 mm
  • 02
    Safety eyes 30 mm (2 pieces)
  • 03
    Washers for safety eyes
  • 04
    Scissors
  • 05
    Sewing needle / yarn needle for sewing and embroidery
  • 06
    Stitch markers
  • 07
    Polyester fiberfill stuffing (fiberfill)
  • 08
    Pins for assembly (optional)

Progress Tracker

0% Complete

β€” Head and Body :

Info :

Crocheted from top of head to bottom of body. Starting with Color A:

Round 1 :

Make 6 sc into a magic ring= 6

Round 2 :

Increase in each st around= 12

Round 3 :

(sc, inc) x 6= 18

Round 4 :

(2 sc, inc) x 6= 24

Round 5 :

(3 sc, inc) x 6= 30

Round 6 :

(4 sc, inc) x 6= 36

Round 7 :

(5 sc, inc) x 6= 42

Round 8 :

sc in each st around

Round 9 :

(6 sc, inc) x 6= 48

Round 10-14 :

sc in each st around

Round 15 :

(6 sc, dec) x 6= 42

Round 16 :

sc in each st around

Round 17 :

(5 sc, dec) x 6= 36

Info :

If you want, cut a circle larger than the eye in white felt, approximately 4 cm in diameter. Cut a hole on the outer edge of the circle to put the eye inside.

Info :

Place eyes between rounds 15 and 16, leaving 11 holes between them. If you want the sunken eye look, do not place the backs of the eyes on until round 20.

Info :

TIP! You may have to adjust the eye placement depending on yarn and hook size you use.

Round 18-20 :

sc in each st around

Info :

Start stuffing the head and body

Info :

Now for the eyes. Cut a long piece of yarn and remove the eyes. Place the needle in the hole where the first eye was and insert the needle into a hole next to the eye hole. Go back and forth between each eye hole repeating the process from the first eye. Pull slightly on the yarn after going through each hole. Do this about 3 times on each side until you reach the look you want. Follow the pictures for help. There is also a youtube video I have for extra help on this process. https://www.youtube.com/watch?v=9XoBnTY6k70&t=55s

Info :

To place the backs of the eyes you will need to remove most of the stuffing to place the washers on the eyes then re stuff it.

Round 21 :

BLO (4 sc, dec) x 6= 30

Round 22 :

(3 sc, dec) x 6= 24

Round 23 :

(2 sc, dec) x6= 18

Round 24 :

(sc, dec) x 6= 12

Round 25 :

Dec x 6= 6

Info :

F/O and sew the hole closed

β€” Tentacles or Frill :

Info :

Turn the body upside down. Attach Color A yarn on round 21 with a sl st. Ch 2

Round 1 :

hdc-inc in each st around, join with a sl st to top of ch 2

Round 2 :

Ch 2, hdc in each st around, join with a sl st to top of ch 2

Round 3 :

Ch 2, (hdc, dc, tr, ch 1, tr, dc, hdc, 3 sl) x 8, sl st to top of ch 2 to fasten off

Info :

Weave in the tail ends.

β€” Ears (Make 2 Color A, 2 in Color B) :

Info :

Starting with Color B:

Round 1 :

Make 6 sc into a magic ring= 6

Round 2 :

Increase in each st around= 12

Round 3 :

(sc, inc) x 6= 18

Round 4 :

(2 sc, inc) x 6= 24

Info :

Do not F/O the Color A ears!

Info :

Place the back sides of Color A and Color B ears together. sc around the ears with the Color A yarn. F/O and leave a long tail for sewing.

β€” Assembly :

Head and Body :

1. Thread your needle with a strand of black embroidery thread. Insert the needle into a hole on the head. Bring the needle above the eye. Embroider an eyebrow. Repeat for the 2nd eye. Weave in the tail ends.

Head and Body :

2. Thread your needle with a long strand of black embroidery thread. Insert the needle into a hole in the head. Bring the needle up to a spot between the eyes. Embroider a smile. Weave in the tail ends.

Head and Body :

3. If you want, you can glue down your white felt circle to make it flat against the body.

Ears :

1. Pinch the ears at the bottom. Sew about 3 stitches together at the bottom to give the ear a pinched look.

Ears :

2. Pin the ears onto the top of the head.

Ears :

3. Sew the ears onto the head.

Face :

1. If you want you can add some blush to the cheeks with actual blush or pink crayon.

Assembly Instructions

  • Thread your needle with a strand of black embroidery thread and embroider one eyebrow above the eye, repeat for the second eye and weave in ends.
  • Thread a long strand of black embroidery thread and embroider a smile between the eyes, bringing the needle up from a hole in the head and weaving in ends when finished.
  • Glue down the white felt circle behind each eye if you want the felt to sit flat against the body, or secure it with a few stitches.
  • Pinch the bottom of each ear and sew about three stitches to create a pinched ear shape, then pin ears to the top of the head and sew firmly in place.

Important Notes

  • πŸ’‘Do not join rounds unless stated; work in a continuous spiral and use a stitch marker to mark the beginning of each round.
  • πŸ’‘All stitches are worked in both loops unless stated otherwise in the pattern.
  • πŸ’‘Adjust eye placement and stuffing amount depending on yarn and hook size to achieve the desired look and shape.

This adorable Blue the Dumbo Octopus pattern brings a whimsical, huggable friend to life with chunky yarn and big expressive eyes. Whether you make it as a gift or a keepsake, the ruffled frill and pinched ears add so much character to this little companion. Have fun stitching and customizing β€” this octopus is sure to bring smiles! πŸ§ΆπŸ™

You ask,

we answer.

FAQs

What size will the finished piece be?

The finished amigurumi measures approximately 12 inches from bottom of the frill to the top of the head when using bulky weight #6 yarn and a 6.00 mm hook.

Can I use different yarn weights for this pattern?

Yes, you can use different yarn weights, but this will change the final size; use an appropriate hook for your chosen yarn and adjust eye placement accordingly.

Do I need prior crochet experience for this pattern?

This pattern is rated intermediate, so basic knowledge of crochet stitches (sc, inc, dec, hdc) and working in continuous rounds is recommended for best results.

How long does this project typically take to complete?

Most crocheters complete this project in about 5-7 hours, though time may vary based on experience level, yarn choice, and assembly detail.