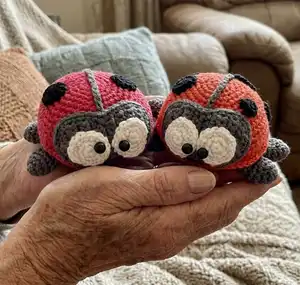
Make a sweet crocheted ladybug to brighten your day and create a handmade gift. This pattern guides you step-by-step through crocheting the belly, back, muzzle, eyes, paws and spots and assembling them into an adorable toy. Clear instructions and helpful assembly photos make it easy to follow as you create a 7 cm ladybug.
Progress Tracker
0% Complete
— Materials and tools :
Infos :
Yarn 100% cotton for crocheting a ladybug. I used PaintBox Yarns Cotton DK 125 m, 50 g: Pillar Red (415), Granite Grey (407), small amount of Champagne White (403) and Pure Black (402). A hook 2.0 mm (I used Clover). Stuffing (hollow fiber). Black beads 6 mm in diameter for eyes. A needle with a big eye. Sewing pins.
Info :
Note: The toy must be crocheted with tight stitches, to be sure that there won't be any holes through which stuffing material can be seen, if there are tiny holes, use a smaller size hook. Ladybug's size is approximately 7 cm (2.7 in), if you use the same material that I used.
Infos :
Used stitches: ch- chain. sc- single crochet. sl.st. - slip stitch. sc inc - increase. sc dec - decrease. (sc, inc)*n - repeat those in brackets n-times.
— Belly :
Row 1 :
6 sc in magic ring (6)
Row 2 :
2 sc in each sc (12)
Row 3 :
(1 sc, sc inc)*6 (18)
Row 4 :
(2 sc, sc inc)*6 (24)
Row 5 :
(3 sc, sc inc)*6 (30)
Row 6 :
(4 sc, sc inc)*6 (36)
Row 7 :
(5 sc, sc inc)*6 (42)
Row 8 :
(6 sc, sc inc)*6 (48)
Row 9 :
(7 sc, sc inc)*6 (54)
Row 10 :
(8 sc, sc inc)*6, sl.st (60)
Info :
Tie off the thread and cut it (pic. 1).
— Back :
Row 1 :
6 sc in magic ring (6)
Row 2 :
2 sc in each sc (12)
Row 3 :
(1 sc, sc inc)*6 (18)
Row 4 :
(2 sc, sc inc)*6 (24)
Row 5 :
(3 sc, sc inc)*6 (30)
Row 6 :
(4 sc, sc inc)*6 (36)
Row 7 :
(5 sc, sc inc)*6 (42)
Row 9 :
(6 sc, sc inc)*6 (48)
Row 11 :
(7 sc, sc inc)*6 (54)
Row 13 :
(8 sc, sc inc)*6 (60)
Info :
Don’t cut the work thread (pic. 2). Join the belly and the back together: put the wrong sides of the pieces to each other (pic. 3), insert the crochet hook through the loops of both pieces (pic. 4) and crochet sc (pic. 5). Work sc around the edge. Stuff the body as you go round (pic. 6-10). Finish with sl.st. Tie off the thread and hide it inside.
— Muzzle :
Instruction :
With dark gray yarn. Use a hook 2.0 mm. The muzzle is crocheted in rows. Crochet 5 ch (pic. 11).
Row 1 :
Start in the second loop from the hook and crochet 1 sc inc, 2 sc, 1 sc inc, 1 ch, turn (6)
Row 2 :
1 sc inc, 4 sc, 1 sc inc, 1 ch, turn (8)
Rows 3-6 :
4 rows - 8 sc, 1 ch, turn (8)
Row 7 :
6 sc, 1 sc dec, 1 ch, turn (7)
Row 8 :
1 sc dec, 5 sc, 1 ch, turn (6)
Row 9 :
5 sc, 1 sc inc, 1 ch, turn (7)
Row 10 :
1 sc inc, 6 sc, 1 ch, turn (8)
Rows 11-14 :
4 rows - 8 sc, 1 ch, turn (8)
Row 15 :
1 sc dec, 4 sc, 1 sc dec, 1 ch, turn (6)
Row 16 :
1 sc dec, 2 sc, 1 sc dec, 1 ch (4)
Info :
Don’t cut the thread and work sc around the edge of the muzzle. Finish with sl.st. (pic. 12-18). Tie off the thread and leave enough for sewing.
— Eyes. 2 pcs :
Instruction :
With white yarn. Use a hook 2.0 mm. The eyes are crocheted in a spiral.
Row 1 :
6 sc in magic ring (6)
Row 2 :
2 sc in each sc (12)
Row 3 :
(1 sc, sc inc)*6 (18)
Info :
Finish with sl.st. Tie off and leave enough thread for sewing (pic. 19).
— Paws. 6 pcs :
Instruction :
With dark gray yarn. Use a hook 2.0 mm. The paws are crocheted in a spiral.
Row 1 :
5 sc in magic ring (5)
Row 2 :
2 sc in each sc (10)
Rows 3-5 :
3 rows - 10 sc (10)
Info :
Fold two edges of the paw to each other and work 4 sc (pic. 20-23). Finish with 1 ch. Tie off the thread and leave enough for sewing. The paws don’t need to be stuffed. (pic. 24).
— Spots. (as many spots as you'd like) :
Big spot :
With black yarn. Use a hook 2.0 mm. The spots are crocheted in a spiral. 1 row: 6 sc in magic ring (6). 2 row: 2 sc in each sc, sl.st (12). Tie off and leave enough thread for sewing.
Small spot :
1 row: 6 sc in magic ring (6). Finish with sl.st. Tie off and leave enough thread for sewing (pic. 25).
— Assembly :
Step :
Crochet 27 ch with dark gray yarn and sew the chain onto the body (pic. 26-31).
Step :
Sew the muzzle onto the body (pic. 32-37).
Step :
Use two black beads 6 mm in diameter for eyes and sew them onto the whites of the ladybug’s eyes (pic. 38, 39). Note: If you don’t have the beads I suggest, you can embroider the eyes.
Step :
Sew the whites of the ladybug’s eyes onto the muzzle (pic. 40-43).
Step :
Sew the paws onto the body (pic. 44-50).
Step :
Sew the spots onto the back (pic. 51-53).
Info :
Finish all ends, hide tails inside, and arrange details symmetrically for the best result. Congratulations! Your ladybug is ready.
Thank you for choosing this little Ladybug pattern — I hope it brings you delight as you crochet! 🧶
This compact amigurumi makes a lovely gift, keychain or shelf buddy and finishes at about 7 cm. 🐞
Enjoy assembling the face and tiny details — they make each toy uniquely charming. ✨