🧢 Beautiful ✨ Detailed πŸ’ Adorable

Diamond Beanie Pattern

Diamond Beanie Pattern
4.7β˜… Rating
5-7 Hours Time Needed
3.9K Made This
βœ‚οΈ

Beginner Friendly Level

Perfect for those just starting their crochet journey, with clear instructions and simple techniques

⏱️

Weekend Treat

Takes 5-7 hours, making it an enjoyable project to finish over a couple of days.

🧣

Snug Essential

Everyday comfort with practical charm, designed for both functionality and style through changing seasons.

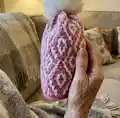
About This Diamond Beanie Pattern

This pattern creates a two-colour mosaic crochet beanie worked top-down as a cylinder. It uses single crochet and front-loop double crochet techniques to create the diamond motif. The pattern is written in US terms and includes a diagram to follow the mosaic repeat. Multiple sizes are provided from toddler to adult, plus yarn and finishing instructions.

Diamond Beanie Pattern crochet pattern - detailed view of completed project

Youll use two contrasting colours (A and B) and a 4mm hook to hit the gauge of 18 sts x 18 rounds per 10x10cm. Full assembly and edge-finishing steps are included, as well as guidance for starting different columns to balance the seam.

Why You'll Love This Diamond Beanie Pattern

I absolutely love this pattern because the mosaic diamonds create a striking two-colour texture with surprisingly simple stitches. I enjoy how the top-down construction lets me try the hat on as I work and adjust the height for a perfect fit. The charted mosaic diagram makes it easy to follow once you understand the method, and changing colours only on the last yarn-over keeps the colourwork tidy. This design is both practical and stylish, and I always get compliments when I wear one.

Diamond Beanie Pattern step 1 - construction progress Diamond Beanie Pattern step 2 - assembly progress Diamond Beanie Pattern step 3 - details and accessories Diamond Beanie Pattern step 4 - final assembly and finishing

Switch Things Up

I love experimenting with colour combinations so I often swap the bright contrast for muted tones to get a more subtle look.

I sometimes use a bulkier yarn and a larger hook to make a cozy, chunky version of the hat that works up faster and is great for cold weather.

I like to make mini versions using finer yarn and a smaller hook to create keychain or ornament-sized hats for gifts.

I add embroidered initials or small motifs on one side for personalization after finishing the hat.

I occasionally swap the pom pom for a crocheted flower or tassel for a different finish that is safer for children's wear.

I try adding a folded ribbed brim by working extra rounds in BLO to create a snugger fit at the edge.

I sometimes test other colourwork charts; you can substitute any 12-stitch repeat into the same construction easily.

I recommend trying the hat on as you work and adding or removing rounds until the height feels right rather than following the table strictly.

I also experiment with needle-finishing techniques for the foundation round to make the seam less visible when closing the top.

I advise practicing the front-loop dc technique on a small swatch before starting to feel comfortable with the mosaic tension and look.

Common Mistakes & How to Fix Them

βœ— Skipping the gauge check before beginning; always make a 10x10cm (4x4") swatch and adjust hook size so the hat will fit as expected. βœ— Not using a stitch marker when working in a spiral; place and move a marker at the first stitch of each round to avoid losing your starting point. βœ— Pulling stitches too tight when changing colors; keep consistent, moderate tension while carrying and switching colours to maintain an even fabric. βœ— Ignoring the recommended contrast between colours; choose high-contrast shades so the mosaic diamond pattern reads clearly and the motif isnt lost. βœ— Forgetting to start R3 on the column specified for your size; start on the column reported for your size to make the seam meet as symmetrically as possible.

Diamond Beanie Pattern

Make a cozy two-colour Diamond Beanie using mosaic crochet techniques. This beginner-friendly pattern guides you through a top-down cylinder construction so you can shape the hat as you go. Youll learn how to read the mosaic diagram, work front-loop double crochet stitches for the motif, and finish a neat edge. Perfect for gifting or keeping, this hat looks great with a contrasting pom pom.

Beginner Friendly 5-7 Hours

Materials Needed for Diamond Beanie Pattern

β€” Main Fabric

  • 01
    WooleVo Soft Merino by Merinor (example), 105m/50g (115yds/1.8oz) β€” DK / 8 ply (or other 8 ply/DK/worsted weight yarn)
  • 02
    You need two colours: Colour A and Colour B β€” strong contrast recommended (do not choose colours that are too similar)
  • 03
    Amounts per size: 1-2 years: 50g A, 50g B
  • 04
    Amounts per size: 3-4 years: 50g A, 50g B
  • 05
    Amounts per size: 5-8 years: 50g A, 50g B
  • 06
    Amounts per size: 9-12 years: 100g A, 100g B
  • 07
    Amounts per size: Teen: 100g A, 100g B
  • 08
    Amounts per size: Women: 100g A, 100g B

β€” Tools Required

  • 01
    Crochet hook size 4mm (or the one giving the correct gauge)
  • 02
    Scissors
  • 03
    Tape measure
  • 04
    Yarn needle for sewing
  • 05
    Stitch marker
  • 06
    Pom pom (or materials to make one)
  • 07
    Sewing needle (for finishing) optional

Progress Tracker

0% Complete

β€” How to work Mosaic Crochet and how to read the Mosaic Diagram :

Infos :

The numbers on the vertical axis indicate which round/row you are on. The first row consist of sc worked using color A, the second of sc blo worked with color B. You start working the actual pattern on the third row of the diagram. You use only one color per row. Odd numbered rows are worked in color A, even numbered rows in color B. Read each row in the diagram from right to left. Empty boxes indicate sc blo. Black boxes indicate dc fastening to the flo 2 rows earlier. This front loop will always have the same color as the color you are currently using. Usually, you will fasten the dc to the front loop of a sc, sometimes you fasten the dc to the front loop of a dc. Insert the hook from below, as you would when crocheting through both loops ("normal" crochet). Image 1 and 2 shows how you will work the dc. After image 2, pull the yarn with you through the front loop and finish the dc like you normally would. On each round, repeat column 1-12 all the way around. Column 13-16 are in the diagram to give you a better idea of the complete pattern. When you have finished row 14 in the diagram, start on row 3 again. Image 3 shows what the diamond pattern will look like.

β€” Pattern :

Info :

You work the hat in one piece, as a cylinder. You start at the top and work down. You do this because the foundation chain often comes out less stretchy than the rest of your work. You finish by sewing through the foundation round, tightening, securing the top with a few extra stitches, and attaching the pom pom.

Info :

Chain 76 (79) 82 (84) 86 (88) in color A. Sl st to the first st, making a circle.

Round 1 :

sc all the way around 76 (79) 82 (84) 86 (88), in color A. The last time you "yo and pull through" on the last sc on the round, change to color B.

Info :

Place a marker in the first st. As you move from one round into the next, move the marker to the new first stitch, but do not use sl st or other transitional stitches (You work in a spiral).

Round 2 :

sc blo all the way around 76 (79) 82 (84) 86 (88), in color B. The last time you "yo and pull through" on the last sc on the round, change to color A.

Info :

You now start working the pattern. The pattern repeats over 12 st. Because of this, you will not be able to complete the last repeat of the pattern on all sizes. In order to get the spot where the rounds meet as symmetrical as possible, you start on different columns in the diagram, depending on size. From R3, start every round with column 11 (9) 2 (1) 12 (11) in the diagram.

Round 3 and onwards :

Repeat the pattern of the round you are currently on, starting in the column reported for your size, all the way around. Always change color on the last "yarn over and pull through".

Info :

After completing row 14 in the diagram, start on row 3 again. Repeat row 3 to 14 until your hat has the height listed in the table for your size – or the height you prefer. As you work top down, it is easy for you to add a few rounds or remove a few after trying the hat on.

Info :

The last round should be worked in color A. Finish the last round by sl st to the first st on the round – or finish the edge as described below.

β€” Finishing the edge perfectly :

Info :

Cut the yarn and pull it up, so it comes out of the last stitch of the round. Thread a yarn needle onto the yarn end. Sew below front and back loop of the first stitch on the round. Then, insert needle back down, into the stitch where the yarn comes from. See image 6. Weave in all ends.

β€” Sewing the hat and adding the pom pom :

Info :

Using a yarn needle and color A, through the foundation round, all the way around, leaving about 2 cm between each time you sew through. Tighten, so that the hat closes completely. Sew a few extra stitches at the top, making sure everything is secure. Depending on the type of pom pom you are using, either sew the pom pom or a button (for the pom pom) to the top of the hat. Attach hat/button well, especially if you are making a hat for small children. I do not recommend using buttons for children below the age of 3. Fasten all ends well. And pat yourself on the back – your hat is ready to be used!

Assembly Instructions

  • Sew through the foundation round with a yarn needle and color A, spacing stitches about 2 cm apart to gather the top and close the hat securely.
  • Tighten the foundation seam and sew a few extra stitches at the top to ensure the hat remains closed and stable.
  • Attach the pom pom securely to the top by sewing through its base or use a button to fasten the pom pom as recommended, ensuring extra reinforcement for children's hats.
  • Weave in and fasten all yarn ends neatly on the wrong side of the hat so they cannot be seen or come loose during wear.
  • If desired, block the hat gently to even out the stitches and make the mosaic pattern lay flat before attaching the pom pom.

Important Notes

  • πŸ’‘Check your gauge: 10x10cm (4x4") should equal 18 stitches and 18 rounds; adjust hook size if necessary.
  • πŸ’‘Work in a spiral without extra join stitches; move your stitch marker to the new first stitch each round.
  • πŸ’‘Choose two contrasting colours for best mosaic definition and readability of the diamond pattern.
  • πŸ’‘Do not use buttons for pom pom attachment on hats intended for children under age 3; sew pom poms on securely.

This Diamond Beanie pattern is a beautiful introduction to mosaic crochet and two-colour hats, perfect for gifting or keeping. The top-down cylinder construction makes fitting easy and the diamond motif looks stunning with high-contrast yarn choices. Enjoy making and wearing your handmade hat β€” happy crocheting! 🧢✨

You ask,

we answer.

FAQs

What size will the finished piece be?

The finished hat sizes correspond to the table in the pattern: for example, Women: circumference 56-57 cm (22.2") with foundation stitch count 88 and height 23 cm (9.1"). Choose the size that best fits the head circumference.

Can I use different yarn weights for this pattern?

You can, but the final size will change. The pattern is written for DK/8 ply (approx. 105m/50g). If you change weight, make a gauge swatch and adjust hook size to achieve 18 sts x 18 rounds per 10x10cm.

Do I need prior crochet experience for this pattern?

This pattern is beginner friendly, but you should be comfortable with single crochet, double crochet, working in the back loop only, and following a charted mosaic diagram.

How long does this project typically take to complete?

Most crocheters complete this project in 5-7 hours, depending on size and familiarity with mosaic crochet techniques.