🧢 Beautiful ✨ Detailed πŸ’ Adorable

Bunny Amigurumi Pattern

Bunny Amigurumi Pattern
4.4β˜… Rating
5-7 Hours Time Needed
1.2K Made This
βœ‚οΈ

Intermediate Level

Ideal for those with basic crochet experience, featuring slightly more advanced stitches and techniques to expand your skills.

⏱️

Weekend Treat

Takes 5-7 hours, making it an enjoyable project to finish over a couple of days.

🧸

Cute Companion

An adorable friend to cherish, handcrafted with love to bring comfort and joy for years to come.

About This Bunny Amigurumi Pattern

This pattern creates a charming seated bunny amigurumi approximately 20 cm (8 inches) tall while sitting. You will crochet separate pieces (head, body, arms, legs, ears, tail) and sew them together, finishing with embroidered facial features. The instructions include full round-by-round stitch counts and helpful photos to guide shaping and stuffing.

Bunny Amigurumi Pattern crochet pattern - detailed view of completed project

Worked in continuous rounds using a small hook for a tight fabric, this bunny is great for gifting or display. The pattern is written in clear English with abbreviations and materials listed for easy reference.

Why You'll Love This Bunny Amigurumi Pattern

I absolutely love this pattern because it combines simple shaping with a lot of personality in the finished bunny. I enjoy how the long ears and embroidered face let you customize expression and style. The pattern balances structure and ease β€” you get a professional-looking amigurumi without overly complex steps. I also appreciate that each part is made separately, which makes assembly neat and allows you to adjust stuffing and placement to suit your taste.

Bunny Amigurumi Pattern step 1 - construction progress Bunny Amigurumi Pattern step 2 - assembly progress Bunny Amigurumi Pattern step 3 - details and accessories Bunny Amigurumi Pattern step 4 - final assembly and finishing

Switch Things Up

I love how easy it is to customize this bunny β€” I often change the yarn color to create seasonal versions like pastel spring bunnies or warm fall tones.

I sometimes use a thicker yarn and larger hook to make a chunky, cuddle-sized bunny, or a finer yarn with a smaller hook for a tiny keychain version.

I like to add accessories such as tiny crocheted scarves, bows or a little heart to personalize each toy and make it gift-ready.

For different expressions, I vary the position of the embroidered mouth and eyebrows; a slight angle can make a very different personality.

I also switch to safety eyes for a glossy look if making a non-child toy, or embroider the eyes for a fully handmade finish that's safer for small children.

Try adding wire into the limbs for posability if you want a bunny that can sit or pose differently; I wrap wire with yarn before stuffing for safety.

Want a friend set? Make multiple sizes by changing yarn weight and hook size and line them up for a family of bunnies.

I sometimes embroider freckles, appliquΓ© patches, or add tiny felt or crocheted props (like a carrot) to tell a story with each bunny.

When I gift them, I attach a small handmade tag or mini envelope with the recipient's name; personal touches like that make the toy extra special.

Don’t be afraid to experiment with textured stitches or stripes β€” the simple shape really showcases color and texture changes beautifully.

Common Mistakes & How to Fix Them

βœ— Skipping a stitch marker when working in spiral rounds causes you to lose track of the beginning of rounds; use a marker and move it after each round to always know where to start. βœ— Not stuffing gradually leads to lumps and distorted shaping; stuff the piece bit by bit while continuing the rounds and adjust before finishing. βœ— Counting mistakes during increases or decreases result in incorrect stitch counts; count your stitches at the end of each round and correct errors immediately. βœ— Pulling yarn too tight on decreases changes the shape and size of the round; use consistent, moderate tension and practice invisible decreases for a smooth finish. βœ— Securing ends poorly can cause unravelling during washing or play; leave long tails and sew them firmly into the stuffing with a yarn needle.

Bunny Amigurumi Pattern

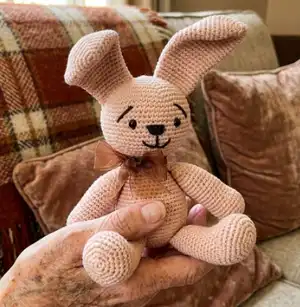
Make an adorable handmade bunny with this clear, photo-supported crochet pattern. You will work in continuous rounds and shape a soft, sit-able amigurumi using simple increases and decreases. This pattern is perfect if you want a sweet gift-ready toy with embroidered facial details.

Intermediate 5-7 Hours

Materials Needed for Bunny Amigurumi Pattern

β€” Main Fabric

  • 01
    Sport weight yarn (#2/sport) 260-330m per 100g (285-360 yds/100g) - main color
  • 02
    Cream color yarn: approx. 240m (263 yds) - main color (as listed on materials page)
  • 03
    Black color yarn: approx. 1m (1.1 yds) for facial embroidery
  • 04
    Small amounts of contrasting yarn for details (optional)

β€” Tools Required

  • 01
    Crochet hook size 2.5 - 2.75mm (US size C)
  • 02
    Sewing needle
  • 03
    Yarn needle for sewing parts
  • 04
    Scissors
  • 05
    Stitch markers
  • 06
    Polyester stuffing (fiberfill)
  • 07
    Pins for assembly (optional)
  • 08
    Textile marker for marking embroidery placement (optional)

Progress Tracker

0% Complete

β€” Head :

Info :

Cream color yarn: ch2

Round 1 :

6sc in 2nd ch from hook (6)

Round 2 :

inc 6 times; (12)

Round 3 :

(1sc, inc) 6 times; (18)

Round 4 :

(2sc, inc) 6 times; (24)

Round 5 :

(3sc, inc) 6 times; (30)

Round 6 :

(4sc, inc) 6 times; (36)

Round 7 :

(5sc, inc) 6 times; (42)

Round 8 :

(6sc, inc) 6 times; (48)

Round 9 :

(7sc, inc) 6 times; (54)

Round 10 :

(8sc, inc) 6 times; (60)

Round 11 :

(9sc, inc) 6 times; (66)

Round 12-20 :

sc around; (66)

Round 21 :

(sc2tog, 9sc) 6 times; (60)

Round 22 :

(sc2tog, 8sc) 6 times; (54)

Round 23 :

(sc2tog, 7sc) 6 times; (48)

Round 24 :

(sc2tog, 6sc) 6 times; (42)

Round 25 :

(sc2tog, 5sc) 6 times; (36)

Round 26 :

(sc2tog, 4sc) 6 times; (30)

Round 27 :

(sc2tog, 3sc) 6 times; (24)

Round 28 :

(sc2tog, 2sc) 6 times; (18)

Info :

Finish. Stuff the head (Pic.1). Leave a long tail to sew the head to the body.

β€” Body :

Info :

Cream color yarn: ch2

Round 1 :

6sc in 2nd ch from hook; (6)

Round 2 :

inc 6 times; (12)

Round 3 :

(1sc, inc) 6 times; (18)

Round 4 :

(2sc, inc) 6 times; (24)

Round 5 :

(3sc, inc) 6 times; (30)

Round 6 :

(4sc, inc) 6 times; (36)

Round 7-10 :

sc around; (36)

Info :

Finish and leave long end to sew head to the body. Stuff the body (Pic.2).

β€” Arms :

Info :

Arms (make 2). Cream color yarn: ch2

Round 1 :

6sc in 2nd ch from hook; (6)

Round 2 :

inc 6 times; (12)

Round 3 :

(1sc, inc) 6 times; (18)

Round 4 :

(2sc, inc) 6 times; (24)

Round 5-9 :

sc around; (24)

Round 10 :

(sc2tog, 4sc) 4 times; (20)

Round 11-20 :

sc around; (20)

Round 21 :

(sc2tog, 3sc) 4 times; (16)

Info :

Start to stuff the arm lightly and keep adding stuffing after every few rounds.

Round 22 :

sc around; (16) (Pic.3)

Round 23 :

(sc2tog, 6sc) 2 times; (14)

Round 24 :

(sc2tog, 5sc) 2 times; (12)

Round 25 :

(sc2tog, 2sc) 3 times; (9)

Info :

Finish, leave long end to sew arms to the body. (Pic.5).

β€” Legs :

Info :

Legs (make 2). Cream color yarn: ch2

Round 1 :

6sc in 2nd ch from hook; (6)

Round 2 :

inc 6 times; (12)

Round 3 :

(1sc, inc) 6 times; (18)

Round 4 :

(2sc, inc) 6 times; (24)

Round 5 :

(3sc, inc) 6 times; (30)

Round 6 :

(4sc, inc) 6 times; (36)

Round 7-10 :

sc around; (36)

Round 11 :

sc2tog 10 times, 16sc; (26)

Round 12-13 :

sc around; (26)

Round 14 :

2sc, sc2tog 3 times, 18sc; (23)

Round 15 :

sc around; (23)

Round 16 :

1sc, sc2tog 3 times, 16sc; (20) (Pic.4)

Info :

Start to stuff the leg lightly and keep adding stuffing after every few rounds.

Round 17-20 :

sc around; (20)

Round 21 :

(sc2tog, 8sc) 2 times; (18)

Round 22-23 :

sc around; (18)

Round 24 :

(sc2tog, 4sc) 3 times; (15)

Round 25 :

sc around; (15)

Info :

Finish and leave long end to sew legs to the body. (Pic.5).

β€” Ears :

Info :

Ears (make 2). Cream color yarn: ch2

Round 1 :

6sc in 2nd ch from hook; (6)

Round 2 :

inc 6 times; (12)

Round 3 :

(1sc, inc) 6 times; (18)

Round 4 :

(2sc, inc) 6 times; (24)

Round 5 :

(3sc, inc) 6 times; (30)

Round 6 :

(4sc, inc) 6 times; (36)

Round 7-11 :

sc around; (36)

Round 12 :

(sc2tog, 4sc) 6 times; (30)

Round 13-15 :

sc around; (30)

Round 16 :

(sc2tog, 3sc) 6 times; (24)

Round 17-22 :

sc around; (24)

Round 23 :

(sc2tog, 4sc) 4 times; (20)

Round 24-27 :

sc around; (20)

Info :

Finish and leave long end to sew ear onto the head. Do not stuff (Pic.6).

β€” Tail :

Info :

Tail (make 1). Cream color yarn: ch2

Round 1 :

6sc in 2nd ch from hook; (6)

Round 2 :

inc 6 times; (12)

Round 3 :

(1sc, inc) 6 times; (18)

Round 4-6 :

sc around; (18)

Round 7 :

(sc2tog, 1sc) 6 times; (12)

Info :

Finish and leave long end to sew tail to the body. Stuff the tail (Pic.7).

β€” Assembly :

Item 1 :

Sew legs, arms and tail to the body as shown in photos, spacing evenly for balance.

Item 2 :

Sew head to the body using the long tail left from the head, centering and securing tightly.

Item 3 :

Sew ears onto the head with long tails, positioning symmetrically and pinning before stitching if needed.

Item 4 :

Embroider eye, nose and mouth areas with black yarn (or mark areas with a textile marker before embroidering).

Assembly Instructions

  • Sew legs, arms and tail to the body, spacing them evenly so the bunny sits balanced and using small, tight stitches to secure.
  • Sew head to the body by inserting the neck portion into the opening at the top of the body and sewing firmly with a yarn needle.
  • Position and sew ears onto the head, pinning and checking symmetry before final stitching to ensure matching placement.
  • Embroider eyes, nose and mouth with black yarn, marking placement with a textile marker if preferred before stitching.

Important Notes

  • πŸ’‘Work in continuous rounds and use a stitch marker to mark the beginning of each round for accurate shaping.
  • πŸ’‘The number at the end of each round is the number of stitches you should have now; count often to avoid errors.
  • πŸ’‘Do not join the first and last stitches in a round with slip stitch unless stated; maintain spiral rounds for seamless shaping.
  • πŸ’‘I recommend using invisible decreases to keep the fabric smooth, especially on visible areas like the head and limbs.

This sweet bunny pattern is designed to be a cozy, handmade companion for gifting or collecting. The project uses basic amigurumi techniques and small, detailed shaping that makes each bunny unique. Have fun customizing the face, colors, and accessories to match your style. 🧢 Sew with joy and enjoy your new handmade friend! 🧡

You ask,

we answer.

FAQs

What size will the finished piece be?

The finished amigurumi measures approximately 20 cm (8 inches) tall when sitting using the recommended sport weight yarn and 2.5-2.75mm hook.

Can I use different yarn weights for this pattern?

Yes, you can use different yarn weights, but this will affect the final size; adjust hook size accordingly and expect changes to proportions.

Do I need prior crochet experience for this pattern?

This pattern is rated intermediate and assumes you know basic stitches such as single crochet, increases and decreases and can work in continuous rounds.

How long does this project typically take to complete?

Most crocheters complete this project in 5-7 hours, though actual time depends on experience level and how quickly you work.

Should I stuff the ears?

No, the pattern specifies not to stuff the ears; leave them flat and sew into position as instructed.