🧢 Beautiful ✨ Detailed πŸ’ Adorable

Tick the Rabbit Amigurumi Pattern

Tick the Rabbit Amigurumi Pattern
4.5β˜… Rating
5-7 Hours Time Needed
3.3K Made This
βœ‚οΈ

Intermediate Level

Ideal for those with basic crochet experience, featuring slightly more advanced stitches and techniques to expand your skills.

⏱️

Weekend Treat

Takes 5-7 hours, making it an enjoyable project to finish over a couple of days.

🧸

Cute Companion

An adorable friend to cherish, handcrafted with love to bring comfort and joy for years to come.

About This Tick the Rabbit Amigurumi Pattern

This pattern creates a small, stretchy rabbit toy with long movable limbs and a soft square body. The design uses two color panels and simple amigurumi shaping to form ears, arms, legs, eyes and a square body. Techniques include crocheting in rounds, joining two body panels, and simple embroidery for facial details.
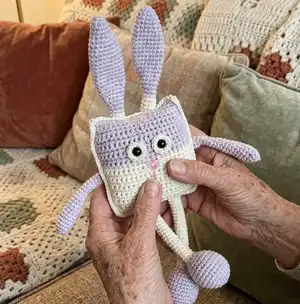
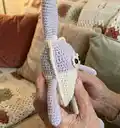
Tick the Rabbit Amigurumi Pattern crochet pattern - detailed view of completed project

The finished toy measures approximately 30 cm from ears to feet using the recommended materials. The limbs stretch up and down giving the toy a playful, interactive feature.

Why You'll Love This Tick the Rabbit Amigurumi Pattern

I absolutely love this pattern because it combines simple crochet techniques with a clever stretchy-limb feature that makes the toy playful and engaging. I enjoy the clean square body panels which are easy to crochet yet give a modern look. The pattern is versatile so I can change colors and yarn types to create different moods and sizes. It is also satisfying to assemble β€” joining panels and inserting limbs gives a real sense of progress and personalization.

Tick the Rabbit Amigurumi Pattern step 1 - construction progress Tick the Rabbit Amigurumi Pattern step 2 - assembly progress Tick the Rabbit Amigurumi Pattern step 3 - details and accessories Tick the Rabbit Amigurumi Pattern step 4 - final assembly and finishing

Switch Things Up

I love customizing this pattern by swapping the color scheme to make different personalities β€” try pastels for a baby version or bold contrasts for a modern look.

I sometimes make a mini keychain version by using thinner yarn and a smaller hook to create a pocket-sized rabbit.

I also experiment with yarn textures: a soft chenille gives a plush cuddle toy while 100% cotton keeps the stitches neat and durable.

Want posable limbs? I will add a thin wire inside the arms or legs to make them poseable for display.

I often change the eye style β€” safety eyes, embroidered eyes, or tiny buttons each give a different expression and safety level for small children.

To make seasonal versions I add little accessories like a crocheted scarf, a felt bow, or tiny embroidered patterns on the body.

If I want a sturdier toy for toddlers, I skip small detachable parts and embroider the eyes and nose instead of using safety eyes.

I also enjoy adding tiny pockets or stitched patches to the body to create a 'clothing' effect and more tactile detail.

To change proportions, I adjust the number of rows in the body panels β€” more rows equals a longer torso and a taller rabbit.

I recommend testing one modification at a time so you can see how each change affects the overall look and function of the toy.

Common Mistakes & How to Fix Them

βœ— Skipping stitch markers during rounds or panel joins leads to misaligned edges and corners; mark the first stitch of each round and mark panel corners before joining to keep sections even. βœ— Not stuffing sections at the right time can make shaping difficult and cause lumps; stuff as directed (for example stuff the lilac ear piece before switching colors) and add fiber gradually for an even result. βœ— Changing yarn colors without securely fastening the join can lead to loose ends and unraveling; weave in or secure color transitions neatly and leave tails long enough to sew or weave in later. βœ— Forgetting to count stitches after increases or decreases causes uneven shaping and incorrect stitch counts; count your stitches after each shaping round and correct mistakes immediately. βœ— Crocheting too tightly will make the fabric stiff and the stretchy limbs less flexible; maintain consistent, relaxed tension, especially when making long tubular limbs to preserve stretch.
Tick the Rabbit Amigurumi Pattern

Create a stretchy, playful rabbit toy designed to delight kids and crafters alike. This pattern guides you through crocheting the detachable ears, limbs, body panels, and cute facial details. You will enjoy the simple shaping and the unique stretchy limbs that move up and down. Perfect as a handmade gift or a fun dexterity toy for little hands.

Intermediate 5-7 Hours

Materials Needed for Tick the Rabbit Amigurumi Pattern

β€” Main Fabric

  • 01
    YarnArt Jeans 50gr/160 m; 55% cotton, 45% acrylic; shade 19 (lilac)
  • 02
    YarnArt Jeans 50gr/160 m; 55% cotton, 45% acrylic; shade 03 (white)
  • 03
    YarnArt Iris 20 gr/170 m; 100% cotton; shade 917 (pink) for nose embroidery
  • 04
    Fiber filler for stuffing body and limb heads

β€” Tools Required

  • 01
    Crochet hook size 2 mm
  • 02
    Crochet hook size 3 mm
  • 03
    8 mm safety eyes (2 pieces)
  • 04
    Scissors
  • 05
    Large-eye yarn needle for sewing and embroidery
  • 06
    Stitch markers
  • 07
    Polyester stuffing (fiber filler)
  • 08
    Pins for assembly (optional)

Progress Tracker

0% Complete

β€” General Info :

Info :

The finished toy size from the recommended materials is 30 cm from ears to feet. Please note: this pattern does not contain crocheting lessons. You should master basic crocheting skills to create this toy. Enjoy your crocheting!

β€” Ears and legs (make 2) :

Info :

Ears and legs are crocheted in one piece. Begin crocheting in lilac with 2 mm hook.

Round 1 :

6 MR (6)

Round 2 :

(1 SC, INC)*3 (9)

Round 3-4 :

2 rnds straight: 9 SC

Round 5 :

(2 SC, INC)*3 (12)

Round 6 :

(3 SC, INC)*3 (15)

Round 7-8 :

2 rnds straight: 15 SC

Round 9 :

(4 SC, INC)*3 (18)

Round 10-17 :

8 rnds straight: 18 SC

Round 18 :

(DEC, 4 SC)*3 (15)

Round 19 :

2 rnds straight: 15 SC

Round 20 :

(DEC, 3 SC)*3 (12)

Round 21-22 :

2 rnds straight: 12 SC

Round 23 :

1 rnd straight 10 SC

Info :

Stuff the lilac piece.

Info :

Switch to white yarn. Go on crocheting. Don't stuff the white piece.

Round 24 - 75 :

52 rnds straight: 10 SC

Info :

Switch to lilac yarn.

Round 76 :

(INC, 4 SC)*2 (12)

Round 77 :

(1 SC, INC)*6 (18)

Round 78 :

(2 SC, INC)*6 (24)

Round 79 :

(3 SC,INC)*6 (30)

Round 80 - 83 :

4 rnds straight: 30 SC

Round 84 :

(DEC, 3 SC)*6 (24)

Round 85 :

(DEC, 2 SC)*6 (18)

Round 86 :

(DEC, 1 SC)*6 (12)

Info :

Stuff the piece.

Round 87 :

DEC*6 fasten off.

β€” Arms (make 2) :

Info :

Begin crocheting in lilac with 2 mm hook.

Round 1 :

5 MR (5)

Round 2 :

INC*5 (10)

Round 3-9 :

7 rnds straight: 10 SC

Round 10 :

DEC, 8 SC (9)

Round 11-13 :

3 rnds straight: 9 SC

Info :

Stuff the piece to 13th row.

Round 14 :

DEC, 7 SC (8)

Round 15-20 :

6 rnds straight: 8 SC

Info :

Fold in half and single crochet 4 through both edges. Leave a long yarn tail for sewing.

β€” Eyes (make 2) :

Info :

Begin crocheting in white with 2 mm hook.

Round 1 :

6 MR (6)

Round 2 :

INC*6 (12)

Info :

Install safety eyes in the center of the ring.

β€” Body (make 2) :

Info :

Work in lilac with 3 mm hook.

Info :

The first piece:

Info :

Chain 25, and starting into the 2nd stitch from hook work 24 SC.

Round 1 - 19 :

19 rows straight: 24 SC, make 1 turning CH at the end of each row.

Round 20 :

1 SC, DEC, 18 SC, DEC, 1 SC (22)

Round 21 :

1 rnd straight: 22 SC

Round 22 :

1 SC, DEC, 16 SC, DEC, 1 SC (20)

Round 23 - 25 :

3 rnds straight: 20 SC.

Info :

Fasten off and cut yarn.

Info :

Crochet the second piece alike: 1-16. crochet in white. 17-25. crochet in lilac.

β€” Assembly :

Info :

Begin joining the body parts together from the right upper corner using 2 mm hook.

Step :

Put the two parts together and work 4 SC through both parts' stitches. You are going to insert the ear-leg piece here. 3 SC across the front part of the body only (skip 3 stitches on the back body part), put the first ear-leg piece and go on crocheting across both body parts 5 SC, 3 SC across the front part of the body only (skip 3 stitches on the back body part), put the second ear-leg piece and go on crocheting across both body parts 4 SC, 2 SC to the corner stitch.

Step :

Get to the side edge. Work 24 SC through both parts' stitches, work 2 SC to the corner stitch.

Step :

Get to the bottom edge. Work 6 SC through both parts' stitches. You are going to insert the ear-leg piece here. 3 SC across the front part of the body only (skip 3 stitches on the back body part), put the first ear-leg piece and go on crocheting across both body parts 5 SC, 3 SC across the front part of the body only (skip 3 stitches on the back body part), put the second ear-leg piece and go on crocheting across both body parts 6 SC, 2 SC to the corner stitch. Stuff the body.

Step :

Get to the side edge. Work 24 SC through both parts' stitches, work 2 SC to the corner stitch. Stuff the body.

Info :

Eyes: Sew on between rows 17 - 20 in the middle.

Info :

Nose: Embroider a nose with pink yarn.

Info :

Arms: Attach the arms on the back on between rows 14-17.

Assembly Instructions

  • Begin joining the body panels at the right upper corner with a 2 mm hook, placing the front and back panels together and working 4 SC through both layers to secure the start point.
  • When you reach the front center for the ear-leg insertion, work 3 SC across the front panel only (skip 3 stitches on the back panel), place the first ear-leg piece and continue crocheting across both panels as directed (5 SC across both, then 3 SC front only), then insert the second ear-leg piece and continue (4 SC, 2 SC to corner).
  • Work across side edges by crocheting 24 SC through both panel stitches, then 2 SC to reach the corner stitch, repeating on the opposite side and stuffing the body as you go to maintain shape.
  • At the bottom edge insert the leg pieces following the same sequence: 6 SC through both parts, 3 SC front only (skip 3 on back), place first leg and continue 5 SC across both, 3 SC front only, place second leg, and continue 6 SC then 2 SC to corner; stuff the body before closing.
  • Sew eyes centered between rows 17-20, embroider the nose with pink yarn, and attach arms to the back between rows 14-17; weave in ends and secure all attachments firmly.

Important Notes

  • πŸ’‘Work with stitch markers to mark the first stitch of each round and to keep panel edges aligned for easier joining.
  • πŸ’‘Stuff parts gradually and at the stages indicated (for example stuff the lilac ear part before continuing and stuff the leg heads and body when directed) to achieve a smooth shape.
  • πŸ’‘Keep consistent tension across rounds and panels; tighter tension will make limbs less flexible and change the finished size.
  • πŸ’‘When joining panels, align edges and count stitches carefully to ensure ear and leg insertions sit symmetrically.

This stretchy rabbit is a playful, tactile toy that kids will adore and adults will enjoy making. The long movable limbs make it extra fun and unique, perfect for fidgety hands or as a whimsical gift. Crochet it in your favorite color combinations and share the handmade joy with someone special. 🧢🐰✨

You ask,

we answer.

FAQs

What size will the finished piece be?

The finished toy measures approximately 30 cm from ears to feet when using the recommended YarnArt Jeans and the specified hook sizes.

Can I use different yarn weights for this pattern?

Yes, you can change yarn weight, but this will affect the final size and feel; adjust hook size accordingly and note that lighter yarn will create a smaller, firmer toy while bulkier yarn makes a chunkier, softer toy.

Do I need prior crochet experience for this pattern?

This pattern is rated intermediate: basic amigurumi skills (magic ring, single crochet, increases/decreases, joining) are required to complete the toy successfully.

How long does this project typically take to complete?

Most crocheters finish this pattern in about 5-7 hours, depending on experience, assembly speed, and how much time you spend on finishing details and embroidery.