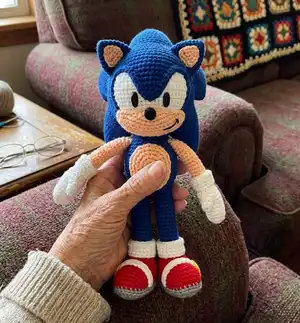
🧢 Beautiful ✨ Detailed πŸ’ Adorable

Super-Prickle Amigurumi Pattern

Super-Prickle Amigurumi Pattern
4.0β˜… Rating
12-15 Hours Time Needed
3.9K Made This
βœ‚οΈ

Intermediate Level

Ideal for those with basic crochet experience, featuring slightly more advanced stitches and techniques to expand your skills.

⏱️

Multi-Day Project

A rewarding 12+ hour journeyβ€”perfect for dedicated crafters who love detailed work.

🧸

Cute Companion

An adorable friend to cherish, handcrafted with love to bring comfort and joy for years to come.

About This Super-Prickle Amigurumi Pattern

This pattern creates a full Super-Prickle plush toy using plush and semi-cotton yarns, complete with sneakers and gloves. The design includes step-by-step rounds, photo tips for shaping, and clear assembly notes so you can reproduce the character faithfully. You will build the legs, body, head, arms and detailed gloves, then join everything for a finished collectible toy.

Super-Prickle Amigurumi Pattern crochet pattern - detailed view of completed project

Includes yarn palette suggestions, stitch abbreviations, and tips for aligning rounds and seams. Suitable for crocheters comfortable with amigurumi techniques and simple seaming.

Why You'll Love This Super-Prickle Amigurumi Pattern

I absolutely love this pattern because it balances playful character with solid construction β€” the shoes and gloves are a joy to make. I enjoyed designing the layered spikes and expressive muzzle because they give so much personality to the toy. The step-by-step rounds are written to make assembly straightforward and to help you avoid common shaping mistakes. Working with plush yarn and a contrasting cotton thread for details produces a neat, durable finish that I use in all my toys.

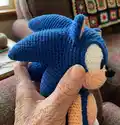
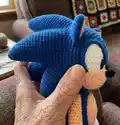
Super-Prickle Amigurumi Pattern step 1 - construction progress Super-Prickle Amigurumi Pattern step 2 - assembly progress Super-Prickle Amigurumi Pattern step 3 - details and accessories Super-Prickle Amigurumi Pattern step 4 - final assembly and finishing

Switch Things Up

I love how easy it is to customize this pattern β€” you can change the colors to make your own unique character instead of the original palette.

Want a mini version? Use a thinner yarn and smaller hook to create a keychain-sized friend, or go chunky with a bulky plush yarn for a large, cuddly toy.

I often add embroidered eyebrows or a tiny felt accessory to give each toy a different expression and story, which makes them feel personal and unique.

For a sturdier display piece, I sometimes insert light wire into the arms for posability; just be sure to secure and cover any wire ends safely inside the stuffing.

Try swapping the shoe color combinations for seasonal themes β€” red and green for holidays or pastels for spring β€” and create a whole collection.

If you prefer safety eyes, use small options and place them as directed between the head rounds, or embroider pupils with cotton for a child-safe toy.

I like adding a small loop at the top spike to hang the plush as an ornament β€” simply crochet a short chain and secure it inside the head before stuffing fully.

To make the muzzle more pronounced, tighten the hole before sewing by pulling the long thread end and shaping with your fingers until you get the desired muzzle depth.

Try different stuffing densities: firmer stuffing gives a toy that stands well, while softer stuffing makes a more cuddly feel β€” choose based on how you plan to use the toy.

Finally, experiment with finishing touches like contrast topstitching around shoes or gloves to highlight details and make your version stand out.

Common Mistakes & How to Fix Them

βœ— Skipping stitch markers during joining rounds leads to misplaced arms or legs; place markers at attachment points and count stitches often to align pieces correctly. βœ— Overstuffing the limbs causes awkward proportions and lumpy joints; stuff gradually and shape the piece as you go to maintain the intended silhouette. βœ— Cutting the thread too early when making fingers prevents joining details seamlessly; keep the last finger attached and join all four before fastening off. βœ— Ignoring color-change notes will create loose ends and visible joins; follow the instructions to carry or change colors and leave necessary tails for sewing. βœ— Not checking front/back loop instructions produces mismatched textures; work BLO and FLO rounds exactly as written and fold pieces so loose loops appear on the outside as directed.

Super-Prickle Amigurumi Pattern

Make your own Super-Prickle plush toy with clear, photo-filled instructions and detailed stitch rounds. This pattern uses plush and cotton yarn to create a sturdy, poseable character with sewn details. You will love the expressive face, layered spikes, and classic sneakers β€” all crocheted step by step. Suitable for makers who enjoy assembly and shaping projects.

Intermediate 12-15 Hours

Materials Needed for Super-Prickle Amigurumi Pattern

β€” Main Fabric

  • 01
    Plush yarn (120 m/100 g) (Himalaya Dolphin Baby / YarnArt Dolce) main shade deep blue - approximately 2.5 skeins
  • 02
    Plush yarn ivory/skin tone (HDB 80333) - less than half skein for muzzle and belly
  • 03
    Plush yarn white (HDB 80301) - small amount for gloves and eye whites
  • 04
    Plush yarn grey (YA Dolce 782) - small amount for shoe soles and accents
  • 05
    Plush yarn red (HDB 80318) - small amount for shoes
  • 06
    Plush yarn blue (HDB 80329) - small amount for accents and body
  • 07
    Cotton / semi-cotton yarn (~330 m/100 g) (YarnArt Jeans, Alize Cotton Gold, Gazzal Jeans) - black for pupils and nose and to match details (small amounts)

β€” Tools Required

  • 01
    Crochet hook size 3.5 mm
  • 02
    Long needle for tightening (for plush yarn ~ 12 cm)
  • 03
    Nylon thread for tightening or any strong light thread
  • 04
    Needles for sewing body parts
  • 05
    Stitch markers
  • 06
    Pins with large head
  • 07
    Scissors
  • 08
    Fiber filling (polyester stuffing)
  • 09
    Yarn needle for weaving in ends
  • 10
    Optional: wire for posable limbs

Progress Tracker

0% Complete

β€” Arms :

Info :

First, we are going to crochet arms, as they are going to be attached in the process of crocheting. But you can always sew them to the body in specified rounds.

Info :

*make 2 details *stuff only the palms

Item Name (Thumb) :

*white yarn *don't stuff

Round 1 :

6 SC in MR;

Rounds 2-5 :

4 rounds of 6 SC;

Info :

- work a CH, fold in half and crochet the sides together with 3 SC. - fix and cut the thread.

Section :

All other fingers (except the thumb): *white yarn *make 4 details *don't stuff

Round 1 :

6 SC in MR;

Rounds 2-6 :

5 rounds of 6 SC;

Info :

- fix and cut the thread in 3 details; - when crocheting the last 4th detail, do NOT cut the thread and begin to join all 4 fingers;

Round 7 :

3 SC on the 1st finger, 3 SC on the 2nd finger, 3 SC on the 3rd finger, 6 SC on the 4th finger, 3 SC on the 3rd finger, 3 SC on the 2nd finger, 3 SC on the 1st finger (24)

Rounds 8-12 :

5 rounds of 24 SC;

Info :

- in Rd 13 we attach the thumb; - to make sure that the finger is exactly in its place, fold the detail in half along all the fingers and shift the stitch marker to the next SC from the fold line

Round 13 :

left arm: SC, 3 SC with the thumb, 20 SC (24); right arm: 8 SC, 3 SC with the thumb, 13 SC (24);

Round 14 :

(10 SC, DEC)*2 (22);

Round 15 :

(9 SC, DEC)*2 (20);

Round 16 :

(3 SC, DEC)*4 (16);

Round 17 :

(2 SC, DEC)*4 (12);

Info :

- change thread color to ivory;

Round 18 :

(4 SC, DEC)*2 (10);

Round 19 :

(3 SC, DEC)*2 (8);

Round 20 :

(2 SC, DEC)*2 (6);

Info :

- stuff only the palm so that it stays flat;

Rounds 21-32 :

12 rounds of 6 SC;

β€” Edge of the glove :

Info :

*white yarn *make 2 details *make a turn and work a turning CH at the end of each row

Round 0 :

Chain 22;

Round 1 :

start in the 2nd chain from the hook: 21 SC;

Round 2 :

BLO: 21 SC;

Round 3 :

FLO: 21 SC;

Info :

- fix the thread and leave a long end to sew; - fold the detail in half so that the loose front loops of rows 2 and 3 are on the front side; - carefully sew the edges; - turn out the detail; - put it on the arm and fix it with two stitches on two opposite sides of the arm so that the seam is on the opposite side from the thumb between Rds 15 and 16 of the arm.

β€” Legs :

Info :

*make 2 details *stuff in process *start with grey yarn Principle of crocheting an oval without SS and turning chain using 10 CH in the base.

Round 0 :

Chain 10; - work in spiral (without a turning CH and SS) as in all amigurumi toys (oval-shape detail);

Round 1 :

start in the 2nd chain from the hook: 8 SC, 3 into the last chain from the hook, on the other side: 7 SC, INC (20);

Round 2 :

INC, 7 SC, 3 INC, 7 SC, 2 INC (26);

Round 3 :

SC, INC, 7 SC, (SC, INC)*3, 7 SC, (SC, INC)*2 (32);

Round 4 :

(2 SC, INC)*2, 4 SC, (2 SC, INC)*3, 4 SC, (2 SC, INC)*3 (40);

Round 5 :

(3 SC, INC)*2, 4 SC, (3 SC, INC)*3, 4 SC, (3 SC, INC)*3 (48);

Info :

- change thread color to red, don’t cut the grey thread and leave it on the outside for further crocheting;

Round 6 :

BLO: 48 SC;

Info :

- shift stitch marker to the middle of the heel (if needed);

Round 7 :

20 SC, 4 DEC, 20 SC (44);

Info :

- return to the grey thread, don’t cut the red one; - work 48 SS in loose front loops of Rd 5; - join the Rd with SS, fasten off, hide the thread inside the foot;

Info :

- continue crocheting the foot with a red thread;

Round 8 :

18 SC, 4 DEC, 18 SC (40);

Round 9 :

16 SC, 4 DEC, 16 SC (36);

Round 10 :

14 SC, 4 DEC, 14 SC (32);

Round 11 :

12 SC, 4 DEC, 12 SC (28);

Round 12 :

10 SC, 4 DEC, 10 SC (24);

Round 13 :

8 SC, 4 DEC, 8 SC (20);

Round 14 :

6 SC, 4 DEC, 6 SC (16);

Info :

- stuff the foot tightly keeping a pointed triangle shape;

Info :

- change thread color to deep blue;

Round 15 :

(6 SC, DEC)*2 (14);

Round 16 :

(5 SC, DEC)*2 (12);

Round 17 :

(4 SC, DEC)*2 (10);

Round 18 :

(3 SC, DEC)*2 (8);

Info :

- stuff the ankle well, then keep stuffing the leg in the process;

Rounds 19-31 :

13 rounds of 8 SC;

Info :

- fasten off on the first leg; it is the left leg; - do NOT fasten off on the second leg (right one), work several additional SC (or loose several SC), so that the end of the round is on the inner side;

β€” Body-Head :

Info :

*stitch marker is on the back *stuff in process *crochet chain 4 from the right leg; *attach both legs to each other and continue crocheting on the left leg from the side behind according to the pattern:

Round 32 :

on the left leg: 8 SC, on the chain: 4 SC, on the right leg: 8 SC, on the chain: 4 SC (24);

Round 33 :

(3 SC, INC)*6 (30);

Round 34 :

30 SC;

Round 35 :

(4 SC, INC)*6 (36);

Round 36 :

36 SC;

Round 37 :

(5 SC, INC)*6 (42);

Rounds 38-43 :

6 rounds of 42 SC;

Round 44 :

(5 SC, DEC)*6 (36);

Rounds 45-46 :

2 rounds of 36 SC;

Round 47 :

(4 SC, DEC)*6 (30);

Info :

- in Rd 48 we are going to attach arms; - for accuracy of attachment mark 3 SC (place of attachment) at a distance of 12 SC in the front and on the back;

Round 48 :

5 SC, 3 SC with the arm, 12 SC, 3 SC with the arm, 7 SC (30);

Round 49 :

30 SC;

Round 50 :

(3 SC, DEC)*6 (24);

Round 51 :

(2 SC, DEC)*6 (18);

Round 52 :

(SC, INC)*9 (27); (the first Rd of the head)

Round 53 :

(2 SC, INC)*9 (36);

Round 54 :

(3 SC, INC)*9 (45);

Round 55 :

(4 SC, INC)*9 (54);

Round 56 :

(8 SC, INC)*6 (60);

Rounds 57-68 :

12 rounds of 60 SC;

Round 69 :

(8 SC, DEC)*6 (54);

Round 70 :

(7 SC, DEC)*6 (48);

Round 71 :

(6 SC, DEC)*6 (42);

Round 72 :

(5 SC, DEC)*6 (36);

Round 73 :

(4 SC, DEC)*6 (30);

Round 74 :

(3 SC, DEC)*6 (24);

Round 75 :

(2 SC, DEC)*6 (18);

Round 76 :

(SC, DEC)*6 (12);

Round 77 :

6 DEC (6); - do NOT tighten the hole, we will need it for a neat muzzle tightening; - fix the thread and leave the long end for tightening the hole.

Assembly Instructions

  • Attach the head to the body by closing the head opening (after round 77) and use the long thread end to tighten the muzzle evenly before sewing the head securely to the neck area.
  • Position and sew the arms into the attachment points marked in round 48 (3 SC markers); insert the arm so seam is secure and sew from inside with a yarn needle using matching thread.
  • Fold glove details and sew edges first, then place glove on the arm and fix with two stitches on two opposite sides so the seam sits opposite the thumb between rounds 15 and 16 of the arm.
  • Align and attach the legs by crocheting the chain connection and sewing any gap between the legs from the inside; the first leg fastened off is the left leg, keep the right leg attached until joining to the body.
  • Sew details such as eye whites, pupils and nose using cotton yarn; position pupils in the eye whites before securing and embroider any small mouth lines for expression.

Important Notes

  • πŸ’‘Use stitch markers to keep track of rounds, especially when attaching arms and marking the front/back placement of pieces.
  • πŸ’‘Work with consistent tension when using plush yarn β€” it behaves differently than standard yarn, so check gauge with small test pieces.
  • πŸ’‘Do not cut color threads when instructed to carry them; some sections require the previous color left on the outside for further crocheting or joining.
  • πŸ’‘Stuff gradually and shape each part as you go; overstuffing small details like fingers will distort the final look.
  • πŸ’‘Pin parts in place before sewing to ensure even, symmetrical placement and a balanced finished toy.

This Super-Prickle pattern walks you through a full plush character with personality and classic sneaker details. Whether you are making it for yourself or gifting it, the pattern is designed to be durable and charming. Happy crocheting and enjoy bringing your handmade friend to life! 🧢 🧡

You ask,

we answer.

FAQs

What size will the finished piece be?

The finished amigurumi measures approximately 35-38 cm (13.7"-15") tall when using the recommended plush yarn and a 3.5 mm hook.

Can I use different yarn weights for this pattern?

Yes, you can use different yarn weights, but the final size and stitch definition will change; adjust your hook size accordingly to maintain similar proportions.

Do I need prior crochet experience for this pattern?

This pattern is rated intermediate, so basic knowledge of amigurumi techniques, increases, decreases, and working in BLO/FLO is recommended for best results.

How long does this project typically take to complete?

Most crocheters complete this project in 12-15 hours spread over several sessions, though time may vary based on experience and speed.