🧢 Beautiful ✨ Detailed πŸ’ Adorable

Cute Bunny Amigurumi Pattern

Cute Bunny Amigurumi Pattern
4.9β˜… Rating
5-7 Hours Time Needed
2.3K Made This
βœ‚οΈ

Intermediate Level

Ideal for those with basic crochet experience, featuring slightly more advanced stitches and techniques to expand your skills.

⏱️

Weekend Treat

Takes 5-7 hours, making it an enjoyable project to finish over a couple of days.

🧸

Cute Companion

An adorable friend to cherish, handcrafted with love to bring comfort and joy for years to come.

About This Cute Bunny Amigurumi Pattern

This pattern teaches you how to crochet a delightful chenille bunny amigurumi complete with muzzle, long ears, a bow and a fluffy tail. Youll work in spiral rounds with clear stitch counts and shaping instructions. The finished bunny measures approximately 35 cm tall and is perfect for gifting, decorating, or practicing shaping skills.

Cute Bunny Amigurumi Pattern crochet pattern - detailed view of completed project

Includes full parts instructions (legs, body, head, ears, arms, tail) and simple assembly steps. Uses chenille yarn for an ultra-soft finished toy.

Why You'll Love This Cute Bunny Amigurumi Pattern

I absolutely love this pattern because it turns simple stitches into a sweet, huggable character with lots of personality. I enjoy how the chenille yarn creates a plush, snuggly texture thats irresistible to touch. The shaping for the muzzle and head gives the bunny a cheerful expression that always makes me smile when a piece is finished. Its satisfying to sew the parts together and watch the toy come to life with a bow and soft ears.

Cute Bunny Amigurumi Pattern step 1 - construction progress Cute Bunny Amigurumi Pattern step 2 - assembly progress Cute Bunny Amigurumi Pattern step 3 - details and accessories Cute Bunny Amigurumi Pattern step 4 - final assembly and finishing

Switch Things Up

I love customizing this bunny by changing yarn colors and small details to make each one unique.

You can swap the yellow chenille for pastel shades to create a soft baby version or use bold colors for a playful look.

To make a mini version, use a finer yarn and a smaller hook; for a jumbo cuddle friend, choose chunky chenille and a larger hook.

I often change the bow color or add tiny crocheted accessories like a scarf or hat to give each bunny personality.

Try embroidering different facial expressions by moving the mouth or eye placement slightly to change the mood of the character.

Use safety eyes for a polished finish or felt for a softer, child-safe face depending on who will receive the toy.

For a weighted base, add a small bag of poly pellets inside the feet before stuffing to help the bunny sit upright.

I sometimes add wire to the ear base for poseable ears or to the limbs for a posable toy that can be arranged.

Mix textures by using cotton for the muzzle and chenille for the body to create contrast and visual interest.

Turn this into a set by making matching accessories like a tiny blanket, carrot, or a miniature friend using the same color palette.

Common Mistakes & How to Fix Them

βœ— Skipping stitch markers while joining legs and body can cause misaligned shaping; mark the start of the round and the join points so your increases and decreases stay in the right place. βœ— Not stuffing evenly leads to lumpy or collapsed shapes; stuff gradually and shape as you go, adding small amounts until the piece feels firm and smooth. βœ— Changing color without securing the ends neatly creates a messy finish; carry the yarn or weave in ends immediately after a color change for clean transitions. βœ— Forgetting to count after increases or decreases results in wrong stitch counts later; count your stitches every few rounds and especially after shaping rounds to stay on track. βœ— Pulling yarn too tight for chenille makes the fabric stiff and hides stitch definition; maintain a gentle, consistent tension to keep the toy soft and stretchy.

Cute Bunny Amigurumi Pattern

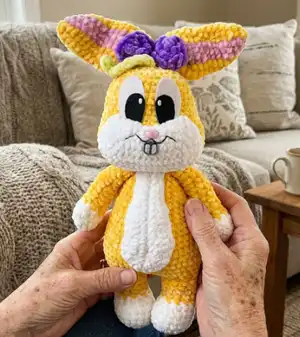
Make a soft, squishy chenille bunny with this full crochet pattern. Youll create a 35 cm tall plush with a cute muzzle, long ears, a sweet bow and a fluffy tail. The pattern uses chenille yarn and clear step-by-step instructions so you can stitch, stuff and assemble a charming handmade companion. Perfect for gifting or decorating nurseries and cozy corners.

Intermediate 5-7 Hours

Materials Needed for Cute Bunny Amigurumi Pattern

β€” Main Fabric

  • 01
    Chenille yarn (main yellow color) - approx 150-200g
  • 02
    Chenille yarn (white) - approx 75-100g for belly, muzzle, paws and tail
  • 03
    Chenille yarn (pink) - small amount for inner ear and nose detail
  • 04
    Chenille yarn (purple) - small amount for bow (approx 10-20g)
  • 05
    Cotton yarn (pink) for nose - small scrap with 2.5mm hook

β€” Tools Required

  • 01
    Crochet hook size 6 mm
  • 02
    Crochet hook size 2.5 mm for nose (cotton yarn)
  • 03
    Sewing needle for sewing parts
  • 04
    Scissors
  • 05
    Fabric glue or hot glue gun
  • 06
    Fiberfill for stuffing
  • 07
    Black and white felt for eyes (or safety eyes alternative)
  • 08
    Stitch markers
  • 09
    Pins for assembly

Progress Tracker

0% Complete

β€” ARMS (make 2) :

Round 1 :

Start with white yarn 6 sc (6)

Round 2 :

6 inc (12)

Round 3 :

12 sc (12)

Round 4 :

5 sc, 1 bobble, 6 sc. Change to yellow color yarn (12)

Round 5 :

(sc, dec) * 4 times (8)

Round 6-7 :

8 sc (8)

Round 8 :

3 sc, inc, 4 sc (9)

Round 9-11 :

9 sc (9)

Round 12 :

4 sc, inc, 4 sc (10)

Round 13-15 :

10 sc (10)

Info :

Stuff firmly, cut the yarn and leave a long tail for sewing

β€” LEGS (make 2) AND BODY :

Round 1 :

Start with white yarn Chain 5: start to crochet on the 2nd chain from the hook: 3 sc, 4 sc in the same stitch, continue to work on the other side of foundation chain: 2 sc, inc, inc, 2 sc, 4 inc, 2 sc, 2 inc (stitches shown 11)

Round 2 :

dec, 4 sc Change to yellow color 6 sc, dec, 5 sc 12 sc (18)

Round 3-5 :

18 sc (18)

Round 6 :

12 sc (13)

Round 7 :

12 sc (12)

Round 8-11 :

12 sc (12)

Info :

Stuff firmly, cut the yarn Do the 2nd leg the same way, do not cut the yarn, chain 2 and join 2 legs together in the next round and crochet the body

β€” BODY :

Round 12 :

12 sc on the 1st leg, 2 sc on the chain 2, 12 sc on the 2nd leg, 2 sc on the chain 2 (28)

Round 13 :

(3 sc, inc) * 7 times (35)

Round 14 :

(4 sc, inc) * 7 times (42)

Round 15 :

(inc, 2 sc) * 3 times, 24 sc, (inc, 2 sc) * 3 times (48)

Round 16-18 :

48 sc (48)

Round 19 :

(6 sc, dec) * 6 times (42)

Round 20 :

42 sc (42)

Round 21 :

(5 sc, dec) * 6 times (36)

Round 22 :

36 sc (36)

Round 23 :

(4 sc, dec) * 6 times (30)

Round 24-26 :

30 sc (30)

Round 27 :

(3 sc, dec) * 6 times (24)

Round 28-30 :

24 sc (24)

Round 31 :

(2 sc, dec) * 6 times (18)

Round 32 :

4 sc on the body, 5 sc through body and arm 1, 4 sc on the body, 5 sc through body and arm 2 (sc, dec) * 6 times (18)

Round 33 :

12 sc (12)

Info :

Stuffed firmly, do not cut the yarn, we will continue to crochet the head

β€” HEAD :

Round 34 :

12 inc (24)

Round 35 :

(sc, inc) * 12 times (2 sc, inc) * 12 times (3 sc, inc) * 12 times 60 sc (60)

Round 36 :

Continue to crochet to the middle of the head back (9 sc, you may need to add or omit one sc to reach the midpoint) (48)

Round 37 :

Place marker. This will be the new starting point of the round (60)

Round 38-40 :

sc, 10 dec, 10 sc, 10 dec, 5 sc. (3 sc, dec) * 8 times 32 sc. Stuff as you go (2 sc, dec) * 8 times (sc, dec) * 8 times (60)

Round 41 :

8 dec (40)

Round 42 :

32 sc (32)

Round 43-49 :

32 sc (32)

Round 50 :

24 sc (24)

Round 51 :

16 sc (16)

Round 52 :

8 sc (8)

Info :

Stuffed firmly, cut the yarn and weave the end

β€” TAIL (Use white color yarn) :

Round 1 :

6 sc in the MR (6)

Round 2 :

6 inc (12)

Round 3 :

(sc, inc) * 6 times (18)

Round 4 :

18 sc (18)

Round 5 :

(sc, dec) * 6 times (12)

Info :

Fasten off and leave a long tail for sewing

β€” EARS :

Info :

YELLOW COLOR is written in BLACK, PINK color is written in RED

Round 1 :

5 sc in the MR (5)

Round 2 :

2 inc, inc, 2 inc (10)

Round 3 :

4 sc, 2 sc, 4 sc (10)

Round 4 :

(sc, inc) * 2 times, sc, inc, (sc, inc) * 2 times (15)

Round 5-9 :

6 sc, 3 sc, 6 sc (15)

Round 10 :

(2 sc, inc) * 2 times, 2 sc, inc, (2 sc, inc) * 2 times (20)

Round 11-17 :

8 sc, 4 sc, 8 sc (20)

Round 18 :

20 sc (20)

Info :

Fold in half, cut the yarn and leave a long tail for sewing

β€” BELLY (Use white color yarn) :

Round 1 :

Chain 14, start to crochet on the 2nd chain from the hook: 12 sc, 5 sc in the same stitch, 12 sc on the other side of the foundation chain. Chain 1 and turn (27)

Round 2 :

6 sc, 5 hdc, dc, 5 dc inc, dc, 5 hdc, 6 sc (34)

Info :

Cut the yarn and leave a long tail for sewing

β€” MOUTH (Use white color yarn) :

Round 1 :

Chain 11, start to crochet on the 2nd chain from the hook: inc, 8 sc, 4 sc in the same stitch, 8 sc on the other side of the foundation chain, inc, slst (24)

Round 2 :

Chain 1, 2 inc, 8 sc, 4 inc, 8 sc, 2 inc, slst (32)

Round 3 :

Chain 1, (sc, inc) * 2 times, 8 sc, (sc, inc) * 4 times, 8 sc, (sc, inc) * 2 times, slst (40)

Round 4 :

Chain 2, 5 dc, 2 hdc, 2 sc, 2 slst, 2 sc, 2 hdc, 7 dc, 2 hdc, 12 slst, 2 hdc, 2 dc (40)

Info :

Cut the yarn and leave a long tail for sewing

β€” NOSE :

Info :

Use cotton yarn in pink and 2.5mm hook

β€” WOOLYMAGICS :

MR :

4 sc in the MR, close the hole and cut the yarn (do not slst). Leave a long tail for sewing

β€” EYES :

Info :

Use black and white felt to cut the eyes

β€” HAIR :

Info :

Use yellow color yarn Chain 10: start to crochet on the 2nd chain from the hook: 2 slst, 2 sc, 2 hdc, 3 dc, slst and fasten off. Leave a long tail for sewing

β€” BOW :

Info :

Use purple color yarn Chain 5: 4 treble crochet on the 1st chain, chain 4 and slst into the 1st chain, chain 4 + 4 treble crochet on the 1st chain, chain 4 and slst. Cut the yarn and leave a long tail to wrap around the middle of the bow.

β€” MUZZLE :

Info :

Muzzle piece is crocheted in white chenille yarn (see mouth and muzzle photos for shape and placement)

β€” ASSEMBLY :

Info :

Sew the belly on the body over round 16-33. Sew the ears to the head on round 47-51. Sew the bow next to ears, sew the hair close to the bow. Sew the mouth to the head over round 35-42. Sew the tail to the back of body over round 15-18. Use hot glue to attach the eyes on the face.

Assembly Instructions

  • Sew the belly on the body over round 16-33 to sit centered on the front torso.
  • Sew the ears to the head on round 47-51, pinning each ear so they are symmetrical before stitching.
  • Sew the bow next to the ears and sew the hair close to the bow using the long tails to secure and hide seams.
  • Sew the mouth/muzzle to the head over rounds 35-42 and embroider the mouth and teeth with black yarn for definition.
  • Sew the tail to the back of the body over rounds 15-18 and weave in the ends securely.
  • Use hot glue or fabric glue to attach felt eyes to the face if not using safety eyes.

Important Notes

  • πŸ’‘This pattern uses US crochet terminology and works in spiral rounds; do not slip stitch unless stated.
  • πŸ’‘For single stitches I yarn under to make x stitch so the stitches stay neat and nice when stuffing; maintain consistent tension.
  • πŸ’‘Do not stuff too tight; overstuffing can distort the shaping of the head and body.
  • πŸ’‘Use stitch markers to keep track of the start of each round and when joining pieces; this helps maintain correct stitch counts.
  • πŸ’‘Weave in ends and secure color changes as you go to avoid bulky seams during assembly.

This adorable chenille bunny was designed to be soft, cuddly and full of character. Its plush texture and friendly face make it a delightful gift or nursery companion. Make one in different colorways for seasonal gifts or a matching family of bunnies. 🧢🐰

You ask,

we answer.

FAQs

What size will the finished piece be?

The finished amigurumi measures approximately 35 cm tall when using the recommended chenille yarn and 6 mm hook.

Can I use different yarn weights for this pattern?

Yes, you can use different yarn weights but the final size and texture will change; choose an appropriate hook for your yarn and expect a different finished height.

Do I need prior crochet experience for this pattern?

This pattern is rated intermediate; basic knowledge of single crochet, increases, decreases and working in spiral rounds is recommended.

How long does this project typically take to complete?

Most crocheters complete this project in 5-7 hours, though time may vary based on experience level and working pace.

Are safety eyes required or can I use felt?

You can use either; the pattern uses black and white felt pieces for the eyes, attached with fabric or hot glue, but safety eyes may be used if preferred and appropriate for the recipient.