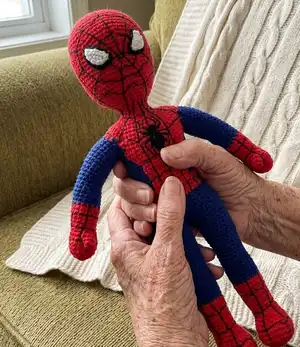
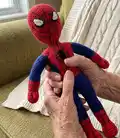
Make your own charming Spiderman amigurumi with step-by-step instructions, clear photos, and full stitch-by-stitch rounds. This intermediate-level pattern walks you through hands, legs, body, head, eyes and the spider logo so you can create a 15-inch (38 cm) handcrafted toy. Perfect for gift-making or expanding your amigurumi skills, with tips for color changes and finishing.
Progress Tracker
0% Complete
— Hands :
Info :
Make two hands with red yarn and blue yarn. This part is crocheted in continuous spirals without joining the rounds. Set a marker to keep track of the beginning of each round. Make two hands with red yarn and change to blue yarn at round 22.
Round 01 :
Start with chain 7, turn( pic 05) (07)
Round 02 :
5 sc( pic 06), 1 tripple ( 3 sc in same stitch - pic 07)), 4 sc, 1 inc ( pic 08). Set a stitch marker. (14)
Round 03 :
1 inc, 4 sc, 3 inc, 4 sc, 2 inc( pic 09) (20)
Round 08 :
20 sc (pic 10) (20)
Round 09 :
1 bobble st( = chain 01, 5 dc in same hole)(pic 11- pic 18) , 19 sc. (20)
Round 10 :
(Ignore chain 01 of round 09),2 dec, 5 sc, 2 dec, 7 sc( pic 19) (16)
Round 11 :
1 dec, 5 sc, 1 dec, 7 sc (14)
Info :
We can start stuffing for his hand from this round.
Round 16 :
1 inc, 13 sc (15)
Round 20 :
1 inc, 14 sc (16)
Info :
Change to blue yarn at last stitch of round 21 (pic 20,21,22)
Round 22 :
Blue yarn BLO 16 sc (16)
Round 23 :
1 inc, 15 sc (17)
Round 27 :
17 sc ( pic 23) (17)
Round 28 :
2 sc, 6 slip stitch( pic 24), 5 sc, 2 hdc -inc( elbow part), 2 sc (19)
Round 29 :
14 sc, 2 hdc, 3 sc ( pic 25) (19)
Round 30 :
19 sc ( pic 26) (19)
Round 31 :
1 inc, 18 sc (20)
Round 39 :
8 sc, 1 dec, 10 sc (19)
Info :
Stuff fully for hand. Cut yarn and keep aside for assembly. Make another hand as same way. (pic 27)
— Legs :
Info :
Make two legs with red yarn and blue yarn. This part is crocheted in continuous spirals without joining the rounds. Set a marker to keep track of where the beginning of each round starts. Make two legs with red yarn and change to blue yarn at round 25.
Round 01 :
Start with chain 10, turn (pic 28) (10)
Round 02 :
8 sc (pic 29), 1 tripple ( 3 sc in same stitch – pic 30) 7 sc, 1 inc ( pic 31) (20)
Round 03 :
1 inc, 7 sc, 3 inc, 7 sc, 2 inc(pic 32) (26)
Round 04 :
1 sc, 1 inc, 7 sc, ( 1 sc, 1 inc) * repeat 3 times, 7 sc, ( 1 sc, 1 inc) * repeat 2 times( pic 33) (32)
Round 05 :
BLO 32 sc( pic 34) (32)
Round 09 :
32 sc( pic 35) (32)
Round 10 :
10 sc, 6 dec, 10 sc (26)
Round 11 :
8 sc, 5 dec, 8 sc (21)
Round 12 :
7 sc, 3 dec, 8 sc (18)
Round 18 :
1 inc, 17 sc (19)
Round 20 :
1 inc, 18 sc (20)
Round 22 :
1 inc, 19 sc (21)
Round 24 :
1 inc, 20 sc (22)
Info :
Change to blue yarn at last stitch of round 24 ( pic 36)
Round 25 :
Blue yarn BLO 22 sc (pic 37) (22)
Round 31 :
4 sc, 2 dec, 14 sc (20)
Round 32 :
12 sc, 5 inc ( the knee part), 3 sc (25)
Round 34 :
12 sc, 1 dec, 6 sc, 1 dec, 3 sc (23)
Round 35 :
13 sc, 3 dec, 4 sc (20)
Round 37 :
4 sc, 1 inc, 15 sc (21)
Round 38 :
5 sc, 1 inc, 15 sc (22)
Round 39 :
6 sc, 1 inc, 15 sc (23)
Round 40 :
7 sc, 1 inc, 15 sc (24)
Round 41 :
8 sc, 1 inc, 15 sc (25)
Round 42 :
9 sc, 1 inc, 15 sc (26)
Round 49 :
2 sc, 1 dec, 22 sc (25)
Round 50 :
7 sc. Cut yarn and stuff fully leg (07). Make another leg as same way and prepare for assembly.( pic 38)
— Joining two legs :
Info :
This part is crocheted in continuous spirals without joining the rounds. Set a marker or stitch marker to keep track of where the beginning of each round starts. Join legs with blue yarn.
Round 01 :
Back side of leg: From inside of side right leg, through hook out (pic 39), make chain 02( pic 40), join with left leg( pic 41) and crochet 25 sc, next FLO 2 sc on chain( pic 42), 25 sc on right leg and 2 sc on chain( pic 43). (54) Set a marker.
Round 03 :
23 sc, 1 dec, 2 inc, 1 dec, 25 sc (54)
Round 04 :
4 sc, 2 inc, 16 sc, 1 dec, 4 sc, 1 dec, 16 sc, 2 inc, 6 sc (56)
Round 05 :
5 sc, 2 inc, 16 sc, 1 dec, 4 sc, 1 dec, 16 sc, 2 inc, 7 sc (58)
Round 06 :
24 sc, 1 dec, 4 sc, 1 dec, 26 sc (56)
Round 07 :
3 sc, 1 dec, 4 sc, 1 dec, 12 sc, 1 dec, 4 sc, 1 dec, 12 sc, 1 dec, 4 sc, 1 dec, 5 sc (50)
Round 08 :
4 sc, 1 dec, 14 sc, 1 dec, 4 sc, 1 dec, 14 sc, 1 dec, 6 sc (46)
Info :
From round 10 we are going change yarn color frequently. As my advise, we should cut yarn at each time the color changed and tight off.
Round 10 :
Blue yarn :11 sc, 1 dec, 9 sc, Red yarn: 2 sc, Blue yarn 9 sc, 1 dec, 11 sc. (pic 44) (44) Change to red yarn at last stitch of round 10
Round 11 :
Red yarn: 9 sc, 1 dec, 9 sc, 1 DEC, 1 DEC, 9 sc, 1 dec, 9 sc (40)
Info :
Specially, at two highlight decrease crochets on round 11, each decrease crochet took 1 first loop of red yarn and 1 first loop of blue yarn (pic 45).
Round 12 :
(4 sc, 1 dec, 4 sc) * repeat 4 times (36)
Round 15 :
36 sc. Move marker to next stitch (36)
Round 16 :
9 sc, 1 inc, 16 sc, 1 inc, 9 sc (38)
Info :
From round 17 – 30: please follow the table as below for color segments and stitch counts.
Round 17 :
6 sc (red), 8 sc (blue), 10 sc (red), 8 sc (blue), 6 sc (red) (38)
Round 18 :
6 sc (red), 4 sc, 1 inc, 3 sc (blue), 4 sc, 1 inc, 5 sc (red), 3 sc, 1 inc, 4 sc (blue), 6 sc (red) (41)
Round 19 :
6 sc (red), 9 sc (blue), 11 sc (red), 9 sc (blue), 6 sc (red) (41)
Round 20 :
6 sc (red), 4 sc, 1 inc, 4 sc (blue), 11 sc (red), 4 sc, 1 inc, 4 sc (blue), 6 sc (red) (43)
Round 21 :
6 sc (red), 10 sc (blue), 11 sc (red), 10 sc (blue), 6 sc (red) (43)
Round 22 :
6 sc (red), 10 sc (blue), 1 inc, 9 sc, 1 inc (red), 10 sc (blue), 6 sc (red) (45)
Round 23 :
6 sc (red), 10 sc (blue), 13 sc (red), 10 sc (blue), 6 sc (red) (45)
Round 24 :
6 sc (red), 10 sc (blue), 13 sc (red), 10 sc (blue), 6 sc (red) (45)
Round 25 :
7 sc (red), 8 sc (blue), 15 sc (red), 8 sc (blue), 7 sc (red) (45)
Round 26 :
8 sc (red), 6 sc (blue), 17 sc (red), 6 sc (blue), 8 sc (red) (45)
Info :
Prepare two hands and start joining at round 27. ( pic 48)
Round 27 :
8 sc (red), 3 sc, join left hand 19 sc, 2 sc (blue), 19 sc (red), 2 sc, join right hand 19 sc, 3 sc (blue), 8 sc (red) (83)
Round 28 :
Red 9 sc, Blue 1 sc 1 dec 8 sc, Red 1 sc, Blue 8 sc 1 dec 21 sc, Red 1 dec 8 sc 1 sc 9 sc (79) (follow table segmentation)
Round 29 :
Follow table segmentation for round 29 (see pattern table) resulting in 75 stitches (75)
Round 30 :
Follow table segmentation for round 30 resulting 71 stitches (71)
Info :
Stuff fiber for body as long as we crochet. From round 31 we are going with Red yarn.
Round 31 :
9 sc, 1 dec, 13 sc, 1 dec, 19 sc, 1 dec, 13 sc, 1 dec, 9 sc (67)
Round 32 :
8 sc, 1 dec, 12 sc, 1 dec, 18 sc, 1 dec, 12 sc, 1 dec, 9 sc (63)
Round 33 :
(4 sc, 1 dec, 3 sc) * repeat 7 times (56)
Round 34 :
(3 sc, 1 dec, 3 sc) * repeat 7 times (49)
Round 35 :
(3 sc, 1 dec, 2 sc) * repeat 7 times (42)
Round 36 :
(5 sc, 1 dec) * repeat 6 times (36)
Round 37 :
(2 sc, 1 dec, 2 sc) * repeat 6 times (30)
Round 38 :
(3 sc, 1 dec) * repeat 6 times (24)
Round 44 :
3 sc . Move marker here (pic 49, 50). (Now, our marker is placed in center of his back side.) Continue with round 44: 7 sc, 1 inc, 1 sc, 1 inc, 1 sc, chain 5 ( pic 51) turn, 3 sc on chain( pic 52 ) , next on round 44: 1 sc, 1 inc, 1 sc, 1 inc, 9 sc (36)
Round 45 :
8 sc, 1 inc, 1 sc, 1 inc, 1 sc, 1 inc, 2 sc, 4 sc in same hole ( at center of chain), 2 sc (all 8 sc are crocheted on chain made at round 44) , 1 inc, 1 dec, 1 inc, 1 sc, 1 inc, 9 sc (pic 53, 54) (41)
Round 46 :
15 sc, 1 inc, 3 sc, 2 inc ( in center of chin ) 3 sc, 1 inc, 16 sc (45)
Round 47 :
16 sc, 1 inc, 10 sc, 1 inc, 17 sc (47)
Round 67 :
47 sc. (pic 55) (47)
Round 68 :
4 sc, (3 sc, 1 dec, 3 sc) * repeat 5 times, 3 sc (42)
Round 69 :
(5 sc, 1 dec)* repeat 6 times (36)
Round 70 :
(2 sc, 1 dec, 2 sc) * repeat 6 times (30)
Round 71 :
(3 sc, 1 dec) * repeat 6 times (24)
Round 72 :
(1 sc, 1 dec, 1 sc) * repeat 6 times (18)
Round 73 :
(1 sc, 1 dec) * repeat 6 times (12)
Info :
Fully stuff for head.
Round 74 :
6 dec. Fasten off. (06)
Info :
Cut yarn. Keep long tail, sew around his under chin for a best seeing, as like as his armpits, use a piece of blue yarn for sewing it tightly.
— Eyes :
Info :
Make two eyes with white yarn and black yarn. Use Alize Miss yarn for making two eyes with White yarn and black yarn around (hook number: 1.mm). This part is crocheted in turn.
Round 01 :
Magic ring with 6 sc ( pic 56) (06)
Round 02 :
3 inc, 1 sc, chain 01, turn(pic 57) (07)
Round 03 :
1 inc, 2 sc, 1 inc, 2 sc, 1 inc, chain 01, turn (pic 58) (10)
Round 04 :
1 inc, 3 sc, 1 inc, 4 sc, 1 inc, chain 01, turn (13)
Round 05 :
1 inc, 4 sc, 1 inc, 6 sc, 1 inc (16)
Round 06 :
9 sc around bottom and change to black yarn at last stitch of this round 06. ( pic 59) (09)
Round 07 :
Black yarn: 4 hdc, 15 sc, 7 slip stitch (26). Fasten off and keep a long tail for sewing on head.
Infos :
Eyes 02 (right eye) same as left eye with white yarn through round 06. Round 07: Black yarn: 10 sc, 4 hdc, 7 slip stitch, 5 sc (26). Fasten off and keep long tail for sewing on head (pic 60).
— Spider Logo :
Info :
Make with Alize Miss yarn. This part is crocheted in turn. Black yarn: hook no: 1mm.
Round 01 :
chain 02, turn ( pic 61) (02)
Round 02 :
1 inc, chain 01, turn (02)
Round 03 :
2 inc, chain 01, turn (pic 62) (04)
Round 04 :
4 sc, chain 01, turn (04)
Round 05 :
4 sc, chain 01, turn (04)
Round 06 :
1 inc, 2 sc, 1 inc, chain 01, turn (06)
Round 07 :
6 sc, chain 01, turn (06)
Round 08 :
6 sc, chain 01, turn (06)
Round 09 :
1 dec, 2 sc, 1 dec, chain 01, turn (04)
Round 10 :
2 dec, chain 01, turn (02)
Round 11 :
2 inc, chain 01, turn (04)
Round 12 :
4 sc, chain 01, turn (04)
Round 13 :
4 sc, chain 01, turn (04)
Round 14 :
2 dec (pic 63) (02)
Info :
Fasten off and cut yarn, leave a long tail for sewing on front of Spiderman chest.
— Assembly :
Info :
Place two eyes from round 58 to round 64 with a part of 7 slip stitches on top and pin temporally with needle. Each eye is 3 stitches bottom distance and 11 stitches top distance. We could adjust positions while pinning on. From the long tail of black yarn of eye, sew tightly around these eyes.
Info :
Sew spider logo to front chest using the long tail from logo. Attach hands at the positions indicated in round 27 joining. Sew legs seams and finish hiding ends. Embroider web lines on legs, hands and head using black Alize Miss yarn with needle, making vertical and horizontal links as described.
— Spider - Cobweb - legs :
Info :
Use a mount of black Alize Miss yarn (about 1.00mm) for making the cobweb on hands, legs, in front, back and Spiderman head. With a needle, through from bottom of Spiderman shoes, make a link to end of red yarn on leg (pic 65).
Info :
Through back at 1/3 or 1/4 of this link and make a knot to hole the yarn on leg (pic 66, 67). Do as the same for the second knot and third knot. Repeat as same around Spiderman leg. About 6 vertical links and 3 horizontal links.
This Spiderman amigurumi pattern walks you from first chain to the embroidered web details with clear photos and stitch counts. Create a lovable 15-inch Spiderman to gift, display, or collect — perfect for fans and crafters alike. Enjoy the process, try color variations, and make a hero to treasure. 🧶🧵