About This Mini Turtle Amigurumi Pattern
This pattern creates a tiny amigurumi turtle with a two-tone shell, small legs and a sculpted head. It uses simple rounds, increases and decreases, plus a joining method to crochet legs and tail while assembling shell and belly. You can customize colors, eyes and embroidery to make different looks.

The mini size is perfect for scrap yarn and quick makes, and the instructions include a plush-yarn head alternative. The pattern uses basic US crochet terms and clear round-by-round counts.
Why You'll Love This Mini Turtle Amigurumi Pattern
I absolutely love this pattern because it turns small amounts of yarn into a delightful little character quickly. I enjoy how a few simple rounds and clever joining create a complete toy with legs and tail crocheted in place. It is satisfying to finish one tiny turtle in an afternoon and watch it take personality through color and eye choices. I also like that it is very adaptable—you can change yarn, eye types or add embroidery to make each turtle unique.
Switch Things Up
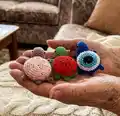
I love customizing these mini turtles by changing shell colors and adding embroidered patterns to match different personalities.
You can make a tiny sea-themed turtle with blues and white embroidery, or a woodland friend using earth tones and leaf motifs on the shell.
To make the turtle larger or smaller, switch yarn weight and hook size; bulky yarn with a larger hook makes a chunky, cuddly version while fine yarn produces a delicate mini.
I often replace safety eyes with sewn French-knot eyes or tiny beads for a safer child-friendly toy.
Try adding a keyring loop before finishing to create a turtle keychain or bag charm—just attach a metal ring through the top of the shell.
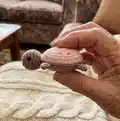
For a plush yarn look, use the provided plush-head variation so the head stays neat and soft without visible stitches.
I sometimes stuff less in the head and more in the body to alter posture so the turtle sits differently, which changes the overall expression.
Experiment with embroidery—dots, spirals or geometric panels—on the shell to create seasonal or themed turtles (holiday, rainbow, ocean).
If you like posing toys, add a length of flexible wire into the legs (careful with safety) to make very gentle posable legs for display only.
I recommend trying contrast yarn for the leg tips and tail for a cute two-tone detail that stands out against the shell.
Common Mistakes & How to Fix Them
✗ Skipping stitch markers during rounds can make it hard to track the start; place a marker at the first stitch of each round and move it as you go.
✗ Cutting yarn before joining shell and belly will make it hard to crochet legs and tail in one piece; do not cut the yarn and join the two parts facing wrong sides as instructed.
✗ Stuffing too much or unevenly will distort the shape of the head and body; stuff gradually and shape with small amounts to keep a smooth, round finish.
✗ Placing safety eyes too early or asymmetrically can ruin facial placement; mark eye positions and insert safety eyes between the recommended rounds with the correct stitch spacing.
✗ Crocheting the joining row in regular loops instead of BLO will change the shell shape; work in BLO of both shell and belly as specified to create the correct ridge and seam.
✗ Forgetting to fasten off and leave a sculpting tail will make shaping the opening difficult; leave a long tail when fastening off to sculpt and close the opening neatly.