🧢 Beautiful ✨ Detailed πŸ’ Adorable

Grumpy Mini Octopus Amigurumi Pattern

Grumpy Mini Octopus Amigurumi Pattern
4.5β˜… Rating
2-4 Hours Time Needed
2.4K Made This
βœ‚οΈ

Intermediate Level

Ideal for those with basic crochet experience, featuring slightly more advanced stitches and techniques to expand your skills.

⏱️

Bite-Sized Project

Finishes in 2-4 hoursβ€”perfect for an afternoon of creative relaxation.

🎁

Tiny Treasure

Small, sweet, and gift-worthy creations that fit perfectly in the palm of your hand with detailed charm.

About This Grumpy Mini Octopus Amigurumi Pattern

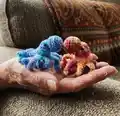
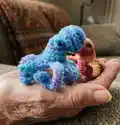
This pattern creates a tiny, grumpy mini octopus amigurumi with a small rounded nose, a slightly flattened body, and eight curly arms. It uses simple amigurumi techniques plus a few stitches like hdc and sc3tog to create texture and curl. The finished toy makes a wonderful ornament or a pocket-sized gift. Instructions include nose, body, arms, and detailed assembly notes.

Grumpy Mini Octopus Amigurumi Pattern crochet pattern - detailed view of completed project

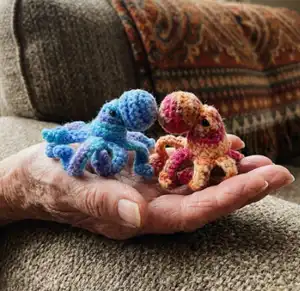
Perfect for using variegated Red Heart Super Saver or any yarn that pools for a colorful effect. Photos and placement tips are included to help you get the grumpy expression just right.

Why You'll Love This Grumpy Mini Octopus Amigurumi Pattern

I absolutely love this pattern because it turns simple stitches into a character with tons of personality. I enjoy how just a tiny nose and eyelid shaping makes the face look grumpy and full of expression. The curled arms are playful and fun to make, and they allow for creative variations depending on direction and stitch choices. It is quick to crochet but still satisfying, so I often make several in different yarns to gift to friends and family.

Grumpy Mini Octopus Amigurumi Pattern step 1 - construction progress Grumpy Mini Octopus Amigurumi Pattern step 2 - assembly progress Grumpy Mini Octopus Amigurumi Pattern step 3 - details and accessories Grumpy Mini Octopus Amigurumi Pattern step 4 - final assembly and finishing

Switch Things Up

I love changing up the yarn to create very different looks; try a self-striping or variegated yarn for a playful color pool or a solid color for a cleaner look.

If you want a bigger octopus, I often use a bulkier weight yarn and a larger hook to make a chunky, cuddly version.

For a tiny keychain or charm, use lighter weight yarn and smaller hook to create a miniature version perfect for bags or advent calendars.

I sometimes replace safety eyes with French knots or tiny embroidered eyes for a safer toy option for little children.

Try adding a small loop at the top before fastening off to hang the octopus as a Christmas tree ornament or bag charm.

I like to embroider small freckles or a mouth to change the expression from grumpy to surprised or happy.

To make posable arms, weave a thin piece of wire into the arm cores before stuffing; this lets me pose them wrapped around branches or fingers.

Experiment with different arm curl directions by working clockwise or counterclockwise as described; alternating directions gives a more dynamic finished piece.

Change eye placement slightly to alter personality β€” higher, lower, closer, or wider eye spacing drastically changes the look.

Add tiny accessories like a crocheted hat, a little scarf, or a felt star to make themed sets or seasonal variants.

Common Mistakes & How to Fix Them

βœ— Skipping stitch counts during increases or decreases leads to uneven shaping; recount after each round and mark the start of round with a stitch marker. βœ— Overstuffing the body makes the octopus too round and prevents the arms from sitting flat; stuff lightly and evenly to keep the body somewhat flat as instructed. βœ— Placing safety eyes too close or too far apart ruins the expression; add eyes between rows 2 and 3 about 4 to 5 stitches apart as directed. βœ— Forgetting to leave a long tail for sewing the nose will make attachment difficult; leave the long tail when finishing the nose and use it to sew the nose securely to the head. βœ— Not reattaching correctly to the FLO or BLO can misalign rounds; follow the exact reattachment instruction after closing to ensure correct loop placement.

Grumpy Mini Octopus Amigurumi Pattern

Make a tiny grumpy octopus that is perfect as an ornament, gift, or tiny toy. This charming amigurumi features curled arms and a squishy body, designed to be quick to crochet with playful personality. You will love how the eyelids and tiny nose give it a grumpy expression. Follow the step-by-step rounds and assembly notes to finish a delightful mini sea friend.

Intermediate 2-4 Hours

Materials Needed for Grumpy Mini Octopus Amigurumi Pattern

β€” Main Fabric

  • 01
    2 oz Red Heart Super Saver (Ocean, Marrakesh, Stillwater Pooling, or any color you like) - variegated/color-changing yarn recommended
  • 02
    Small amounts of contrasting yarn for eye lids or details (optional)
  • 03
    Polyester stuffing for nose and body (small amount)

β€” Tools Required

  • 01
    Crochet hook size 3.5 mm (or what you like to use with the yarn choice)
  • 02
    6 mm safety eyes (2 pieces)
  • 03
    Embroidery needle for sewing nose and assembly
  • 04
    Yarn needle for weaving in ends
  • 05
    Scissors
  • 06
    Stitch markers (optional)
  • 07
    Polyester stuffing
  • 08
    Pins for positioning (optional)

Progress Tracker

0% Complete

β€” Nose :

Rnd 1 :

6 sc in a mc

Rnd 2 :

(inc) 6 times (12)

Rnd 3 :

(1 sc, inc) 6 times (18)

Rnd 4-5 :

1 sc in each st around (18)

Rnd 6 :

(1 sc, dec) 6 times (12)

Rnd 7 :

(2 sc, dec) 3 times (9)

Info :

TO but do not close, leave long tail for sewing. Stuff the nose at this time. Set aside.

β€” Body :

Rnd 1 :

Ch 9 slst into first chain to close

Rnd 2-3 :

1 sc in each st around (9)

Rnd 4 :

(2 sc, inc) 3 times (12)

Rnd 5 :

(2 sc, inc) 4 times (16)

Rnd 6 :

BLO 1 sc in each st around (16)

Info :

Add eyes between rows 2 and 3 about 4 to 5 stitches apart (See Picture A). At this time you can add the eye lids in a 'V' shape to make it appear a bit grumpy (See Picture B). Stuff the body but not too much as it should be some what flat.

Rnd 7 :

(dec) 8 times (8)

Info :

Close then reattach to FLO from round 6

Rnd 6 :

FLO 1 sc in each st around (16)

Rnd 7-8 :

1 sc in each st around (16)

Info :

We will begin making the Octopuses arms now.

β€” Arms :

Info :

Arms can be done in any number of ways. If you work the arms Clockwise they will curl up, if you work the arms counterclockwise they will curl down (See pictures C and D). Either way is fine and gives you a unique look! I prefer working counter clockwise so they curl down, if I can figure out how to alternate to get them curling in both directions I will update the pattern!!

Info :

Here are 4 arm patterns. Once you complete Arm 4 go back and repeat all arms again to get 8 arms.

Arm 1 :

Ch 20 turn, slst into 2nd chain from hook, 5 sc, sc3tog, 2 sc, 5 hdc, 3dc (should be at base of chain), skip st, sc into next st.

Arm 2 :

Ch 15 turn, slst into 2nd chain from hook, 7 sc, 6 hdc, skip st, sc into next st.

Arm 3 :

Ch 18 turn, slst into 2nd chain from hook, 3 sc, hdc3tog, 7 hdc, 3 dc, skip st, sc into next st.

Arm 4 :

Ch 20 turn, slst into 2nd chain from hook, 4 sc, 3 hdc, hdc3tog, 5 hdc, 3 dc, skip st, sc into next st.

Info :

Once you have 8 arms slst into 1st chain of 1st arm. TO leave tail. Using a needle and the tail go around and close hole left from skipping a stitch (See picture E). Weave in ends.

β€” Assembling :

Info :

Using the tail from the nose and an embroidery needle, sew the nose on. I start at the top of the head sewing the opening closed and tucking in any extra starting tail from the first chain. Try to center it between the eyes with the eyelids positioned so it is looking towards the nose. Weave in any loose ends.

Assembly Instructions

  • Attach the nose to the front of the head using the long tail left from the nose; start at the top of the head, sew the opening closed and tuck in any extra starting tail from the first chain.
  • Place safety eyes between rounds 2 and 3 of the body about 4 to 5 stitches apart (see Picture A) and add small 'V' shaped eyelids to create the grumpy look (see Picture B).
  • Make 4 arm patterns, then repeat Arms 1-4 to produce 8 arms total; after making 8 arms slst into the 1st chain of the 1st arm to join them.
  • Using a needle and the tail left when joining the arms, go around and close the hole left from skipping a stitch and weave in all ends securely.
  • Pin parts in place before final sewing to check symmetry and positioning, then weave in any loose ends to finish.

Important Notes

  • πŸ’‘Use stitch markers to mark the beginning of each round for accurate stitch counts and shaping.
  • πŸ’‘Stuff the nose and body lightly and evenly; the body should be somewhat flat rather than overstuffed to keep the shape.
  • πŸ’‘Place eyes before closing the body so they are secure and positioned correctly between rounds 2 and 3.
  • πŸ’‘Weave in tails as you go and leave long tails where instructed for sewing nose and joining arms.
  • πŸ’‘Work with consistent tension, especially on arm chains, to ensure even curling and length.

This tiny Grumpy Mini Octopus is a delightful little project that packs a lot of personality into a small package. Make one in variegated yarn for a fun color surprise or in a solid tone for a classic look. Perfect for ornaments, advent calendars, or pocket-sized gifts. 🧢🧡

You ask,

we answer.

FAQs

What size will the finished piece be?

The finished amigurumi measures approximately 2 inches from top of nose to bottom of body and 4-5 inches from nose to end of arms depending on yarn and tension.

Can I use different yarn weights for this pattern?

Yes, you can use different yarn weights but it will change the final size; adjust your hook accordingly and expect the octopus to be larger with bulky yarn or much smaller with thinner yarn.

Do I need prior crochet experience for this pattern?

This pattern is rated intermediate because it uses techniques like BLO/FLO, hdc3tog and joining small parts; basic amigurumi experience is recommended.

How long does this project typically take to complete?

Most crocheters finish this tiny octopus in 2-4 hours, depending on experience and how many color changes or finishing details you add.