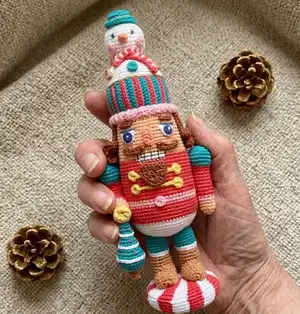
Create a festive Nutcracker amigurumi using 100% cotton yarn and a 2.0mm hook. This detailed pattern guides you through crocheting the body, limbs, hat, snowman topper, accessories and candy base with step-by-step rounds and assembly tips. Perfect for holiday decor or a handmade gift, it includes color-change guidance and finishing details to make your nutcracker truly special. Grab your yarn and let your creativity shine with this charming holiday project.
Progress Tracker
0% Complete
— BODY (starting from head with nude color) :
Round 1 :
6sc into magic ring (left 6)
Round 2 :
2 sc in each stitch (left 12)
Round 3 :
1 sc, 2 sc in next st (left 18)
Round 4 :
2 sc, 2 sc in next st (left 24)
Round 5 :
3 sc, 2 sc in next st (left 30)
Round 6 :
4 sc, 2 sc in next st (left 36)
Round 7 :
5 sc, 2 sc in next st (left 42)
Round 8 :
6 sc, 2 sc in next st (left 48)
Round 9 :
7 sc, 2 sc in next st (left 54)
Round 10 :
8 sc, 2 sc in next st (left 60)
Round 11 :
on back loops: 60 sc (left 60)
Round 12-21 :
60 sc (left 60)
Round 22 :
26 sc, change to white and 8 sc, change to nude and finish (left 60) change to red
Round 23 :
26 sc, change to white and 8 sc, change again to red and finish (left 60)
Round 24-34 :
60 sc in red (left 60) change to pink
Round 35-36 :
60 sc in pink (left 60) change to red
Round 37-41 :
60 sc in red (left 60) change to white
Round 42-43 :
60 sc in White (left 60)
Round 44 :
on back loops 8 sc, 1 dec (left 54)
Round 45 :
7 sc, 1 dec (left 48)
Round 46 :
6 sc, 1 dec (left 42)
Round 47 :
5 sc, 1 dec (left 36) stuff
Round 48 :
4 sc, 1 dec (left 30)
Round 49 :
3 sc, 1 dec (left 24)
Round 50 :
2 sc, 1 dec (left 18)
Round 51 :
1 sc, 1 dec (left 12) leave a long piece of yarn and close.
— LEGS (MAKE 2) start with green :
Round 1 :
6sc into magic ring (left 6)
Round 2 :
2sc in each stitch around (left 12)
Round 3 :
1 sc, 2 sc in next st (left 18)
Round 4 :
18 sc on back loops (left 18)
Round 5-8 :
18 sc (left 18) change to white
Round 9 :
18 slip stitch (left 18)
Round 10 :
obl 18 sc (left 18) change to kaki
Round 11 :
18 slip stitch (left 18)
Round 12 :
obl 18 sc (left 18)
Round 13-18 :
18 sc (left 18) leave a long piece of yarn to sew, do not forget stuffing
— FEET (MAKE 2) :
Round 1 :
6sc into magic ring (left 6)
Round 2 :
Instead of continuing the round, "go up" with one chain and 2sc in each stitch (left 12)
Round 3-7 :
Chain 1 to "go up" and 12 sc (left 12) See pictures. Stuff a little and sew the pieces to the legs to create boots.
— LEFT ARM (start with green) :
Round 1 :
6sc into magic ring (left 6)
Round 2 :
2 sc in each stitch (left 12)
Round 3 :
1 sc, 2 sc in next st (left 18)
Round 4 :
2 sc, 2 sc in next st (left 24)
Round 5-6 :
24 sc (left 24)
Round 7 :
2 sc, 1 dec (left 18)
Round 8 :
1 sc, 1 dec (left 12) change to red
Round 9-17 :
12 sc (left 12) change to pink
Round 18-19 :
12 sc (left 12) change to nude
Round 18-20 :
12 sc (left 12) stuff
Round 21 :
dec all row (left 6) hide the yarn with needle and cut it
— RIGHT ARM (PART 1) start with green :
Round 1 :
6sc into magic ring (left 6)
Round 2 :
2 sc in each stitch (left 12)
Round 3 :
1 sc, 2 sc in next st (left 18)
Round 4 :
2 sc, 2 sc in next st (left 24)
Round 5-6 :
24 sc (left 24)
Round 7 :
2 sc, 1 dec (left 18)
Round 8 :
1 sc, 1 dec (left 12) change to red
Round 9-17 :
12 sc (left 12) stuff now
Round 18 :
obl decrease x6, with a needle hide the yarn
— RIGHT ARM (PART 2) start with nude :
Round 1 :
6sc into magic ring (left 6)
Round 2 :
2 sc in each stitch (left 12)
Round 3-4 :
12 sc (left 12) change to pink
Round 5-6 :
12 sc (left 12) change to red
Round 7-13 :
12 (left 12) stuff leave a long piece of yarn to sew with part 1
— BUTTONS (MAKE 2) :
Item Name (P1) :
6 sc on magic ring, slip stitch, chain 13, "go up" with 1 chain and 6sc on chain 13. Finish with slip stitch and attach to body with glue. Use pins to help.
— PINK BASE FOR CUPCAKE :
Info :
On back loops from top of the head, work 1 popcorn stitch (hdc), 1 hdc. See video.
— HAT BASE (start with red) :
Round 1 :
Chain 10, chain 1 more to "go up" and sc in all stitches
Round 2 :
Chain 1, obl sc in all stitches. Change to green
Round 3 :
Chain 1, obl sc in all stitches
Round 4 :
Chain 1, obl sc in all stitches. Change to red
Info :
Repeat this until you have 14 red rows and 13 green rows
Info :
Once finished, sew the sides to create the hat
Info :
Sew this piece with the pink base using pink thread so the stitches are not visible
— SNOWMAN BODY :
Round 1 :
6sc into magic ring (left 6)
Round 2 :
2 sc in each stitch (left 12)
Round 3 :
1 sc, 2 sc in next st (left 18)
Round 4 :
2 sc, 2 sc in next st (left 24)
Round 5 :
3 sc, 2 sc in next st (left 30)
Round 6 :
4 sc, 2 sc in next st (left 36)
Round 7 :
5 sc, 2 sc in next st (left 42)
Round 8 :
6 sc, 2 sc in next st (left 48)
Round 9 :
7 sc, 2 sc in next st (left 54)
Round 10-14 :
54 sc (left 54)
Info :
Once finished, sew this piece to the hat base, do not forget stuffing
— SNOWMAN HEAD :
Round 1 :
6sc into magic ring (left 6)
Round 2 :
2 sc in each stitch (left 12)
Round 3 :
1 sc, 2 sc in next st (left 18)
Round 4 :
2 sc, 2 sc in next st (left 24)
Round 5 :
3 sc, 2 sc in next st (left 30)
Round 6 :
4 sc, 2 sc in next st (left 36)
Round 7-11 :
36 sc (left 36)
Round 12 :
4 sc, 1 dec all row (left 30)
Round 13 :
3 sc, 1 dec all row (left 24)
Round 14 :
2 sc, 1 dec all row (left 18)
Round 15 :
1 sc, 1 dec all row (left 12) stuff
Round 15 :
1dec all row (left 6) close
— SNOWMAN'S HAT BASE (in green) :
Round 1 :
6sc into magic ring (left 6)
Round 2 :
2 sc in each stitch (left 12)
Round 3 :
1 sc, 2 sc in next st (left 18)
Round 4 :
2 sc, 2 sc in next st (left 24)
Round 5 :
3 sc, 2 sc in next st (left 30)
— SNOWMAN'S HAT UPPER PART (in green) :
Round 1 :
6sc into magic ring (left 6)
Round 2 :
2 sc in each stitch (left 12)
Round 3 :
1 sc, 2 sc in next st (left 18)
Round 4 :
obl, 18 sc (left 18) change to yellow
Round 5 :
18 sc (left 18) sew to base, do not stuff
— CHEEKS AND BUTTON :
Item Name (P1) :
6sc into magic ring
— SCARF :
Info :
Chain 50 and work 1hdc red, 1 hdc white in all stitches
— NOSE (small nose for face) :
Round 1 :
4sc into magic ring (left 4)
Round 2 :
1sc, 2 sc in next stitch (left 6) sew to face, do not stuff
— ARMS (general) :
Info :
Chain 7 and sc in every stitch, make 2 pieces
— HAIR-WIG :
Round 1 :
Chain 15 and hdc in each stitch, DO NOT CUT THE YARN
Round 2 :
Now chain 20 and hdc in each stitch repeat this 19 times.
Round 3 :
For last "hair", chain 15 and hdc in each stitch. Attach the wig with glue
Info :
Note: try the wig, depending on your yarn it might need more or less than 19 hairs.
— CHRISTMAS TREE (start with green) :
Round 1 :
6sc into magic ring (left 6)
Round 3 :
1 sc, 2 sc in next stitch (left 9)
Round 5 :
2 sc, 2 sc in next stitch (left 12)
Round 7 :
1 sc, 2 sc in next st (left 18)
Round 9 :
2 sc, 2 sc in next st (left 24)
Round 10 :
24 sc (left 24)
Round 11 :
obl, decrease (using 3 stitches instead of 2) all row and stuff. Change to brown
Round 12 :
obl, sc all row
Round 13 :
sc all row, cut the yarn and hide
Round 14 :
to create the white details, insert your hook between rows 10 and 11 and slip stitch all row. Repeat this procedure in the other rows (check last picture)
Info :
STAR On magic ring, work sc, dc (5 times) and finish with sc. I attached the star with glue to the hand and tree I also embroidered red stitches in the tree to create the look
— CANDY BASE :
Round 1 :
7sc into magic ring (start with white)
Round 2 :
1 sc red and 1sc white in same st, repeat all round (left 14)
Round 3 :
2 red sc in red st, 1 white sc in white st (left 21) Use white in white stitches, red in red st
Round 4 :
1 sc red, 1 sc red, 2 sc in white st (left 28)
Round 5 :
1 increase red, 1 sc red, 1 sc White, 1 sc White
Round 6 :
1 Sc red, 1 sc red, 1 sc red, increase white, 1 sc White
Round 7 :
Increase red, 1 Sc red, 1 sc red, increase White,1 sc White, 1 sc White
Round 8 :
Increase red, 1 Sc red,1 sc red, 1 sc red, 1 sc White in next 4 stitches
Round 9 :
1 Sc red in next 5 st, inc white, 1 sc White, 1 sc White, 1 sc White
Round 10 :
Increase red, 1 Sc red in next 4 st, increase white, 1 sc White in next 4 st
Round 11 :
Increase red, 1 Sc red in next 5 st, 1 sc White in next 6 st
Round 12 :
On back loops: 1 sc red in next 7 st, 1 sc White in next 6 st
Round 13-14 :
1 sc red in next 7 st, 1 sc White in next 6 st
Round 15 :
On back loops: dec red, 1 Sc red in next 5 st, 1 sc White in next 6 st
Round 16 :
Dec red,1 Sc red in next 4 st, dec white, 1 sc White in next 4 st
Round 17 :
1sc red in next 5 st, dec white, 1 sc White in next 3 st
Round 18 :
Dec red, 1sc red in next 3 st, 1 sc White in next 4 st
Round 19 :
Dec red, 1sc red in next 2 st, dec white, 1 sc White in next 2 st
Round 20 :
1 sc red in next 3 st, dec white, 1 sc White
Round 21 :
Dec red, 1 sc red, sc white in next two stitches
Round 22 :
1 sc red in next 2 st, dec White
Round 23 :
dec red,1 sc White and close
— FRONT AND BACK DETAILS :
Info :
Use photos as reference for front and back placement of stripes and openings on the candy base.
— THE FACE :
NOSE :
Chain 5. On chain nr. 5, 2 chains and hdc on chains 4,3,2,1. Cut the thread and hide
EYES (MAKE 2) Round 1 :
White part: Chain 3. On chain nr. 3, 4 chains and trc on chains 2 and 1. Cut the threadand hide, attach to the face with glue.
EYES (MAKE 2) Round 2 :
Now cut two circles of felt fabric (as the pupils) and attach them too. I also used two mini white beads and attached them to the blue piece.
EYES (MAKE 2) Round 3 :
Finally cut two more pieces of gray felt fabric to be the eyelids.
EYEBROWS :
Chain 4 and cut the yarn, attach them with glue
MUSTACHE 2 :
Sc in the first 3 stitches and slip stitch on the rest. Attach with glue, use pins to help
TEETH DETAILS :
I embroidered the teeth with black thread so they look better (see picture)…
BEARD 1 :
Chain 7 and dc on each chain (left 7)
BEARD 3 :
In chain nr.4, 7 dc and slip stitch in chain nr. 7 Attach with glue, use pins to help
BELT BUCKLE :
6 sc into magic ring
FACE DETAILS :
Use reference photos to place beard, mustache, eyes and eyebrows. Glue felt pupils and sew/bead highlights as desired.
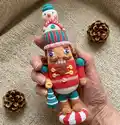
This cheerful Nutcracker amigurumi brings festive charm to your holiday decor and makes a lovely handmade gift. 🧶
With careful color changes and small decorative elements, each piece becomes special and full of personality. 🎄
Enjoy making details like the cupcake base, snowman topper, and embroidered face for a truly unique creation. ✨