๐Ÿงถ Beautiful โœจ Detailed ๐Ÿ’ Adorable

Mike Wazowski Amigurumi Pattern

Mike Wazowski Amigurumi Pattern
4.6โ˜… Rating
5-7 Hours Time Needed
1.4K Made This
โœ‚๏ธ

Intermediate Level

Ideal for those with basic crochet experience, featuring slightly more advanced stitches and techniques to expand your skills.

โฑ๏ธ

Weekend Treat

Takes 5-7 hours, making it an enjoyable project to finish over a couple of days.

๐Ÿงธ

Cute Companion

An adorable friend to cherish, handcrafted with love to bring comfort and joy for years to come.

About This Mike Wazowski Amigurumi Pattern

This pattern creates a small Mike Wazowski-inspired amigurumi with a single layered eye and tiny limbs. It uses 2 mm mercerized cotton yarn and a 2.0 mm crochet hook for tight stitches and neat shaping. Clear round-by-round instructions plus photos guide you through assembly and finishing touches. Suitable for makers comfortable with basic increases, decreases and joining pieces.

Mike Wazowski Amigurumi Pattern crochet pattern - detailed view of completed project

The finished toy stands approximately 11 cm tall using the recommended materials. Includes instructions for body, feet, hands, horns, layered eye and detailed finishing notes.

Why You'll Love This Mike Wazowski Amigurumi Pattern

I absolutely love this pattern because it transforms simple stitches into a playful character with a lot of personality. I enjoyed designing the layered eye โ€” the color changes add a lovely textured effect that really makes the toy pop. I also appreciate how compact and giftable the finished piece is; it only takes a few hours to crochet. Every time I make one, I find the assembly and tiny details like the embroidered mouth incredibly satisfying.

Mike Wazowski Amigurumi Pattern step 1 - construction progress Mike Wazowski Amigurumi Pattern step 2 - assembly progress Mike Wazowski Amigurumi Pattern step 3 - details and accessories Mike Wazowski Amigurumi Pattern step 4 - final assembly and finishing

Switch Things Up

I love how easy it is to change the personality of this pattern by swapping colors; try pastel greens or neon yarn for a very different vibe.

I often use a slightly thicker yarn and a larger hook to make a chunkier Mike โ€” it becomes a cuddly desk pal instantly.

For a tiny keychain version I use finer thread and a 1.5 mm hook, then leave off stuffing for an ultra-light mini.

I sometimes embroider freckles, eyebrows or a different mouth shape to make each character unique and expressive.

Try using wool instead of cotton for a softer, fluffier finish if you prefer a plush feel.

I like to add a small loop at the top so it can hang as an ornament or backpack charm.

Swap the yellow horns for contrasting colors or make them slightly longer by adding rounds for a quirky look.

To add posability, insert thin wire into the arms before stuffing so you can pose them slightly outward or upward.

I recommend experimenting with different eye sizes and color rings to change the focal point of the face dramatically.

Finally, try grouping several in a set with different color combinations โ€” they make adorable themed gifts or decor.

Common Mistakes & How to Fix Them

โœ— Not placing stitch markers when working continuous rounds leads to losing track of the start; place a marker at the start of each round and move it up as you crochet. โœ— Forgetting to stuff at the indicated 'STUFF.' points can distort shaping as you decrease; stuff gradually at the marked rounds to maintain a smooth shape. โœ— Overstuffing the pieces creates bulges and makes joining difficult; add stuffing little by little and check the silhouette frequently for a balanced look. โœ— Changing yarn colors without securing tails may cause loose ends showing through; weave in or secure color change tails as you go to keep the front neat.

Mike Wazowski Amigurumi Pattern

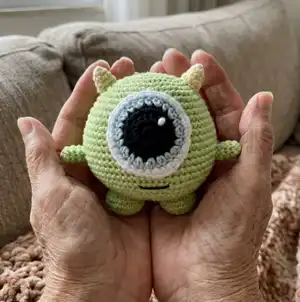
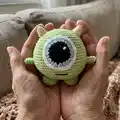
Create a charming Mike Wazowski amigurumi with this clear, photo-supported crochet pattern. You will make a small, round one-eyed monster using simple rounds and basic shaping. The pattern includes step-by-step instructions for body, feet, hands, horns and the layered eye, plus assembly tips. Perfect for gifting or keeping as a cute handmade companion.

Intermediate 5-7 Hours

Materials Needed for Mike Wazowski Amigurumi Pattern

โ€” Main Fabric

  • 01
    2 mm Yarn 100% Mercerized Cotton - Green (main color) for body and limbs
  • 02
    2 mm Yarn 100% Mercerized Cotton - Yellow (horns)
  • 03
    2 mm Yarn 100% Mercerized Cotton - Black (eye center and mouth)
  • 04
    2 mm Yarn 100% Mercerized Cotton - Blue (eye ring)
  • 05
    2 mm Yarn 100% Mercerized Cotton - White (eye highlight)
  • 06
    Note: yarn weight corresponds to a very fine/2 mm crochet yarn suitable for 2.0 mm hook; quantities are small skeins (approx. 10-50 g each depending on project numbers)

โ€” Tools Required

  • 01
    Crochet Hook 2.0 mm
  • 02
    Stitch marker
  • 03
    Pins
  • 04
    Wool needle
  • 05
    Scissors
  • 06
    Polyester stuffing

Progress Tracker

0% Complete

โ€” Materials :

Info :

- Crochet Hook 2.0 mm. - 2 mm Yarn 100% Mercerized Cotton (Color: Green, Yellow, Black, Blue and White) for Crochet Hook 2.0 mm. - Stitch marker. - Pins. - Wool needle. - Stuffing. - Scissors.

Info :

NOTE: Using a wool needle: Close the hole.

โ€” Final Measure :

Info :

Mike Wazowski is 11 cm tall.

โ€” Abbreviations :

Info :

inc: increase. dec: decrease. sc: single crochet. hdc: half double crochet.

โ€” Body :

Round 1 :

Magic ring 8 sc (8 sc)

Round 2 :

8 inc (16 sc)

Round 3 :

(1 sc, 1 inc) x 8 (24 sc)

Round 4 :

(2 sc, 1 inc) x 8 (32 sc)

Round 5 :

(3 sc, 1 inc) x 8 (40 sc)

Round 6 :

1 sc in each of the 40 sc (40 sc)

Round 7 :

(4 sc, 1 inc) x 8 (48 sc)

Round 8 :

(5 sc, 1 inc) x 8 (56 sc)

Round 9 :

(6 sc, 1 inc) x 8 (64 sc)

Round 10 to 13 :

1 sc in each of the 64 sc (64 sc)

Round 14 :

(15 sc, 1 inc) x 4 (68 sc)

Round 15 to 16 :

1 sc in each of the 68 sc (68 sc)

Round 17 :

(16 sc, 1 inc) x 4 (72 sc)

Round 18 to 19 :

1 sc in each of the 72 sc (72 sc)

Round 20 :

(17 sc, 1 inc) x 4 (76 sc)

Round 21 to 24 :

1 sc in each of the 76 sc (76 sc)

Round 25 :

(2 sc, 1 dec) x 19 (57 sc)

Round 26 :

(1 sc, 1 dec) x 19 (38 sc)

Round 27 :

(2 sc, 1 dec) x 9, 1 dec (28 sc)

Round 28 :

(2 sc, 1 dec) x 7 (21 sc)

Info :

STUFF.

Round 29 :

(1 sc, 1 dec) x 7 (14 sc)

Round 30 :

7 dec (7 sc)

โ€” Feet :

Info :

(Crochet two pieces using the green-colored yarn) Using a Crochet Hook 2.0 mm

Round 1 :

Magic ring 8 sc (8 sc)

Round 2 :

8 inc (16 sc)

Round 3 :

(1 sc, 1 inc) x 8 (24 sc)

Round 4 to 5 :

1 sc in each of the 24 sc (24 sc)

Round 6 :

12 dec (12 sc)

Info :

STUFF.

โ€” Hands :

Info :

(Crochet two pieces using the green-colored yarn) Using a Crochet Hook 2.0 mm

Round 1 :

Magic ring 6 sc (6 sc)

Round 2 to 4 :

1 sc in each of the 6 sc (6 sc)

Info :

DON'T STUFF.

โ€” Horns :

Info :

(Crochet two pieces using the yellow-colored yarn) Using a Crochet Hook 2.0 mm

Round 1 :

Magic ring 6 sc (6 sc)

Round 2 :

1 sc in each of the 6 sc (6 sc)

Round 3 :

(1 sc, 1 inc) x 3 (9 sc)

Round 4 :

1 sc in each of the 9 sc (9 sc)

Info :

STUFF.

โ€” Eye :

Info :

(Crochet one piece starting to use the black-colored yarn) Using a Crochet Hook 2.0 mm

Round 1 :

Magic ring 8 sc (8 sc)

Round 2 :

8 inc hdc (16 hdc)

Round 3 :

(3 sc, 1 inc) x 4 (20 sc)

Info :

(Change the black-colored yarn to the blue one)

Round 4 :

(1 hdc, 1 inc) x 10 (30 hdc)

Info :

(Change the blue-colored yarn to the white one)

Round 5 :

(2 sc, 1 inc) x 10 (40 sc)

โ€” Assembly :

Info :

NOTE: Begin to join. Using a wool needle:

Item Name (P1) :

1.- Join the eye to the body, starting on round number 8.

Item Name (P2) :

2.- Join the feet to the body.

Item Name (P3) :

3.- Join the hands to the body.

Item Name (P4) :

4.- Join the horns to the body.

Item Name (P5) :

5.- Embroider the detail in the eye using the white-colored yarn.

Item Name (P6) :

6.- Embroider the mouth using the black-colored yarn.

Assembly Instructions

  • Join the eye to the body, starting on round number 8, using a wool needle and matching stitches so the eye sits centered on the front.
  • Position and sew the two feet at the bottom opening so they are evenly spaced, securing firmly through several passes to the body base.
  • Sew the hands to the sides of the body at the midline (level shown in photos), making sure both hands are symmetrical before fastening off.
  • Attach the two horns to the top of the head, spacing them evenly at the upper rounds; use pins to check placement before sewing.
  • Embroider the small white highlight dot on the eye using the white yarn to create the glossy eye effect shown in the photos.
  • Embroider the mouth with black yarn centered under the eye; use backstitch or a short satin stitch to create the small smile.

Important Notes

  • ๐Ÿ’กUse a wool needle to close the final hole securely and neatly after finishing the last round.
  • ๐Ÿ’กStart joining the eye on round 8 of the body to achieve the same placement and scale as the photos.
  • ๐Ÿ’กDo not stuff the hands as instructed; stuffing them will alter the intended shape and affect assembly.
  • ๐Ÿ’กPin parts in place before sewing to ensure correct alignment and symmetry for hands, feet and horns.

Thank you very much for choosing this Mike Wazowski amigurumi pattern, I hope you had fun making him! ๐Ÿงถ This cute monster makes a perfect pocket-sized gift or a cheerful desk companion to brighten any day. ๐Ÿ˜Š Happy stitching and happy gifting โ€” share your finished photos and leave a review if you enjoyed the pattern! โœจ

You ask,

we answer.

FAQs

What size will the finished piece be?

The finished amigurumi measures approximately 11 cm tall when using the recommended 2 mm mercerized cotton yarn and a 2.0 mm crochet hook.

Can I use different yarn weights for this pattern?

Yes, you can use different yarn weights but the final size will change; choose an appropriate hook for your yarn and expect a larger or smaller finished toy.

Do I need prior crochet experience for this pattern?

This pattern is rated intermediate because it uses increases, decreases and color changes; familiarity with continuous rounds and basic shaping is recommended.

How long does this project typically take to complete?

Most crocheters finish this project in about 5-7 hours, though time may vary depending on experience, speed, and assembly detail.