🧶 Beautiful ✨ Detailed 💝 Adorable

Teddy Bear in Suitcase Amigurumi Pattern

Teddy Bear in Suitcase Amigurumi Pattern
3.9★ Rating
8-10 Hours Time Needed
1.6K Made This
✂️

Intermediate Level

Ideal for those with basic crochet experience, featuring slightly more advanced stitches and techniques to expand your skills.

⏱️

All-Day Adventure

Requires 8-10 hours, ideal for a full day of immersive crocheting.

🧸

Cute Companion

An adorable friend to cherish, handcrafted with love to bring comfort and joy for years to come.

About This Teddy Bear in Suitcase Amigurumi Pattern

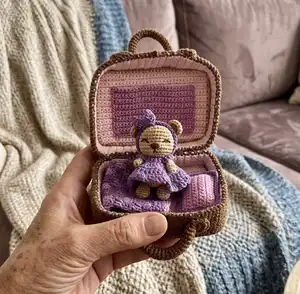
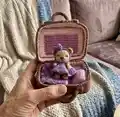
This pattern makes a small amigurumi teddy bear that lives inside a crocheted suitcase complete with pillow, blanket, dress and accessories. The design uses sport weight yarn and a tiny 2.0 mm hook for a dense, neat finish. Every round and assembly step is included so you can follow along exactly and reproduce the finished toy.

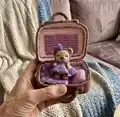
Teddy Bear in Suitcase Amigurumi Pattern crochet pattern - detailed view of completed project

Youll get full instructions for the bear body, limbs, ears and tail, plus the suitcase construction and decorative straps. Photos and notes show how to join pieces, add facial embroidery, and finish seams neatly.

Why You'll Love This Teddy Bear in Suitcase Amigurumi Pattern

I absolutely love this pattern because it combines small-scale amigurumi with a clever structural accessory — a tiny suitcase — that makes the toy feel special and gift-ready. I enjoyed designing the little details like the button fastener and sewn-in cardboard base because they give the suitcase structure and charm. The project is compact but satisfying: you can finish each element in a short session, and assembly brings everything together beautifully. I hope you find the step-by-step rounds and photos as helpful as I did when creating the sample.

Teddy Bear in Suitcase Amigurumi Pattern step 1 - construction progress Teddy Bear in Suitcase Amigurumi Pattern step 2 - assembly progress Teddy Bear in Suitcase Amigurumi Pattern step 3 - details and accessories Teddy Bear in Suitcase Amigurumi Pattern step 4 - final assembly and finishing

Switch Things Up

I love how easy it is to customize the colors of this project; I often switch the purple dress for pastel tones or bright primary shades to match a nursery or gift theme.

I sometimes make the whole set larger by using DK or worsted yarn and a larger hook, but I add extra cardboard or interfacing so the suitcase stays firm when enlarged.

I like to replace the embroidered face with safety eyes for a different expression; if you do this, place the eyes before stuffing and reinforce the area from the inside for safety.

For a more vintage look, I swap the brown trim for taupe or rust and use wooden buttons instead of plastic ones to add charm and texture.

I enjoy adding embroidery details to the dress or blanket — tiny flowers or initials make the piece feel personal and unique.

Try changing the blanket to a granny stitch or a simple shell pattern for more texture; the blanket size is flexible so you can play with stitch height and pattern repeats.

If you want a posable bear, I sometimes insert a small length of floral wire into the limbs before stuffing and secure it well inside the body for mild posability.

To make a keychain version, reduce the blanket and pillow and attach a keyring through the top of the suitcase; use thinner yarn and a smaller hook for a neat miniature.

I often use variegated yarn for the blanket or pillow to create an instant multi-color effect without multiple yarn changes — it looks delightful with minimal effort.

Finally, experiment with trims: a slip-stitch scallop around the suitcase edge, or a tiny crocheted flower sewn at the handle base, can elevate the finished item into a cherished keepsake.

Common Mistakes & How to Fix Them

✗ Skipping the stitch marker at the start of rounds leads to lost counts and uneven shaping; place a marker at the beginning of each round and move it after you finish the round. ✗ Understuffing limbs makes them floppy and hard to position; stuff small amounts gradually and shape firmly but not overpacked for a smooth finish. ✗ Not counting increases and decreases precisely will change final stitch counts; count after each shaping round and mark each completed repeat to stay on track. ✗ Failing to weave in ends before assembly leaves loose tails and messy joins; weave ends in securely as you finish each piece to simplify sewing later. ✗ Sewing parts in the wrong position changes the bear's proportions; pin pieces in place and compare to the photos before stitching permanently. ✗ Using a looser hook than recommended creates a soft, unstructured suitcase; use the suggested 2.0 mm hook for a tight stitch that holds the shape.

Teddy Bear in Suitcase Amigurumi Pattern

Create a tiny, travel-ready teddy tucked inside its own crocheted suitcase. This detailed amigurumi pattern walks you through every piece — bear, dress, blanket, pillow and a structured suitcase — with clear rounds and assembly photos. Youll love making this charming heirloom-sized toy that fits perfectly in your palm and makes a thoughtful handmade gift.

Intermediate 8-10 Hours

Materials Needed for Teddy Bear in Suitcase Amigurumi Pattern

— Main Fabric

  • 01
    Sport weight 4ply yarn (Yarn Art Jeans) 50g / 160m
  • 02
    Color N07 - Beige (main bear and suitcase base) - approx 50-100g
  • 03
    Color N18 - Light Pink (suitcase inner, pillow parts) - approx 20-50g
  • 04
    Color N20 - Pink (pillow and blanket main) - approx 20-50g
  • 05
    Color N50 - Purple (dress, headband, blanket accents) - approx 20-50g
  • 06
    Color N40 - Brown (suitcase trim, straps, handle, decoration) - approx 20-50g
  • 07
    Cardboard rectangle for suitcase inserts (cut to size of covers)
  • 08
    Fiberfill stuffing for bear, pillow and blanket

— Tools Required

  • 01
    Crochet hook size 2.0 mm
  • 02
    Sport weight yarn (Yarn Art Jeans) in listed colors
  • 03
    Yarn needle for sewing pieces and weaving ends
  • 04
    Scissors
  • 05
    Stitch marker
  • 06
    Polyester stuffing (fiberfill)
  • 07
    Cardboard for suitcase inserts cut to size
  • 08
    2 small buttons for fasteners
  • 09
    Long needle for mounting legs and arms (sewing through the body)

Progress Tracker

0% Complete

— Arms (make 2) :

Round 1 :

6sc in MR (6)

Info :

Place row marker here.

Round 2-6 :

6sc (6) (5 rounds)

Info :

Stuff the arms with fiberfill.

Info :

Fasten off, cut the yarn, weave in the yarn ends.

— Legs (make 2) :

Round 1 :

6sc in MR (6)

Info :

Place row marker here.

Round 2 :

6inc (12)

Round 3 :

3sc, 3dec, 3sc (9)

Round 4 :

(1sc, dec) *3 (6)

Round 5-9 :

6sc (6) (5 rounds)

Info :

Stuff the legs with fiberfill.

Info :

Fasten off, cut the yarn, weave in the yarn ends.

— Ears (make 2) :

Round 1 :

6sc in MR (6)

Info :

Place row marker here.

Round 2 :

6inc (12)

Round 3 :

12sl st (12)

Info :

Leave long tail for sewing.

— Tail :

Round 1 :

6sc in MR (6)

Info :

Place row marker here.

Round 2 :

6inc (12)

Round 3 :

6dec (6)

Info :

Stuff the tail with fiberfill.

Info :

Leave long tail for sewing.

— Body :

Round 1 :

6sc in MR (6)

Info :

Place row marker here.

Round 2 :

6inc (12)

Round 3 :

(1sc, inc) *6 (18)

Round 4 :

(2sc, inc) *6 (24)

Round 5-8 :

24sc (24) (4 rounds)

Round 9 :

(2sc, dec) *6 (18)

Round 10 :

18sc (18)

Round 11 :

(1sc, dec) *6 (12)

Round 12 :

12sc (12)

Info :

Stuff the body with fiberfill.

— Head :

Round 13 :

12inc (24)

Round 14 :

(3sc, inc) *6 (30)

Round 15-21 :

30sc (30) (7 rounds)

Round 22 :

(3sc, dec) *6 (24)

Info :

Stuff the head with fiberfill.

Round 23 :

(2sc, dec) *6 (18)

Round 24 :

(1sc, dec) *6 (12)

Round 25 :

6dec (6)

Info :

Fasten off, cut the yarn, weave in the ends.

— Assembly & Finishing :

Info :

Fasten the legs and arms with a thread mount. Attach the legs and arms using a long needle and thread (look at the pictures in the pattern for guidance).

Info :

Tighten cheeks following the pictures: pass the needle through the head to form cheek indentations and secure tightly, then knot and hide the thread.

Info :

Sew the ears to the head using the long tails, positioning symmetrically on top of the head as shown.

Info :

Sew the tail to the body with the long tail left from the tail piece.

Info :

Embroider the eyes, nose and eyebrows with brown yarn following the photos for placement and expression.

— Headband :

Info :

With purple yarn. Chain 45. Start in the second chain from the hook: 1sl st, 1sc, 3dc, 1sc, 32sl st, 1sc, 3dc, 1sc, 1sl st. Cut the yarn and fasten off. Tie the headband on the head.

— Dress :

Round 1 :

With purple yarn. Work in rows. Chain 19. From the second chain on the hook: 18sc, turn (18)

Round 2 :

ch1, 3sc, ch4, (skip 4 sc, start from the next stitch), 4sc, ch4, (skip 4 sc, start from the next stitch), 3sc, turn (18)

Round 3 :

ch2, 18dcinc, turn (36)

Round 4 :

ch2, 36dc, turn (36)

Round 5 :

ch2, (dcinc, sc) *18

Info :

Cut the yarn. Make a fastener on the dress (sew a button on one side, make a button loop on the other). Put the dress on the bear.

— Pillow :

Round 1 :

Crochet 2 pieces in pink color. Chain 15. Start in the second chain from the hook: 14sc, turn (14)

Round 2-11 :

Ch1, 14sc, turn (10 rows)

Info :

Cut the yarn. Apply the pink part and crochet with purple yarn: 14sc, inc in the corner, 11sc, inc in the corner, 14sc, inc in the corner, 11sc, inc in the corner. Fasten off, cut the yarn, weave in the yarn ends.

— Blanket :

Round 1 :

With pink yarn. Work in rows. Ch 31. Start in the second chain from the hook: 30sc, turn (30)

Info :

Attention! Crochet in jacquard technique from Row 2 to 11. Add purple yarn (these stitches are highlighted in red in the pattern).

Round 3 :

ch2, (3dc, 3dc) *5, turn (30)

Round 4 :

ch2, (3dc, 3dc) *5, turn (30)

Round 5 :

ch2, (3dc, 3dc) *5, turn (30)

Round 6 :

ch2, (3dc, 3dc) *5, turn (30)

Round 7 :

ch2, (3dc, 3dc) *5, turn (30)

Round 8 :

ch2, (3dc, 3dc) *5, turn (30)

Round 9 :

ch2, (3dc, 3dc) *5, turn (30)

Round 10 :

ch2, (3dc, 3dc) *5, turn (30)

Round 11 :

ch2, (3dc, 3dc) *5, turn (30)

Round 12 :

With pink yarn. Ch1, 30sc. Fasten off, cut the yarn, weave in the yarn ends.

— Suitcase: Side parts (make 2) :

Info :

Crochet 2 pieces in light pink and 2 pieces in beige color. Work in rows.

Round 1 :

Chain 7. From the second chain on the hook: 6sc, turn (6)

Round 2-107 :

Ch1, 6sc, turn (106 rows)

Info :

Fold in half and make 6sl st through both sides. Cut the yarn.

— Suitcase: Connect the pieces (make 2) :

Info :

Put the light pink detail inside the beige one. Apply the beige part and crochet with beige yarn: 108sc. Cut the yarn.

Info :

Connect on the other side of the side with brown yarn: 108 reserve sc. Cut the yarn.

— Bottom cover :

Info :

Crochet 1 piece in light pink and 1 piece in beige color. Work in rows.

Round 1 :

Chain 33. Start from the second chain on the hook: inc, 30sc, inc, turn (34)

Round 2-22 :

Ch1, 34sc, turn (21 rows) (34)

Round 23 :

ch1, dec, 30sc, dec (32)

Info :

Continue crocheting from one beige piece. Cut a rectangle from the cardboard and put it between the parts.

Info :

Apply the beige part and crochet with beige yarn: 108sc. Fasten off, cut the yarn, weave in the ends.

— Attach pieces to bottom cover :

Info :

Attach the side pieces to the bottom cover in a circle. Attach the bottom cover to the side part with brown yarn by crocheting 108 reserve sc. Fasten off, cut the yarn, weave in the ends.

— Upper cover :

Info :

Crochet 1 piece in light pink and 1 piece in beige color. Work in rows. Chain 33. Start from the second chain on the hook: inc, 30sc, inc, turn (34)

Round 2-22 :

Ch1, 34sc, turn (21 rows) (34)

Round 23 :

ch1, dec, 30sc, dec (32)

Info :

Fasten off, cut the yarn, weave in the yarn ends.

Info :

Attach the pieces to the upper cover in a circle. Attach the upper cover to the side part with brown yarn by crocheting 108 reserve sc. Fasten off, cut the yarn, weave in the ends.

Info :

Fold together the upper with the bottom. On the long side, make a seam with a brown thread connecting the parts.

— Decoration (make 2) :

Round 1 :

With brown yarn. Chain 82. Start in the third chain from the hook: 80dc, turn (80)

Round 2 :

ch2, 80dc (80)

Info :

Leave long tail for sewing. Sew the decoration to the suitcase.

— Handle :

Round 1 :

With brown yarn. 6sc in MR (6)

Info :

Place row marker here.

Round 2-24 :

6sc (6) (23 rounds)

Info :

Leave long tail for sewing. Sew the handle to the suitcase.

Info :

Make a fastener on the suitcase (sew a button on one side, make a button loop on the other). Fasten.

Assembly Instructions

  • Fasten the legs and arms with a thread mount: use a long needle and sturdy thread to pass through the body and secure each limb in the positions shown in the pictures.
  • Tighten the cheeks by passing a needle and thread through the head to form small indentations, then knot and hide the thread on the inside.
  • Sew the ears to the top sides of the head using the long tails left on the ear pieces, positioning symmetrically and reinforcing with several stitches.
  • Sew the tail to the lower back of the body using the long tail from the tail piece and secure firmly.
  • Insert the cardboard into the bottom cover, then join bottom, sides and upper cover by crocheting/whipstitching 108 reserve sc as instructed to assemble the suitcase.
  • Sew suitcase decorations, straps and handle in place using the long tails supplied on those pieces and reinforce the handle base before finalizing.
  • Make a dress fastener by sewing a small button to one side of the dress and creating a button loop on the other side so it can be put on and removed.

Important Notes

  • 💡Use a stitch marker at the first stitch of every round to keep track of round starts and avoid losing your place.
  • 💡Stuff limbs and head gradually and consistently to avoid lumps; add small amounts of fiberfill and shape as you go.
  • 💡Weave in ends and leave long tails where indicated to make sewing pieces together and finishing easier.
  • 💡Pin and position pieces before sewing to confirm placement and symmetry with the photo references.

This tiny Teddy Bear in Suitcase pattern is a delightful blend of amigurumi charm and miniature craft detail, perfect for gifts or collectible displays. The finished set includes a dressed bear, blanket, pillow and a structured suitcase with trim and handle for a complete scene. Make one as a sweet keepsake or a special present for a loved one — tiny, cozy and full of personality. 🧸 ✨
You ask,

we answer.

FAQs

What size will the finished piece be?

The finished teddy bear measures approximately 11 cm tall and the suitcase measures approximately 14 cm high by 8 cm wide when using the recommended sport weight yarn and 2.0 mm hook.

Can I use different yarn weights for this pattern?

Yes, but changing yarn weight will alter the final size and structure; if you use thicker yarn, use a larger hook and consider adding stiffer cardboard or interfacing to maintain suitcase shape.

Do I need prior crochet experience for this pattern?

This pattern is rated intermediate and assumes you know basic amigurumi stitches like magic ring, inc, dec, sc and dc, as well as simple sewing techniques for assembly.

How long does this project typically take to complete?

Most crocheters complete this project in 8-10 hours, though time will vary by experience level and whether you choose to customize details.

How do I make the suitcase rigid?

Cut a cardboard rectangle to fit the bottom and insert it between the crocheted layers before joining; this gives the suitcase a stable, structured base.