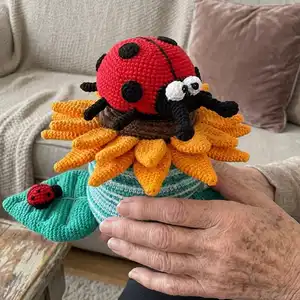
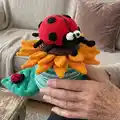
Create a playful sunflower stacking toy with removable rings, petals, leaves and an adorable ladybug companion. This pattern walks you through making each piece so you can assemble a charming, interactive set your child will love. Perfect for gifting or adding a handmade touch to nursery playtime. Follow the complete step-by-step instructions and photos to guide your crocheting journey.
Progress Tracker
0% Complete
— BASE :
Info :
make 2 parts. Start with green color
Round 3 :
(1 sc; inc)*6 (18)
Round 4 :
(2 sc; inc)*6 (24)
Round 5 :
(3 sc; inc)*6 (30)
Round 6 :
FLO (4 sc; inc)*6 (36)
Round 7 :
(5 sc; inc)*6 (42)
Round 8 :
3 sc; inc; (6 sc; inc)*5; 3 sc (48)
Round 9 :
(7 sc; inc)*6 (54)
Round 10 :
4 sc; inc; (8 sc; inc)*5; 4 sc (60)
Round 11 :
FLO (9 sc; inc)*6 (66)
Round 12 :
5 sc; inc; (10 sc; inc)*5; 5 sc (72)
Round 13 :
(11 sc; inc)*6 (78)
Round 14 :
6 sc; inc; (12 sc; inc)*5; 6 sc (84)
Round 15 :
(13 sc; inc)*6 (90)
Round 16-17 :
90 sc (90) cut the yarn, leave a long tail for sewing
Info :
Sew two parts of the base together in back loops of rounds 6 and 11. Fill with stuffing as you go. After that sew edges of two parts of base in round 17.
— POLE :
Round 4 :
(1 sc; inc)*6 (18)
Round 7 :
(2 sc; inc)*6 (24)
Round 11 :
(3 sc; inc)*6 (30)
Round 16 :
(4 sc; inc)*6 (36)
Round 22 :
(5 sc; inc)*6 (42)
Round 29 :
(6 sc; inc)*6 (48)
Round 37 :
(7 sc; inc)*6 (54)
Round 46 :
(8 sc; inc)*6 (60) cut the yarn, leave a long tail for sewing. Sew the pole with the part of the base (in round 11) like in the pictures.
— LARGE RING :
Info :
Start with light green yarn
Round 1 :
60 ch; slst in 1st ch (60)
Round 2 :
(9 sc; inc)*6 (66)
Round 3 :
5 sc; inc; (10 sc; inc)*5; 5 sc (72)
Round 4 :
(11 sc; inc)*6 (78)
Round 5 :
6 sc; inc; (12 sc; inc)*5; 6 sc (84)
Round 6 :
(13 sc; inc)*6 (90)
Round 7 :
7 sc; inc; (14 sc; inc)*5; 7 sc (96)
Round 8 :
(15 sc; inc)*6 (102)
Round 9 :
102 sc (102) change to green color
Round 10 :
102 sc (102) change to light green color
Round 11 :
102 sc (102) change to green color
Round 12 :
102 sc (102) change to light green color
Round 13 :
102 sc (102) change to green color
Round 14 :
102 sc (102) change to light green color
Round 16 :
(15 sc; dec)*6 (96)
Round 17 :
7 sc; dec; (14 sc; dec)*5; 7 sc (90)
Round 18 :
(13 sc; dec)*6 (84)
Round 19 :
6 sc; dec; (12 sc; dec)*5; 6 sc (78)
Round 20 :
(11 sc; dec)*6 (72)
Round 21 :
5 sc; dec; (10 sc; dec)*5; 5 sc (66)
Round 22 :
(9 sc; dec)*6 (60) cut the yarn, leave a long tail for sewing
Info :
Sew round 22 with round 1, fill with stuffing as you go.
— MIDDLE RING (1) :
Info :
Start with green yarn
Round 1 :
48 ch; slst in 1st ch (48)
Round 2 :
(7 sc; inc)*6 (54)
Round 3 :
4 sc; inc; (8 sc; inc)*5; 4 sc (60)
Round 4 :
(9 sc; inc)*6 (66)
Round 5 :
5 sc; inc; (10 sc; inc)*5; 5 sc (72)
Round 6 :
(11 sc; inc)*6 (78)
Round 7 :
6 sc; inc; (12 sc; inc)*5; 6 sc (84)
Round 8 :
(13 sc; inc)*6 (90) change to light green color
Round 9 :
90 sc (90) change to green color
Round 10 :
BLO 90 sc (90) change to light green color
Round 11 :
90 sc (90) change to green color
Round 12 :
BLO 90 sc (90) change to light green color
Round 13 :
90 sc (90) change to green color
Round 14 :
(13 sc; dec)*6 (84)
Round 15 :
6 sc; dec; (12 sc; dec)*5; 6 sc (78)
Round 16 :
(11 sc; dec)*6 (72)
Round 17 :
5 sc; dec; (10 sc; dec)*5; 5 sc (66)
Round 18 :
(9 sc; dec)*6 (60)
Round 19 :
4 sc; dec; (8 sc; dec)*5; 4 sc (54)
Round 20 :
(7 sc; dec)*6 (48) cut the yarn, leave a long tail for sewing. Sew round 20 with round 1, fill with stuffing as you go.
Info :
There are two ways to make pretty edges on the rings (in rounds 10, 12, 14) - in the front loops make slip stitch round or reverse crochet (crab stitch) round.
— MIDDLE RING (2) :
Info :
Start with light green yarn
Round 1 :
48 ch; slst in 1st ch (48)
Round 2 :
(7 sc; inc)*6 (54)
Round 3 :
4 sc; inc; (8 sc; inc)*5; 4 sc (60)
Round 4 :
(9 sc; inc)*6 (66)
Round 5 :
5 sc; inc; (10 sc; inc)*5; 5 sc (72)
Round 6 :
(11 sc; inc)*6 (78)
Round 7 :
6 sc; inc; (12 sc; inc)*5; 6 sc (84)
Round 8 :
(13 sc; inc)*6 (90) change to green color
Round 9 :
90 sc (90) change to light green color
Round 10 :
90 sc (90) change to green color
Round 11 :
90 sc (90) change to light green color
Round 12 :
90 sc (90) change to green color
Round 13 :
90 sc (90) change to light green color
Round 14 :
(13 sc; dec)*6 (84)
Round 15 :
6 sc; dec; (12 sc; dec)*5; 6 sc (78)
Round 16 :
(11 sc; dec)*6 (72)
Round 17 :
5 sc; dec; (10 sc; dec)*5; 5 sc (66)
Round 18 :
(9 sc; dec)*6 (60)
Round 19 :
4 sc; dec; (8 sc; dec)*5; 4 sc (54)
Round 20 :
(7 sc; dec)*6 (48) cut the yarn, leave a long tail for sewing. Sew round 20 with round 1, fill with stuffing as you go.
— SUNFLOWER RING :
Info :
Large petals (make 13)
Round 3 :
(1 sc; inc)*3 (9)
Round 5 :
(2 sc; inc)*3 (12)
Round 7 :
(3 sc; inc)*3 (15)
Round 9 :
(4 sc; inc)*3 (18)
Round 17 :
(4 sc; dec)*3 (15)
Round 18 :
(3 sc; dec)*3 (12)
Round 19 :
12 sc (12) cut the yarn, leave a tail for sewing.
Info :
There are two ways to make this part: you may sew petals or "crochet in" in the middle of the flower ring. For the sewing: make in rounds 10 and 12 (BLO 78 sc) and in the front loops sew petals. For the second way: while making the ring in rounds 10 and 12 "crochet in" petals as in the pictures.
Info :
Small petals (make 15)
Round 3 :
(1 sc; inc)*3 (9)
Round 5 :
(2 sc; inc)*3 (12)
Round 7 :
(3 sc; inc)*3 (15)
Round 13 :
(3 sc; dec)*3 (15)
Round 14 :
12 sc (12) cut the yarn, leave a tail for sewing.
— FLOWER RING :
Info :
Start with brown yarn
Round 1 :
36 ch; slst in 1st ch (36)
Round 2 :
(5 sc; inc)*6 (42)
Round 3 :
3 sc; inc; (6 sc; inc)*5; 3 sc (48)
Round 4 :
(7 sc; inc)*6 (54)
Round 5 :
4 sc; inc; (8 sc; inc)*5; 4 sc (60)
Round 6 :
(9 sc; inc)*6 (66)
Round 7 :
5 sc; inc; (10 sc; inc)*5; 5 sc (72)
Round 8 :
(11 sc; inc)*6 (78)
Round 10 :
BLO 78 sc (78) (or "crochet in" large petals)
Round 12 :
BLO 78 sc (78) (or "crochet in" small petals)
Round 14 :
(11 sc; dec)*6 (72)
Round 15 :
5 sc; dec; (10 sc; dec)*5; 5 sc (66)
Round 16 :
(9 sc; dec)*6 (60)
Round 17 :
4 sc; dec; (8 sc; dec)*5;4 sc (54)
Round 18 :
(7 sc; dec)*6 (48)
Round 19 :
3 sc; dec; (6 sc; dec)*5;3 sc (42)
Round 20 :
(5 sc; dec)*6 (36) cut the yarn, leave a long tail for sewing. Sew round 20 with round 1, fill with stuffing as you go.
— LEAVES (make 2) :
Round 2 :
(inc; 2 sc)*2 (8)
Round 3 :
(inc; 3 sc)*2 (10)
Round 4 :
1 sc; inc; 4 sc; inc; 3 sc (12)
Round 5 :
1 sc; inc; 5 sc; inc; 4 sc (14)
Round 6 :
2 sc; inc; 6 sc; inc; 4 sc (16)
Round 7 :
2 sc; inc; 7 sc; inc; 5 sc (18)
Round 8 :
3 sc; inc; 8 sc; inc; 5 sc (20)
Round 9 :
3 sc; 2 inc; 8 sc; 2 inc; 5 sc (24)
Round 10 :
4 sc; 2 inc; 10 sc; 2 inc; 6 sc (28)
Round 11 :
4 sc; 4 inc; 10 sc; 4 inc; 6 sc (36)
Round 14 :
6 sc; 4 inc; 14 sc; 4 inc; 8 sc (44)
Round 17 :
BLO (6 sc); 2 sc; 4 inc; 2 sc; BLO (14 sc); 2 sc; 4 inc; 2 sc; BLO (8 sc) (52)
Round 20 :
10 sc; 4 inc; 22 sc; 4 inc; 12 sc (60)
Round 23 :
BLO (10 sc); 2 sc; 4 inc; 2 sc; BLO (22 sc); 2 sc; 4 inc; 2 sc; BLO (12 sc) (68)
Round 29 :
BLO (11 sc); 10 sc; BLO (24 sc); 10 sc; BLO (13 sc) (68)
Round 32 :
67 sc (67) - divide in half and sew the line in the middle of the leaf, fill with stuffing and sew horizontal lines in rounds 17, 23, 29.
Info :
From now on we'll crochet two parts exactly the same way, starting to count from the middle of the leaf:
Round 33 :
skip 34 sc; turn, make 34 sc (34)
Round 34 :
2 dec; 9 sc; 4 dec; 9 sc; 2 dec (26)
Round 37 :
2 dec; 5 sc; 4 dec; 5 sc; 2 dec (18)
Round 38 :
(1 sc; dec)*6 (12)
Round 39 :
6 dec (6) - fasten off, hide a tail.
Item Name (Leaf Petiole) :
Make 6 ch, turn; 5 sc; 1 ch, turn (make 30 rows).
Info :
Sew one side of the petiole to the leaf and sew both ends of the petiole around the large ring if you want it to be irremovable. OR Use buttons, sewable snap buttons or velcro tape, so the leaf could easily come off, it all depends on your preferences and the age of a child.
— LADYBUG :
Info :
Start with red yarn
Round 3 :
(1 sc; inc)*6 (18)
Round 4 :
(2 sc; inc)*6 (24)
Round 5 :
(3 sc; inc)*6 (30)
Round 6 :
(4 sc; inc)*6 (36)
Round 7 :
(5 sc; inc)*6 (42)
Round 8 :
(6 sc; inc)*6 (48)
Round 9 :
(7 sc; inc)*6 (54)
Round 10 :
(8 sc; inc)*6 (60)
Round 12 :
(9 sc; inc)*6 (66)
Round 14 :
(10 sc; inc)*6 (72)
Round 16 :
(11 sc; inc)*6 (72)
Round 17-21 :
78 sc (78) change to black color
Round 23 :
BLO (11 sc; dec)*6 (72)
Round 24 :
5 sc; dec; (10 sc; dec)*5; 5 sc (66)
Round 25 :
(9 sc; dec)*6 (60)
Round 26 :
4 sc; dec; (8 sc; dec)*5; 4 sc (54)
Round 27 :
(7 sc; dec)*6 (48)
Round 28 :
3 sc; dec; (6 sc; dec)*5; 3 sc (42)
Round 29 :
(5 sc; dec)*6 (36)
Round 30 :
BLO 36 sc (36) fill with stuffing
Round 34 :
(4 sc; dec)*6 (30)
Round 37 :
(3 sc; dec)*6 (24)
Round 40 :
(2 sc; dec)*6 (18)
Round 41 :
(1 sc; dec)*6 (12)
Round 42 :
6 dec (6) fasten off.
— HEAD :
Info :
Start with black yarn, make 2 ladybug's antennaes (R1-R8)
Round 5-8 :
6 sc (6) - connect both antennaes in R9
Round 9 :
6 sc (in 1st antennae) + 5 ch + 6 sc (in 2nd antennae) + 5 sc (22)
Round 11 :
1 sc; 2 dec; 7 sc; 2 dec; 6 sc (18)
Round 12 :
(2 sc; inc)*6 (24)
Round 13 :
(3 sc; inc)*6 (30)
Round 14-15 :
30 sc (30) fill with stuffing, cut the yarn, leave a tail for sewing.
Item Name (SPOTS) :
With black yarn Round 1. 6 sc in MR (6). Round 2. 6 inc (12) cut the yarn, leave a tail for sewing. Make 6 pieces.
Item Name (LEGS) :
With black yarn Round 1. 6 sc in MR (6). Round 2. 6 sc (6) cut the yarn, leave a tail for sewing. Make 6 pieces.
Item Name (EYES) :
With white yarn Round 1. 6 sc in MR (6). Round 2. 6 inc (12). Round 3. 12 sc (12) cut the yarn, leave a tail for sewing. Make 2 pieces.
— SMALL LADYBUG :
Info :
Start with red yarn
Round 3 :
(1 sc; inc)*6 (18)
Round 4 :
(2 sc; inc)*6 (24)
Round 5-6 :
24 sc (24) change to black color
Round 8 :
BLO (2 sc; dec)*6 (18)
Round 9 :
(1 sc; dec)*6 (12)
Head Round 1 :
6 sc in MR (6)
Head Round 3 :
12 sc (12) cut the yarn, leave a tail for sewing.
Info :
Sew the head to the body of the small ladybug, sew the spots (black) and the eyes (white). Also sew velcro tape to the leaf and to the small ladybug if you want to make it removable.
This sunflower stacking toy amigurumi set brings playful, tactile fun to your handmade collection. Create a vibrant sunflower, removable petals and a cheeky ladybug for sweet stacking play. Bright colors and soft cotton yarn make it durable and child-friendly. 🌻🧶✨