🧢 Beautiful ✨ Detailed πŸ’ Adorable

Sea Unicorn Amigurumi Pattern

Sea Unicorn Amigurumi Pattern
4.3β˜… Rating
5-7 Hours Time Needed
1.3K Made This
βœ‚οΈ

Intermediate Level

Ideal for those with basic crochet experience, featuring slightly more advanced stitches and techniques to expand your skills.

⏱️

Weekend Treat

Takes 5-7 hours, making it an enjoyable project to finish over a couple of days.

🧸

Cute Companion

An adorable friend to cherish, handcrafted with love to bring comfort and joy for years to come.

About This Sea Unicorn Amigurumi Pattern

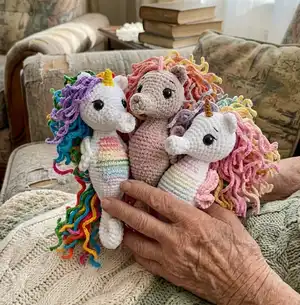
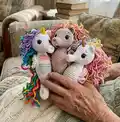
This pattern creates a charming Sea Unicorn (a seahorse-unicorn amigurumi) with a curly tail and rainbow mane. It uses plush yarn for the body and semi-cotton for the mane, fringe and tail tresses. The design highlights colorful embroidered belly lines and a tiny crocheted horn for sweet character.

Sea Unicorn Amigurumi Pattern crochet pattern - detailed view of completed project

Clear, numbered rounds and step-by-step assembly guidance make construction straightforward. You will learn to attach mane tresses, sew the horn and position eyes and flippers for a polished finish.

Why You'll Love This Sea Unicorn Amigurumi Pattern

I absolutely love this pattern because it combines cuddly plush textures with bright, playful colorwork that really pops. I enjoy the satisfying shaping of the head and tail β€” the seahorse silhouette is so gratifying to create. The rainbow mane lets me play with tiny color tresses and express creativity with color placement. I also love how the simple embroidery on the belly adds personality without complicated techniques.

Sea Unicorn Amigurumi Pattern step 1 - construction progress Sea Unicorn Amigurumi Pattern step 2 - assembly progress Sea Unicorn Amigurumi Pattern step 3 - details and accessories Sea Unicorn Amigurumi Pattern step 4 - final assembly and finishing

Switch Things Up

I love customizing this Sea Unicorn by changing the color palette; you can make pastel, neon or gradient mane sets depending on your mood.

I often swap the semi-cotton tresses for variegated yarn to create an ombre effect without changing multiple colors.

If you want a smaller keychain version, use a thinner yarn and a smaller hook β€” adjust the eye size accordingly.

Make a bigger, cuddlier version by using a bulkier plush yarn and a larger hook; stuffing a little firmer will help it keep its shape.

I sometimes embroider different expressions β€” move eye placement or change eyebrow angles to give distinct personalities.

Try adding tiny felt blush circles or a stitched smile to alter the character from dreamy to playful.

For a posable version, consider inserting thin wire into the tail before stuffing, then wrap with yarn to keep it safe for handling.

I like to create themed sets by matching mane colors to seasons β€” warm tones for autumn and cool pastels for spring.

You can add small accessories like a crocheted flower, bow or tiny scarf to personalize gifts.

Think about using metallic or sparkly thread for the horn to add a magical highlight that catches the light.

If you want to emphasize the belly lines, use thicker embroidery thread and two rows of each color for bolder stripes.

Try mixing textures: use boucle or eyelash yarn for an ultra-fluffy mane for a whimsical look.

Common Mistakes & How to Fix Them

βœ— Skipping the stitch counts during increases causes uneven shaping; count your stitches each round to ensure consistent shaping throughout the piece. βœ— Using the wrong hook size for plush yarn leads to gaps or overly tight fabric; use a 3.5 mm hook for plush yarn and a smaller 2.25 mm/2.0 mm hook for semi-cotton as recommended. βœ— Forgetting to stuff in stages will produce lumps or a floppy head; stuff gradually and firmly at the indicated points in the pattern to maintain smooth curves. βœ— Not securing mane tresses before sewing will make placement messy; pin or tack central tresses first and sew from right to left to keep the mane neat and symmetrical. βœ— Placing eyes without checking distance changes the expression of the toy; place safety eyes between rows 2 and 13 and adjust spacing (11-14 sc) before final fixing.

Sea Unicorn Amigurumi Pattern

Bring a whimsical sea unicorn to life with this charming amigurumi pattern. You will crochet a soft plush seahorse-unicorn with a rainbow mane, embroidered belly stripes and playful curled tail. The pattern includes full parts, assembly notes and clear step-by-step rounds for the head, body, horn, ears, mane, tail and flippers. Perfect for makers who enjoy colorful details and a rewarding assembly process.

Intermediate 5-7 Hours

Materials Needed for Sea Unicorn Amigurumi Pattern

β€” Main Fabric

  • 01
    Himalaya Dolphin Baby (100% polyester, 100 g - 120 m) Color 80301 (white) - for head, body, ears and flippers
  • 02
    Alize Cotton Gold (55% cotton/45% acrylic, 100 g - 330 m) - for mane, fringe and tail (used as main semi-cotton source)
  • 03
    YarnArt Jeans (55% cotton/45% acrylic, 50 g - 10 m) - used for colorful tresses (various colors)
  • 04
    Color list for mane and tail tresses: J 42 (dark pink), A 37 (orange), A 216 (yellow), A 126 (green grass), A 16 (ocean), A 43 (purple), J 20 (light pink), J 73 (peach), A 187 (light yellow), J 79 (mint), A 514 (icy), A tweed 682 (violet)
  • 05
    Alize Cotton Gold 110 (chick) - yarn for the horn (any cotton yarn can be used)
  • 06
    Alize Miss 26 (brown) (100% mercerized cotton, 50 g - 280 m) - for embroidering the eyes and eyebrows
  • 07
    Fiberfill / polyester stuffing - to fill head, nose, body and horn as instructed
  • 08
    Black safety eyes 13-14 mm (2 pieces) - used on legs to sew them in place or standard safety eyes for face details

β€” Tools Required

  • 01
    Crochet hook size 3.5 mm (for plush yarn)
  • 02
    Crochet hook size 3.25 mm (alternative for plush yarn)
  • 03
    Crochet hook size 2.25 mm or 2.0 mm (choose suitable for semi-cotton thread)
  • 04
    Needles of different lengths for assembly and sewing pieces together
  • 05
    Yarn needle for sewing and weaving in ends
  • 06
    Stitch markers to mark beginning of rounds
  • 07
    Scissors
  • 08
    Polyester stuffing (fiberfill)
  • 09
    Black safety eyes 13-14 mm (2 pieces)
  • 10
    Tooth floss to make nose contractions and attach pieces
  • 11
    Long thin knitting needle to fix the head while attaching

Progress Tracker

0% Complete

β€” Head :

Info :

Plush yarn, hook 3,5 mm

Round 1 :

6 sc in MR

Round 2 :

(1 sc, inc)x3 - 9

Round 3 :

9 sc in BLO

Round 4 :

9 sc

Round 5 :

Inc, 8 sc - 10

Round 6 :

10 sc

Round 7 :

(4 sc, inc)x2 -12

Round 8 :

(3 sc, inc)x3 - 15

Round 9 :

(4 sc, inc)x3 - 18

Round 10 :

(2 sc, inc)x6 - 24

Round 11 :

24 sc

Round 12 :

(3 sc, inc)x6 - 30

Round 13 :

(4 sc, inc)x6 - 36

Round 14 :

(5 sc, inc)x6 - 42

Round 15/19 :

5 rows - 42 sc

Info :

Fill the nose with fiber.

Round 20 :

(5 sc, dec)x6 - 36

Round 21 :

(4 sc, de )x6 - 30

Round 22 :

(3 sc, dec)x6 - 24

Info :

Fill the head with fiber.

Round 23 :

(2 sc, dec)x6 - 18

Round 24 :

(1 sc, dec)x6 - 12

Info :

Tighten the hole with a needle and a tail thread, only after contractions and head decoration.

β€” Horn :

Info :

Semi-cotton yarn, hook 2,25 mm.

Round 1 :

6 sc in MR

Round 2 :

6 sc

Round 3 :

(2 sc, inc)x2 - 8

Round 4 :

8 sc

Round 5 :

(3 sc, inc)x2 - 10

Round 6 :

(4 sc, inc)x2 - 12

Info :

Fill the horn with fiber and leave a tail thread for attaching.

β€” Head decoration :

Info :

Make nose contraction with a needle and tooth floss:

Round 1 :

Insert a needle in the back and pull it out the center of the nose.

Round 2 :

Skip 1 row up and insert a needle again and pull it out in the back; make some knots.

Round 3 :

Repeat 1-2, but skip 1 row down the previous point to make the nose contraction in the symmetry.

Info :

I use eyes on legs to finish eye contractions at once. Attach the eyes between 2/13 row of the head in the distance of 11-14 sc (choose according to your crochet density and eye size). Embroider the eyelids, eyebrows and attach the horn between 16-17 rows of the head. Attach the ears a bit farther (1-2 rows behind the horn).

β€” Body :

Info :

Plush yarn, hook 3,5 mm.

Round 1 :

9 sc in MR

Round 2/18 :

17 rows - 9 sc

Round 19 :

(2 sc, inc)x3 - 12

Round 20 :

(3 sc, inc)x3 - 15

Round 21 :

(4 sc, inc)x3 - 18

Round 22 :

4 sc, (inc, 1 sc)x2, 2 inc, (1 sc, inc)x2, 4 sc - 24

Round 23 :

24 sc

Round 24 :

5 sc, (inc, 2 sc)x2, 2 inc, (2 sc, inc)x2, 5 sc - 30

Round 25/26 :

2 rows - 30 sc

Info :

1 sc after 26th row. Here is the beginning of work now. It must be exactly along the center of the back.

Round 27 :

6 sc, (inc, 3 sc)x2, 2 inc, (3 sc, inc)x2, 6 sc - 36

Round 28/33 :

6 rows - 36 sc

Info :

1 sc after the 33th row. Here is the beginning of work now.

Round 34 :

6 sc, (dec, 3 sc)x2, 2 dec, (3 sc, dec)x2, 6 sc - 30

Round 35/36 :

2 rows - 30 sc

Info :

Fill the body with fiber.

Round 37 :

5 sc, (dec, 2 sc)x2, 2 dec, (2 sc, dec)x2, 5 sc - 24

Round 38 :

24 sc

Round 39 :

4 sc, (dec, 1 sc)x2, 2 dec, (1 sc, dec)x2, 4 sc - 18

Round 40/41 :

2 rows - 18 sc

Info :

Fill the body with fiber.

β€” Ears (2 pieces) :

Info :

Plush yarn, hook 3,5 mm.

Round 1 :

4 ch, turn the work, 3 sc, 1 ch ↑.

Round 2 :

1 sc, dec, 1 ch ↑.

Round 3 :

dec is in the top of the ear.

Round 4 :

Turn the ear and work 3 sc from the top to the bottom of the left side. Leave tail thread for attaching.

β€” Mane (5 pieces) :

Info :

semi-cotton yarn, hook 2,25 mm.

Info :

For fringe (1 piece): 55 ch, turn the work, 54 slst, from the 2nd ch. The 1st tress is ready. Don't cut thread, work the rest of tresses, cast on 50 ch, 50 ch, 45 ch, 45 ch, 40 ch, 35 ch.

Info :

Leave tail thread for attaching.

Info :

Mane: work tresses by the same technique, as for the fringe. 5 pieces - 17 tresses on each: 45, 45, 45, 45, 45, 45, 45, 40, 40, 40, 40, 35, 35, 35, 35, 35. Leave tail thread for attaching.

β€” Tail (5 pieces) :

Info :

Semi-cotton yarn, hook 2,25 mm.

Info :

60 ch, turn the work, 59 sl st, from the 2nd ch. The 1st tress is ready. Don't cut thread, work 2 more tresses, 55 ch and 50 ch respectively.

Info :

Work 4 more pieces of different colors.

β€” Flippers (4 pieces) :

Info :

Plush yarn, hook 3,5 mm.

Item Name (P1) :

A big flipper (2 pieces): 7 ch, from the 2nd ch: 2 sc, 2 hdc, 1 dc, 6 dc in 1 stitch, turn the work, along the other side: 1 dc, 2 hdc, 2 sc. Leave tail thread for attaching.

Item Name (P2) :

A small flipper (2 pieces): 5 ch, from the 2nd ch: 1 sc, 1 hdc, 1 dc, 6 dc in 1 stitch, turn the work, along the other side:1 dc, 1 hdc, 1 sc. Leave tail thread for attaching.

Info :

You can decorate flippers: work sl st with semi-cotton yarn in plush stitches.

β€” Attachment and decoration :

Info :

Use some piece of working thread or tooth floss to fix the end of the bottom in a bent position. I've used tooth floss.

Info :

In fact, you must sew the end of body to the main piece. Choose the attaching point on your own: if you sew higher, the tail will curl better; if you sew down the tail will curl less.

Info :

Fix the head with a knitting needle and sew it to the body with a tooth floss or semi-cotton thread of the same color as plush one. Fill some fiber in the process to avoid head hanging.

Info :

Attach fringe and mane. Fix the fringe with the 1st stitch along the centre between ears and then sew from right to left. Pin the central tress of the mane (yellow one) in 3 points: to the top, in the center and the bottom of the back and then sew the tress down. Attach the rest of tresses in the same way, allocating them in both sides from the central piece.

Info :

Attach the tail to the back (along 22/23 rows of the body). Firstly sew the yellow tress and then the other ones. Try to attach orange and green tresses in the same place between plush sc as yellow one. Skip a bit to the right and to the left from previous tresses while attaching pink and blue ones.

Info :

Attach flippers to both sides of the body along 32/38 rows (count up). Allocate a big flipper higher, and a small one - down a bit. Unfixed ends of flippers can curl a bit. I recommend you to fix them with some stitches in thread of the same color as plush one or working thread.

Info :

Embroider the lines along the belly with all yarn colors - 2 lines of each color. Our sea unicorn is ready:)

Assembly Instructions

  • Attach the head to the body: fix the head with a knitting needle, then sew the head securely to the top opening of the body using tooth floss or matching semi-cotton thread while adding fiber to avoid head hanging.
  • Attach the horn between rows 16-17 of the head, sewing from base to tip and leaving a tail thread to hide the end securely.
  • Position and attach safety eyes between rows 2 and 13 of the head, spacing them approximately 11-14 sc apart depending on your tension and eye size; embroider eyelids and eyebrows after placement.
  • Sew the ears behind the horn, 1-2 rows back, and secure them with tail threads; attach flippers to both sides of the body around rows 32-38 (count up) placing the larger flipper slightly higher.
  • Attach the mane fringe centrally between the ears and sew tresses from right to left; pin the central tress (yellow) at top, center and bottom of the back and sew down, then allocate remaining tresses evenly to both sides of the central piece

Important Notes

  • πŸ’‘Work with recommended hook sizes: 3.5 mm for plush yarn and 2.25/2.0 mm for semi-cotton to keep correct density and shape.
  • πŸ’‘Use stitch markers to mark the beginning of each round and to keep track of increases and decreases for symmetrical shaping.
  • πŸ’‘Stuff gradually and evenly: fill the nose, head and body at the indicated rounds to preserve smooth contours and avoid lumps.
  • πŸ’‘Pin or tack mane tresses before sewing to secure placement and symmetry; sew tresses from right to left as instructed for tidy results.

Create a magical Sea Unicorn to gift or keep β€” full of color and personality. 🧢🐚 This pattern combines plush textures with bright semi-cotton tresses for a playful, rainbow mane. ✨ Have fun customizing colors and expression; happy crocheting! 🧡🌈

You ask,

we answer.

FAQs

What size will the finished piece be?

The finished toy measures approximately 9.75 inches tall when using the recommended plush yarn and hook sizes.

Can I use different yarn weights for this pattern?

Yes, you can change yarn weights, but this will alter the final size and texture; adjust your hook accordingly and expect different proportions.

Do I need prior crochet experience for this pattern?

This pattern is rated intermediate; basic amigurumi skills such as working in the round, increases, decreases and simple sewing are recommended.

How long does this project typically take to complete?

Most crocheters finish this project in 5-7 hours, depending on experience, color changes and sewing time.