🧢 Beautiful ✨ Detailed πŸ’ Adorable

Star Dreamcatcher Pattern

Star Dreamcatcher Pattern
4.5β˜… Rating
2-4 Hours Time Needed
1.8K Made This
βœ‚οΈ

Intermediate Level

Ideal for those with basic crochet experience, featuring slightly more advanced stitches and techniques to expand your skills.

⏱️

Bite-Sized Project

Finishes in 2-4 hoursβ€”perfect for an afternoon of creative relaxation.

🏑

Cozy Accent

A warm touch for your space that transforms ordinary corners into inviting nooks filled with handmade charm.

About This Star Dreamcatcher Pattern

This pattern makes a double star mandala perfect for a dreamcatcher wall hanging. You will crochet an 8-round mandala with one round worked on the wrong side to create texture on both faces. The pattern includes written rounds, stitch explanations and a photo tutorial so you can follow along step by step.
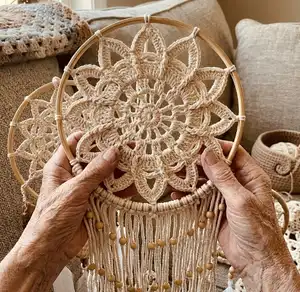
Star Dreamcatcher Pattern crochet pattern - detailed view of completed project

Suitable for upper-beginners and intermediate crocheters who know front-post stitches. Use the suggested yarns and hoop sizes or adapt to create different finished sizes.

Why You'll Love This Star Dreamcatcher Pattern

I absolutely love this pattern because it creates a delicate, double-sided mandala that looks beautiful from both sides. I enjoy the subtle texture you get by working one round on the wrong side β€” it makes the mandala feel more finished and tactile. The joining technique is simple and satisfying, letting you display the mandala in embroidery hoops or wrapped rings. Decorating the finished piece with beads, shells or tassels gives endless possibilities, and I always feel proud gifting these handmade dreamcatchers.

Star Dreamcatcher Pattern step 1 - construction progress Star Dreamcatcher Pattern step 2 - assembly progress Star Dreamcatcher Pattern step 3 - details and accessories Star Dreamcatcher Pattern step 4 - final assembly and finishing

Switch Things Up

I love experimenting with colour changes in the rounds to create ombre or contrasting double-sided effects; try two colours and alternate rounds to make the mandala pop.

I often change yarn weight and hook size to create a mini or oversized dreamcatcher β€” using a thinner yarn with a smaller hook gives a delicate small mandala and a bulky yarn with a larger hook makes a chunky statement piece.

I sometimes add a round of picots or surface crochet to the final edge for extra texture before mounting in the hoop.

For a boho look I attach wooden beads and natural shells to the hanging tails, while bright ribbons and feathers make a playful, colorful version.

I recommend swapping out the plain hoop for a painted or metallic embroidery hoop to match your decor and elevate the finished look.

To make a mobile, I stitch several differently sized mandalas and hang them at staggered lengths from a wooden dowel or branch.

I like to embroider a small charm or initial into the center before joining, which makes a lovely personalized gift.

If you want a reversible, identical look on both sides, practice tension control and ensure round 7 is worked on the wrong side as instructed so both faces sit neatly.

I sometimes add a tiny loop of wire hidden behind the mandala for extra stability when attaching heavier beads or shells.

Feel free to combine tiny crochet flowers or leaves between rounds to change the silhouette β€” just maintain stitch counts for correct placement.

I encourage you to try different decorations for the tails: crocheted tiny motifs, braided yarn, or leather strips all give distinct finishes you can experiment with.

Make a coordinated set in varying sizes and colours to hang in a gallery group and create a customized wall feature that reflects your style.

Common Mistakes & How to Fix Them

βœ— Starting the mandala too large for the hoop will make it difficult to stretch and secure properly; always make the mandala slightly smaller than your ring and adjust tension accordingly. βœ— Skipping the photo tutorial can lead to confusion in rounds with post stitches and joins; follow the photo tutorial pages closely for correct placement and finishing. βœ— Not practicing front-post and triple cluster stitches beforehand can make rounds uneven; practice the 3dc cluster and front-post stitches on a swatch before starting the mandala. βœ— Joining rounds incorrectly by misplacing the final slip stitch can distort your rounds; always join in the specified stitch (for example join in ch1 or in the top of the first cluster) to maintain correct stitch counts. βœ— Pulling yarn too tightly when wrapping or joining to the hoop will distort the mandala shape; tie and secure gently then tighten gradually to keep the flowers centered and the shape even.
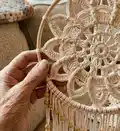
Star Dreamcatcher Pattern

Create a beautiful double-sided star mandala dreamcatcher to hang on your wall or give as a thoughtful handmade gift. This pattern guides you through an 8-round mandala with a textured wrong-side round for a reversible look. Clear written instructions, stitch explanations and a photo tutorial make the project approachable and enjoyable. Decorate with beads, shells, ribbons or tassels to personalise your creation.

Intermediate 2-4 Hours

Materials Needed for Star Dreamcatcher Pattern

β€” Main Fabric

  • 01
    Scheepjes Maxi Sweet Treat - 140 m, 25 g (use with 1.75-2 mm hook) - suitable for 10 cm hoop
  • 02
    Scheepjes Linnen Soft - 135 m, 50 g or Scheepjes Catona - 125 m, 50 g (use with 2.5-3 mm hook) - suitable for 15 cm hoop
  • 03
    Huisje van katoen Barbante M - 100 m, 250 g (use with 3.5-4 mm hook) - suitable for 20 cm hoop
  • 04
    You can use any similar yarn and a suitable hook; adjust hoop diameter selection to yarn/hook combination for best fit

β€” Tools Required

  • 01
    Crochet hook size 1.75-2.0 mm (for Maxi Sweet Treat)
  • 02
    Crochet hook size 2.5-3.0 mm (for Linnen Soft or Catona)
  • 03
    Crochet hook size 3.5-4.0 mm (for Barbante M)
  • 04
    Wooden or wire rings (hoops) 10 cm, 15 cm or 20 cm diameter
  • 05
    Scissors
  • 06
    Tapestry needle to weave in ends
  • 07
    Stitch markers (optional)
  • 08
    Pins and blocking board or mat for spray blocking
  • 09
    Spray bottle with water for blocking
  • 10
    Wooden or gemstone beads, shells, ribbons or tassels for decoration

Progress Tracker

0% Complete

β€” Materials :

Info :

Yarn suggestions: Scheepjes Maxi Sweet Treat 140 m, 25 g (hook 1.75-2 mm) for 10 cm hoop. Scheepjes Linnen Soft 135 m, 50 g or Scheepjes Catona 125 m, 50 g (hook 2.5-3 mm) for 15 cm hoop. Huisje van katoen Barbante M 100 m, 250 g (hook 3.5-4 mm) for 20 cm hoop. Ring: wooden or wire rings respectively 10, 15 or 20 cm. Scissors and tapestry needle to weave in ends. You can use any similar yarn and suitable hook.

β€” Abbreviations :

Infos :

*...* Repeat the section inside. [...] group of sts worked in the same st/sp. RS Right Side. WS Wrong Side. Sl st - slip stitch. Ch(s) - chain(s). Hdc - half double crochet. Dc - double crochet. Sp - space. St(sts) - stitch(es).

β€” Special stitches :

Info :

3dc cl - [yarn over and insert hook into indicated stitch or space. Yarn over, pull a loop, yarn over pull through 2 loops] 3 times. You have 4 loops on the hook, yarn over and pull through 4 loops. Fptr - yarn over twice, insert hook from front to back to front around the post of indicated stitch, yarn over, draw up a loop, [yarn over, pull through 2 loops] 3 times. Fphdc - yarn over, insert hook from front to back to front around the post of indicated stitch, draw up a loop, pull through 3 loops.

β€” Pattern notes :

Infos :

Choose an option to start the mandala; start with a magic ring or with a ring of chains, secured with a slip stitch. Please make yourself familiar with front post stitches before you start. You can finish off each round with a slip stitch. This pattern includes a chart on page 3. Start every round by the mark 'start' and the number of round on the chart. Follow the round from right to left. Pay attention in round 7 that we crochet on the wrong side. Use the photo tutorial (page 5) as reference.

β€” Chart :

Info :

Rounds 1-6 and round 8 are crocheted on the Right Side. The coloured stitches are made on the Right Side, grey stitches are on the Wrong side. Round 7 is crocheted on the Wrong Side. The coloured stitches on the chart are made on the Wrong Side, grey stitches are on the Right Side. See stitch legend for symbols used: 3dc cl, ch, sc, hdc, dc, fphdc, fptr, start, sl st.

β€” Written instructions :

Info :

*...* Repeat the section inside. [...] group of sts worked in the same st/sp. RS Right Side. WS Wrong Side.

Round 1 :

Start: ch6 join with sl st in first ch to form a ring. Ch1 (doesn't counts as a stitch) 12 sc in the ring. Join in ch1. (12sc)

Round 2 :

Sl st in 1st sc, ch5, (counts as 1st dc ch2), dc ch2 in every sc. Join in the 3rd ch of initial ch5. (12dc, 12 ch2-sp)

Round 3 :

Sl st in ch2-sp, ch2 2dc cl (counts as 3dc cl), ch3. Work 11 times: *3dc cl, ch3* in every ch2-sp. Join in the top of 1st 3dc cluster. (12 3dc cl, 12 ch3-sp)

Round 4 :

Sl st in ch3-sp, ch3 (counts as 1st dc), 3 dc in the same ch3-sp, skip 3dc cl. Work 11 times: *ch1, 4 dc in ch3-sp, skip 3dc cl*. Join with hdc in 3rd ch of initial ch3. (48 dc, 12 ch1-sp)

Round 5 :

Ch1 (counts as sc) ch6. Work 11 times: *sc in ch1-sp, ch6*. Join in 1st ch1 (counting as 1st sc). (12 ch6-sp, 12 sc)

Round 6 :

Ch1 (doesn't counts as a stitch), 5 hdc in ch6-sp, fptr around 3dc cluster from round 3. Work 11 times: *5 hdc in ch6 sp, fptr around 3dc cluster from round 3*. Join in ch1. (60 hdc, 12 fptr)

Round 7 :

Turn to the Wrong Side, sl st between fptr and 1st hdc, ch8, sl st between 5th hdc and fptr, fptr around 3dc cl in round 3, sl st between fptr and hdc. Work 11 times: *ch8, sl st between 5th hdc and fptr, fptr around 3dc cl in round 3, sl st between fptr and 1st hdc*. No join, turn your work around. (12 ch8-sp, 12 fptr, 24 sl st)

Round 8 :

Work on the Right Side, ch1 (doesn't counts as a stitch), work [5 hdc, ch2, 5 hdc] in ch8-sp, fphdc around fptr in round 6. Work 11 times: *[5 hdc, ch2, 5 hdc] in ch8-sp, fphdc around fptr in round 6*. Join in ch1. Double Star Mandala for a Dreamcatcher is ready. (120 hdc, 12 ch2-sp, 12 fphdc)

Assembly Instructions

  • Cover the ring: wrap the wire or wooden ring tightly with sisal twine, yarn, fabric or paint the ring in the colour you like to cover the entire ring.
  • Attach the mandala: fold a piece of yarn (about 20 cm) in half to create a loop, place the loop under the crocheted middle and pull the loop to the front. Thread the ends through the loop and pull tight to secure the mandala to the hoop.
  • Secure the centre: position the mandala in the middle of the hoop and tie the middle piece to the hoop in four places (top, bottom and both sides). Continue securing other corners until the mandala is evenly anchored.
  • Weave and finish: weave in all ends into the crocheted mandala, trim excess and tidy the back so knots are secure and hidden.
  • Decorate: tie beads, shells, ribbons or tassels to the bottom of the hoop and make a loop at the top for hanging; tie a small knot under beads to keep them in place.
  • Blocking and final shaping: pin the mandala on a blocking board and spray-block if desired, then allow to dry completely before removing pins and final assembly into the hoop.

Important Notes

  • πŸ’‘Use stitch markers or a reminder to mark the start of each round, especially when following the chart symbols for correct placement.
  • πŸ’‘Block the mandala by spray-blocking and pinning from center to edge to obtain a neat, flat flower before attaching to the hoop.
  • πŸ’‘Make sure the finished mandala is slightly smaller than the ring; otherwise it will not stretch and sit correctly when mounted in the hoop.
  • πŸ’‘Familiarize yourself with front-post stitches, 3dc clusters and the special stitches described before starting to ensure even texture.

This Star Dreamcatcher pattern makes a lovely handmade wall hanging with a reversible double-sided mandala. It is perfect for gifting or customizing with beads, shells and ribbons to suit your decor. Happy crocheting and enjoy adding your personal finishing touches! 🧢✨

You ask,

we answer.

FAQs

What size will the finished piece be?

The finished mandala size depends on the yarn and hook you use; the pattern lists suggested yarns and hoop diameters (10, 15 or 20 cm) to help you achieve a good fit.

Can I use different yarn weights for this pattern?

Yes, you can change yarn weight and hook size to alter finished size. Use the suggested hook sizes for each yarn weight and remember the mandala should be slightly smaller than your hoop.

Do I need to know special stitches for this pattern?

You should be comfortable with front-post stitches and the special 3dc cluster and fptr/fphdc stitches; the pattern includes clear explanations for these stitches.

How long does this project typically take to complete?

Most crocheters finish this project in 2-4 hours, though time can vary depending on experience and whether you do blocking and extra decoration.