🧢 Beautiful ✨ Detailed πŸ’ Adorable

Deer Hat and Scarf Amigurumi Pattern

Deer Hat and Scarf Amigurumi Pattern
4.0β˜… Rating
2-3 Hours Time Needed
2.1K Made This
βœ‚οΈ

Beginner Friendly Level

Perfect for those just starting their crochet journey, with clear instructions and simple techniques

⏱️

Bite-Sized Project

Finishes in 2-4 hoursβ€”perfect for an afternoon of creative relaxation.

🧣

Snug Essential

Everyday comfort with practical charm, designed for both functionality and style through changing seasons.

About This Deer Hat and Scarf Amigurumi Pattern

This pattern provides step-by-step instructions to crochet a cozy hat, a fluffy pompom and two scarf variants sized for the deer amigurumi. Youll use plush yarn and a 4 mm hook to create soft, wearable accessories that finish quickly. The pattern uses continuous spiral rounds for the hat and simple rows for the scarves.

Deer Hat and Scarf Amigurumi Pattern crochet pattern - detailed view of completed project

Clear round and row counts make it easy to follow, even if youre newer to amigurumi accessories. Photos show key steps and finishing tips to help you get neat results.

Why You'll Love This Deer Hat and Scarf Amigurumi Pattern

I absolutely love this pattern because it turns simple stitches into charming seasonal accessories quickly. I enjoy how the plush yarn gives the hat and scarf a cuddly, luxurious feel that suits amigurumi perfectly. I also love offering two scarf variants so you can choose a plain strip or a buttoned style for more personality. Making the pompom is a small, satisfying flourish that completes the look every time. I find these accessories make great last-minute gifts and add instant holiday cheer to finished toys.

Deer Hat and Scarf Amigurumi Pattern step 1 - construction progress Deer Hat and Scarf Amigurumi Pattern step 2 - assembly progress Deer Hat and Scarf Amigurumi Pattern step 3 - details and accessories Deer Hat and Scarf Amigurumi Pattern step 4 - final assembly and finishing

Switch Things Up

I love customizing these accessories by changing yarn colors to match holidays or seasons; try pastels for spring or deep berry tones for winter.

I sometimes substitute a non-plush bulky yarn with a 4 mm hook to get a more traditional yarn texture rather than the plush look.

To make a smaller or larger version I adjust the hook and yarn weight; a thinner yarn with a smaller hook makes a tiny hat and scarf perfect for keychains.

I like to add embroidery or tiny felt appliques to the scarf edge for extra detail and texture.

For the pompom you can experiment with size and fullness; make extra rounds for a fluffier pompom or less for a neat bobble.

I occasionally attach a small bell or charm to the scarf end for a playful jingle effect around the neck of the toy.

If I want a posable look I sew the scarf more loosely so it can be rotated and positioned without distorting the neck stitches.

I recommend trying a decorative button for Variant 2; a contrasting color or wooden button changes the entire style of the scarf.

When I want a textured scarf, I alter row repeats to include slip stitches or half double crochet rows for a different surface.

Dont be afraid to mix yarns: a thin novelty yarn paired with plush yarn can give a fun two-tone edge to the hat band or scarf trim.

Common Mistakes & How to Fix Them

βœ— Skipping the magic ring and starting with chains can make the center hole too large; use a tight magic ring or adjust tension to close the center. βœ— Forgetting that pieces are worked in continuous spiral rounds can cause misalignment if you join rounds; do not end rnds with a slip stitch and work spirally as instructed. βœ— Not changing yarn color cleanly for the white edge will create uneven joins; fasten off the red securely and join the white with a neat slip knot then continue. βœ— Leaving no long tail after the pompom makes sewing it on difficult; leave a long tail and use it to securely attach the pompom to the hat. βœ— Neglecting turning chains when working the scarf rows results in lopsided edges; always make the turning chain at the end of each row and turn your work. βœ— Forgetting to weave in ends leaves loose strands visible on plush yarn; weave in ends carefully and trim close to the fabric for a tidy finish.

Deer Hat and Scarf Amigurumi Pattern

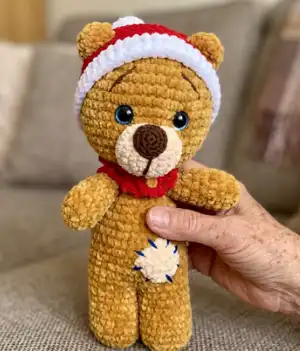
Make a cozy hat, pompom and two scarf variants for your deer amigurumi with this easy-to-follow pattern. Youll work in plush yarn using a 4 mm hook and simple stitches to create holiday-ready accessories. Clear round-by-round instructions and photos guide you through the hat, pompom and two scarf options. Perfect for adding festive charm to your finished amigurumi or as small handmade gifts.

Beginner Friendly 2-3 Hours

Materials Needed for Deer Hat and Scarf Amigurumi Pattern

β€” Main Fabric

  • 01
    Plush yarn Dolce YarnArt 120m (131 yds)/100g – 30g in red and white (original yarn for hat and scarf)
  • 02
    Substitute plush yarn: Himalaya Dolphin Baby 120m (131 yds)/100g (use similar amount)
  • 03
    Substitute plush yarn: Baby Bee Adore a ball 100g/84m (use equivalent yardage)
  • 04
    Substitute plush yarn: Velvet by Bernat 288m (315 yds)/300g (use equivalent yardage)
  • 05
    Substitute plush yarn: IceCream Deluxe by Lion Brand 142m (155 yds)/142g (use equivalent yardage)

β€” Tools Required

  • 01
    Crochet hook US size G/6 (4 mm)
  • 02
    Fiber fill stuffing (for pompom if desired)
  • 03
    Tapestry needle
  • 04
    Scissors
  • 05
    Stitch marker (optional)

Progress Tracker

0% Complete

β€” Hat :

Info :

All pieces are worked in a spiral continuously. This means that you do not end the rnd with a slip stitch and do not start a rnd with a chain. I start working every piece from a magic ring but you can ch2 and work the necessary number of sc in the second st from the hook.

Info :

With red yarn and hook 4mm make a magic ring.

Round 1 :

6 sc in magic ring = 6 sts

Round 2 (INC) :

2 sc in each st around = 12 sts

Round 3 (INC) :

(sc in next st, 2 sc in next st)*6 times =18 sts

Round 4 (INC) :

(sc in next 2 sts, 2 sc in next st)*6 times = 24 sts

Round 5 (INC) :

(sc in next 3 sts, 2 sc in next st)*6 times = 30 sts

Round 6 (INC) :

(sc in next 4 sts, 2 sc in next st)*6 times = 36 sts

Round 7 (INC) :

(sc in next 5 sts, 2 sc in next st)*6 times = 42 sts

Round 8 (INC) :

(sc in next 6 sts, 2 sc in next st)*6 times = 48 sts

Round 9 (INC) :

(sc in next 15 sts, 2 sc in next st)*3 times = 51 sts

Round 10 :

sc in next 10 sts, chain 7, skip 7 stitches, sc in next 9 sts, chain 7, skip 7 stitches, sc in next 18 sts = 51 sts

Round 11 :

sc in next 10 sts, sc in next 7 chains, sc in next 9 sts, sc in next 7 chains, sc in next 18 sts = 51 sts

Round 12 :

sc in each st around = 51 sts

Info :

!!! Change yarn to white

Round 13 :

dc in each st around = 51 sts

Round 14 :

sc in each st around = 51 sts

Info :

Fasten off. Cut yarn and weave in ends.

β€” Pompom :

Info :

With white yarn and hook 4mm make a magic ring.

Round 1 :

6 sc in magic ring =6 sts

Round 2 (INC) :

sc 2 in each st around=12 sts

Round 3 (INC) :

(sc in next st, 2 sc in next st)*6 times =18 sts

Round 4 :

sc in each st around =18 sts

Round 5 (DEC) :

(sc in next st, sc dec)*6 times = 12 sts

Round 6 (DEC) :

sc dec*6 times =6 sts

Info :

Fasten off. Leave the long tail for sewing.

β€” Scarf (Variant 1) :

Info :

Work the scarf back and forth in rows. This means that you need to make a turning chain at the end of each row.

Info :

With red plush yarn and hook 4mm make ch 5.

Row 1 :

sc in 2nd chain from hook and in next 3 sts, ch1= 4 sts, turn

Row 2-39 :

sc in next 4 sts, ch 1= 4 sts, turn

Row 40 :

sc in next 4 sts = 4 sts

Info :

Fasten off, cut yarn and weave in ends.

β€” Scarf (Variant 2) :

Info :

Work the scarf back and forth in rows. This means that you need to make a turning chain at the end of each row.

Info :

With red plush yarn and hook 4mm make ch 5. (leave long tail for sewing botton)

Row 1 :

sc in 2nd chain from hook and in next 3 sts, ch1= 4 sts, turn

Row 2-39 :

sc in next 4 sts, ch 1= 4 sts, turn

Row 25 :

sc in next 4 sts = 4 sts

Row 26 :

sc in next 2 sts, chain, sc in next 2 sts = 5 sts

Row 27 :

sc in next 2 sts, skip 1 chain, sc in next 2 sts = 5 sts

Info :

Fasten off, cut yarn and weave in ends.

Info :

Sew the button between rows 1 and 2.

Assembly Instructions

  • Attach the pompom to the top center of the hat using the long tail left after fastening off and secure with tight stitches.
  • Leave a long tail on the pompom when fastening off to make sewing it on easier and more secure.
  • Sew the button to Scarf (Variant 2) between rows 1 and 2 as instructed to create the buttoned closure.
  • Fasten off each piece, cut yarn and weave in all ends neatly to hide tails and secure the plush fabric.
  • Position the finished scarf around the amigurumi neck and use the button closure (Variant 2) or tie Variant 1 in a simple knot to secure the scarf.

Important Notes

  • πŸ’‘All pieces are worked in a spiral continuously for round sections; do not end rnds with a slip stitch or start rnds with chains unless instructed.
  • πŸ’‘Start pieces from a magic ring for a neat centre; alternatively ch2 and work sc in the second st from the hook if preferred.
  • πŸ’‘When instructed, change yarn color (for the hat band) and fasten off previous color cleanly to avoid loose ends.
  • πŸ’‘Leave a long tail when finishing the pompom so you can securely sew it to the hat without struggling to catch short ends.

This hat and scarf pattern makes fast, festive accessories to dress your deer amigurumi with love and charm. Add the fluffy pompom and choose between two scarf styles for different looks. Whether youre making a quick gift or finishing a toy, these pieces add instant personality and coziness. 🧢🎁

You ask,

we answer.

FAQs

What size will the finished accessories be?

The finished hat and scarf are sized for the deer amigurumi; the full amigurumi measures approximately 12 in / 28 cm high when made with the recommended plush yarn and hook G/6 (4 mm).

Can I substitute a different yarn for the plush yarn suggested?

Yes, you can substitute similar plush or velvet-style yarns listed in the pattern (Himalaya Dolphin Baby, Baby Bee Adore, Bernat Velvet, Lion Brand IceCream Deluxe). Be aware that changing yarn weight will affect final size and gauge.

Do I need advanced crochet skills to make these accessories?

No, this pattern is rated beginner friendly with simple stitches (sc, dc, increases and decreases) and clear row-by-row instructions, so basic crochet experience is sufficient.

How long will it take to make the hat and scarf?

This is a bite-sized projectβ€”most crocheters can finish the hat, pompom and scarf in about 2-3 hours, depending on experience and speed.