🧢 Beautiful ✨ Detailed πŸ’ Adorable

Houses of Wizardry Amigurumi Pattern

Houses of Wizardry Amigurumi Pattern
4.6β˜… Rating
5-7 Hours Time Needed
2.4K Made This
βœ‚οΈ

Intermediate Level

Ideal for those with basic crochet experience, featuring slightly more advanced stitches and techniques to expand your skills.

⏱️

Weekend Treat

Takes 5-7 hours, making it an enjoyable project to finish over a couple of days.

🎁

Tiny Treasure

Small, sweet, and gift-worthy creations that fit perfectly in the palm of your hand with detailed charm.

About This Houses of Wizardry Amigurumi Pattern

This pattern pack teaches you to crochet four house-themed appliques: Lion, Badger, Raven and Snake, each with a striped crest. Youll work small motifs and combine them into layered appliques for a charming finished look. The pack uses worsted weight yarn and includes color suggestions, stitch abbreviations and assembly notes.

Houses of Wizardry Amigurumi Pattern crochet pattern - detailed view of completed project

Each applique measures about 6-7 inches tall when made with the recommended yarn and hook. Clear step-by-step instructions are included for every piece and the optional scarf accessory.

Why You'll Love This Houses of Wizardry Amigurumi Pattern

I absolutely love this pattern because it lets me create tiny character appliques that feel full of personality and detail. I enjoy the mix of simple motifs and small shaping that still produces a polished finished piece. The flexibility of the color choices means I can easily adapt each house to a different look. Making the set feels fast and rewarding, and I always enjoy assembling the layers to see the characters come to life.

Houses of Wizardry Amigurumi Pattern step 1 - construction progress Houses of Wizardry Amigurumi Pattern step 2 - assembly progress Houses of Wizardry Amigurumi Pattern step 3 - details and accessories Houses of Wizardry Amigurumi Pattern step 4 - final assembly and finishing

Switch Things Up

I love how easy it is to swap colors to make your own houses; try pastels for a soft nursery set or bold jewel tones for a dramatic look.

You can change yarn weight and hook size to alter scale β€” bulky yarn creates a chunky applique while fingering weight makes delicate miniatures.

I often add embroidered initials or tiny felt hats to give each character a personalized touch that makes them gift-ready.

Experiment with eyes: use safety eyes for durability, buttons for a crafty vintage vibe, or embroidered eyes for child-safe play items.

For a raised effect, add small bits of stuffing behind noses or paw pads, then secure with stitches to keep everything flat where needed.

I sometimes skip the glue-gun assembly and stitch layers together for items that need to be washable β€” it takes longer but lasts longer.

Try creating a set of matching magnets by gluing small strong magnets to the back of the finished appliques.

I recommend making a single test piece to practice yarn carries for stripes or to test the tension when changing hook sizes.

You can attach these appliques to a tote bag or make a garland by stringing small cord through the top of each crest.

Make sets for occasions: use autumn tones for fall gifts or pastel shades for baby shower favors β€” I love seeing seasonal variations!

Common Mistakes & How to Fix Them

βœ— Skipping stitch markers during shaping causes missed decreases and messy shaping; use a marker at the start of each round and after increases or decreases to stay accurate. βœ— Forgetting to count stitches after an increase or decrease round leads to mismatched rows and uneven edges; count stitches at the end of each round to confirm totals. βœ— Pulling yarn too tightly when switching colors creates puckering at the seam; maintain even tension and carry yarn loosely or tie off and reattach for clean stripes. βœ— Not pinning pieces before gluing or sewing makes placement uneven; pin or baste pieces in place first so you can adjust before permanently attaching. βœ— Overstuffing or under-stuffing small motifs changes their proportions; add stuffing gradually and check shape frequently to maintain the intended silhouette.

Houses of Wizardry Amigurumi Pattern

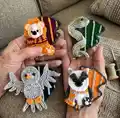
Bring four magical house-themed appliques to life with this detailed crochet pattern pack. Youll make a lion, badger, raven and snake, each paired with a striped house crest β€” perfect for gifts or decor. The instructions walk you step-by-step through each motif with clear stitch counts and assembly guidance. Ideal if you enjoy small, character-driven crochet projects with playful details.

Intermediate 5-7 Hours

Materials Needed for Houses of Wizardry Amigurumi Pattern

β€” Main Fabric

  • 01
    Worsted weight yarn (Caron One Pound recommended) for all motifs
  • 02
    Raven: Navy, Light Blue, Light Grey, Charcoal, Gold (small amounts of each, approx 20-30g per color)
  • 03
    Badger: Gold, Light Grey, Charcoal, White, Black (small amounts for face and details)
  • 04
    Snake: Hunter Green, Light Green, Light Grey, Red (for tongue), Charcoal (outline)
  • 05
    Lion: Gold, Light Yellow, White, Burgundy, Charcoal, Black (small amounts for mane and accents)

β€” Tools Required

  • 01
    Crochet hook size F (3.75mm)
  • 02
    Scissors
  • 03
    Yarn needle for sewing and weaving ends
  • 04
    Stitch markers
  • 05
    Shank buttons (optional) - 13mm for larger animals and 6mm for smaller ones
  • 06
    Glue gun and regular glue sticks (optional for assembly)
  • 07
    Safety eyes (optional; small round beads or buttons can be used)
  • 08
    Small amount of polyester stuffing (for raised parts like noses and paws)

Progress Tracker

0% Complete

β€” Crests :

Round 1 :

CH 18. DC in 3rd from hook and across (16). CH 2, turn.

Round 2 :

DC2TG. DC in next 12. DC2TG. (14). CH 2, turn.

Round 3 :

DC2TG. DC in next 10. DC2TG. (12). CH 2, turn.

Round 4 :

DC2TG. DC in next 8. DC2TG. (10). CH 2, turn.

Round 5 :

DC2TG. DC in next 6. DC2TG. (8). CH 2, turn.

Round 6 :

DC2TG. DC in next 4. DC2TG. (6). CH 2, turn.

Round 7 :

DC2TG. DC in next 2. DC2TG. (4). CH 2, turn.

Round 8 :

DC2TG twice. (2). Tie off.

Info :

Reattach yarn at bottom of original chain as shown, skipping 3 stitches in.

Round 9 :

DC in 10. CH 2, turn.

Round 10 :

2DC in first 2. DC in next 6. 2DC in last 2. (14). CH 2, turn.

Round 11 :

2DC in first. DC in next 12. 2DC in last. (16). CH 1, turn.

Round 12 :

SC in first 2. HDC in next 2. DC in next 3. TC in next 2. DC in next 3. HDC in next 2. SC in last 2. SS in same stitch. Tie off.

Info :

Use charcoal for the outer outline after you complete the crest; attach charcoal chain around the outside for a neat border.

Round 13 :

Using charcoal, make a chain of 85. Tie off. Attach it all the way around the crest as shown in photos.

Info :

Use this same crest pattern for all four houses; simply change the fill and stripe colors to match each house.

β€” Badger :

Eyes - Make 2 :

Using charcoal, CH 5. HDC in 2nd from hook and across (4). CH 1, turn.

Round 2 :

HDC2TG twice. (2). CH 1, turn.

Round 3 :

HDC across (2). CH 1, turn.

Round 4 :

HDC across (2). Tie off.

Nose :

Using black, make a magic circle. CH 1, and SC 4. SS to join. Tie off.

Info :

Using charcoal, make a CH of 10. This is the outline on the bottom of the nose.

Head :

Using white, make a magic circle. CH 2 and then DC 12. SS to join. CH 2, do not turn.

Round 1 :

2DC in each stitch around. SS to join. CH 2, do not turn.

Round 2 :

*2HDC in first. 1HDC in next. Repeat from * all the way around. SS to join. Tie off.

Arms - Make 2 :

Using charcoal, CH 12. DC in 3rd from hook and in next 3. 2DC in next. DC in remaining 5. Tie off.

Scarf :

Follow Scarf instructions on page 6; this will be the same pattern for all animals. You can carry yarn or tie off and reattach for stripes as desired.

Ears - Make 2 :

Using white, CH 5. SC in 2nd from hook. HDC in next. DC in next. TC in last. Tie off.

Head Details :

Using light grey, CH 3. SC in 2nd from hook and HDC in last. Tie off.

Feet - Make 2 :

Using charcoal, make a magic circle. CH 2 and DC 12. SS to join. Tie off.

Feet Detail :

Using white, CH 2. SC 3 times in last CH from hook and pull tight. Tie off.

Body :

Using light yellow (or chosen accent), make a magic circle. CH 2 and DC 12. SS to join. CH 2, do not turn.

Round :

2DC around. SS to join. Tie off.

β€” Lion :

Head :

Using gold, make a magic circle. CH 2 and DC 14. SS to join. CH 2, do not turn.

Round 1 :

2DC in each stitch around. SS to join. CH 1, do not turn.

Round 2 :

*4HDC in next stitch. SS in next. Skip next. Repeat from * 7 more times. The last 2 stitches will be skipped. SS to join. Tie off.

Ears - Make 2 :

Using light yellow, CH 3. 5HDC in last CH from hook. SS in same CH. Tie off.

Body :

Using gold, CH 9. HDC in 2nd from hook and across (8). CH 1, turn.

Round :

2HDC in first. HDC in next 6. 2HDC in last. CH 1, turn.

Feet - Make 2 :

Using gold, make a magic circle. CH 2 and DC 12. SS to join. Tie off.

Tail - Make 4 :

Using light grey, CH 9. SS in 2nd from hook. SC in next and HDC the rest of the way down. Tie off.

β€” Raven :

Head :

Using light grey, make a magic circle. CH 2 and DC 16. SS to join. CH 2, do not turn.

Round 1 :

2DC in each stitch around. SS to join. Tie off.

Wings :

Using light grey, CH 35. SS in 2nd from hook. SC in next. HDC in next. DC in next 28. HDC in next. SC in next. SS in last. Tie off.

Wing Assembly :

Re-attach yarn as shown in pictures - skip 13 stitches in from the left, then stitch the wing to the body as indicated. Repeat wing instructions for second side.

β€” Snake :

Body :

Using light grey, CH 40. SS in 2nd from hook and in next 2. SC in next 3. HDC in next 3. 3DC in next. DC in next 5. SKIP next. DC in next 5. 3DC in next.

Round :

DC in next 5. SKIP next. DC in next 5. TC in next 4. HDC in next. SS in last. Tie off.

Attach :

Attach light green yarn to the end where you started with the SS (skinniest end of snake) and work the lighter green edge as photographed.

Finish :

Using red, cut a small piece of string and attach it to the back of the head so it sticks out like a tongue.

β€” General Assembly :

Info :

I assemble all appliques using a glue gun and regular glue sticks in my photos, but you can stitch pieces if you preferβ€”this is a personal choice.

Info :

Pin all pieces together before gluing or sewing to ensure correct placement and symmetry.

Info :

Weave in yarn ends and trim any excess after final assembly. Add buttons or beads for eyes if desired.

Assembly Instructions

  • Assemble each applique by layering the face, body and crest, pinning pieces in place and securing with a glue gun or whipstitching along the edges.
  • Position arms and feet on either side of the body then sew or glue in place, matching photo references for placement and angle.
  • Attach the head to the body by aligning the neck/chest edges, then stitch or glue securely so the head sits flush against the body.
  • Add the scarf and any small details (nose, paw pads, buttons) last, tucking tails and weaving in ends for a neat finish.

Important Notes

  • πŸ’‘The CH2 at the end of rows NEVER counts as the first DCβ€”follow counts carefully when turning rows.
  • πŸ’‘Use stitch markers to keep track of rounds and marked increases/decreases for consistent shaping.
  • πŸ’‘You can choose glue assembly or hand-stitching; glue holds well but stitching is more secure for items that will be handled frequently.
  • πŸ’‘Follow color notes for each animal to get the same look shown in the photos, but feel free to customize to personal preference.

This Houses of Wizardry applique pack is perfect for adding magical flair to bags, jackets, or gifts. Make the full set to celebrate four whimsical house companions, each with its own crest and personality. Whether you glue or sew them, they make delightful little treasures to gift or display. 🧢✨

You ask,

we answer.

FAQs

What size will the finished piece be?

Each applique measures approximately 6-7 inches tall when using the recommended worsted weight yarn and F (3.75mm) hook.

Can I use different yarn weights for this pattern?

Yes, you can use different yarn weights but this will change the final size; choose an appropriate hook for the yarn and expect sizing differences.

Do I need prior crochet experience for this pattern?

This pattern is rated intermediate and assumes you know basic stitches (SC, HDC, DC, TC) and how to work increases and decreases.

How long does this project typically take to complete?

Most crafters can make a single applique in under a few hours; completing the full 4-applique pack often takes 5-7 hours depending on experience and assembly choices.