🧶 Beautiful ✨ Detailed 💝 Adorable

Squid Amigurumi Pattern

Squid Amigurumi Pattern
4.1★ Rating
2-3 Hours Time Needed
3.3K Made This
✂️

Beginner Friendly Level

Perfect for those just starting their crochet journey, with clear instructions and simple techniques

⏱️

Bite-Sized Project

Finishes in 2-4 hours—perfect for an afternoon of creative relaxation.

🧸

Cute Companion

An adorable friend to cherish, handcrafted with love to bring comfort and joy for years to come.

About This Squid Amigurumi Pattern

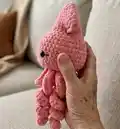
This pattern teaches you how to crochet a plush squid amigurumi with a textured head-body and ten curled tentacles. You will use front loop tentacle attachment to create lively spirals and finish the face with simple embroidery. The project is worked in continuous rounds and uses basic stitches for an easy, satisfying make.
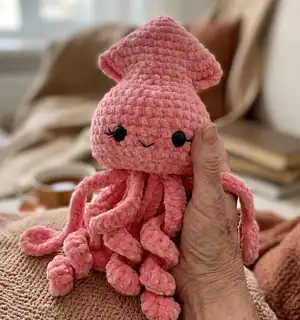
Squid Amigurumi Pattern crochet pattern - detailed view of completed project

Perfect for beginners wanting a fast, delightful toy, the pattern includes clear rounds and finishing steps. Make a cuddly, decorative friend in just a few hours.

Why You'll Love This Squid Amigurumi Pattern

I absolutely love this pattern because it transforms super-bulky plush yarn into a charming, tactile squid with delightful curled tentacles. I adore how quickly the head-body grows with simple increases and how the tentacles curl naturally from the chains. The finished toy is so soft and squishy that it invites hugs and play. I love that the face is customizable with embroidery so each squid can have its own personality and expression.

Squid Amigurumi Pattern step 1 - construction progress Squid Amigurumi Pattern step 2 - assembly progress Squid Amigurumi Pattern step 3 - details and accessories Squid Amigurumi Pattern step 4 - final assembly and finishing

Switch Things Up

I love to change the color palette to give each squid its own personality; try pastel blues or mint greens instead of pink for a sea-inspired look.

I often use a slightly thicker or thinner yarn and adjust the hook to make larger or smaller squids; changing yarn weight will change curl and final size.

I sometimes embroider eyelashes in different styles or add tiny felt cheeks for extra expression; these little details make a big difference.

I recommend experimenting with eye size—bigger safety eyes give a cuter, more toy-like face, while smaller eyes produce a subtler expression.

If you want more poseable tentacles, I add a thin wire inside a tentacle before finishing to create a bendable effect for display pieces.

For a themed gift, crochet a tiny accessory like a bow, hat, or scarf and sew it to the head—this adds charm and makes the squid gift-ready.

I also try different finishes for tentacle ends, such as flat paddle tips or tighter spirals, by changing the number of chains and HDC repeats.

To make a set, vary the yarn textures—one plush, one velour—to create contrasting tactile companions that still match in style.

I sometimes stitch a small loop at the top to turn the squid into a keychain or ornament; use thinner yarn and a smaller hook for a mini version.

When teaching this pattern I encourage students to mark placement and try eye positions before securing them; small adjustments can change the whole personality.

I also enjoy mixing two yarn colors in a round for subtle stripes on the body, which looks wonderful with plush yarn and adds visual interest.

If you plan to wash your squid, choose washable yarn and secure embroidery ends well; I like to recommend gentle hand washing and air drying for long life.

Common Mistakes & How to Fix Them

✗ Skipping the front loop instruction when attaching tentacles will make them sit incorrectly; be sure to crochet the tentacles into the FRONT LOOP ONLY of R23 to get the curled look. ✗ Not placing the safety eyes in the correct rounds will throw off facial placement; flatten the body and insert the eyes between the 19th and 20 th rounds with a distance of 6 stitches (3 stitches from the center) and secure backings. ✗ Overstuffing the head can distort the shape and make it lumpy; stuff firmly but gradually and shape as you go to maintain smooth contours. ✗ Forgetting to count stitches after increases and decreases will lead to mismatch in later rounds; count your stitches at the end of each round and mark the start of round with a stitch marker if needed. ✗ Not hiding or securing embroidery threads properly can leave loose ends visible; tie knots and bring thread ends inside the body, hiding them under stuffing for a neat finish.
Squid Amigurumi Pattern

Make a sweet, squishy squid amigurumi that is full of personality and fun details. This easy pattern guides you through crocheting the head-body, adding curled tentacles, and finishing with embroidered eyes and a smile. Perfect for gifting or keeping as a cuddly handmade friend, the plush texture and curly tentacles make this design especially charming. You will enjoy the simple shaping and playful construction as you bring this little squid to life.

Beginner Friendly 2-3 Hours

Materials Needed for Squid Amigurumi Pattern

— Main Fabric

  • 01
    Super bulky plush yarn - Himalaya Dolphin Baby 120m/100g (131yds/100g), pink color 80346
  • 02
    Black fine yarn for embroidery - YarnArt Begonia black color 0999 (small amount for smile and eyelashes)

— Tools Required

  • 01
    Crochet hook size 4.5 mm (H-7 US)
  • 02
    2 black safety amigurumi eyes 12 mm (0.5 inch)
  • 03
    Stuffing (polyester fiberfill)
  • 04
    Big and small yarn needle
  • 05
    Scissors

Progress Tracker

0% Complete

— Head-body :

Round 1 :

crochet a MR with 4 Sc (4)

Round 2 :

(Sc 1, Inc) x 2 (6)

Round 3 :

Inc 6 (12)

Round 4 :

(Sc 1, Inc) x 6 (18)

Round 5 :

(Sc 2, Inc) x 6 (24)

Round 6 :

(Sc 7, Inc) x 3 (27)

Round 7 :

(Sc 8, Inc) x 3 (30)

Round 8 :

(Sc 4, Inc) x 6 (36)

Round 9 :

(Sc 11, Inc) x 3 (39)

Round 10 :

(Sc 12, Inc) x 3 (42)

Round 11 :

Sc 5, SKIP Sc 10, Sc 11, SKIP Sc 10, Sc 6 (22)

Round 12 :

Sc 5, Inc 1, Sc 10, Inc 1, Sc 5 (24)

Round 13 :

(Sc 3, Inc) x 6 (30)

Round 14 :

(Sc 4, Inc) x 6 (36)

Round 15 :

(Sc 5, Inc) x 6 (42)

Round 16-21 :

Sc around (42) 6 Rnds

Round 22 :

(Sc 5, Dec) x 6 (36)

Round 23 :

(Sc 2, Dec 8) x 2 (20)

Info :

Flatten the body, mark the center and insert the eyes between the 19th and 20 th rounds with a distance of 6 Stitches (3 St from the center) and secure backings.

— Tentacles :

Infos :

Next, we crochet the tentacles, use FRONT LOOP ONLY of R23. There are 10 pieces: 8 pieces of type A, 2 pieces of type B. We continue to crochet from the body in the following order: Type A x 3 Type B x 1 Type A x 4 Type B x 1 Type A x 1.

— Tentacle Type A :

Round 1 :

Sc, Ch 27. From 3rd chain from hook: (Inc HDC, HDC 3) x 5, HDC 4, Sc 1

Round 2 :

Sc 1 to the next stitch of the body to finish tentacle.

Round 3 :

Sc 1 to the next stitch and continue with Ch 27 and repeat the tentacle Type A.

— Tentacle Type B :

Round 1 :

Sc, Ch 30. From 2nd chain from hook: Sl St 5, (1) on the opposite side Sc 1, HDC 3, Sc 1, in the top Stitch (Sc 1, chain 1, Sc 1), (2) on the opposite side Sc 5, (3)

Round 2 :

Sl St 24 to the end of the tentacle.

Round 3 :

Sc 1 to the next stitch of the body to finish tantacle B.

Info :

Next, Sc 1 to the next stitch and continue crochet tentacle Type A.

Info :

After crocheting all the tentacles leave the body for a while and close the holes on the head with the Sc.

Info :

Fill with stuffing and hide the ends of the threads inside.

— Finishing :

Round 24 :

Dec 10 (10)

Info :

Stuff firmly.

Info :

We crocheted the tentacles only on the front loops of the R23, and we will close the hole using the back loops of the same R23. (Indicated in blue in the picture)

Round 25 :

Dec 5, Sl St (5)

Info :

Fasten off and sew the hole closed. Hide the end of the thread inside.

— Eyelashes and smile :

Info :

Take a black cotton thread and tie it in a knot around the eye. Embroider the eyelashes and bring out the threads to the bottom under the tentacles. Tie a knot and hide the ends of the threads inside.

Info :

With the second eye, repeat the same thing, only keep the thread longer and do not hide the ends.

Info :

With a longer end, embroider a smile in a V-shape, bring it to the other end, tie it again in a knot, hide the ends of the threads inside.

Info :

Our squid is ready!

Assembly Instructions

  • Insert and secure the safety eyes between rounds 19 and 20 with a distance of 6 stitches (3 stitches from the center) and fasten the backings tightly.
  • Crochet tentacles into the FRONT LOOP ONLY of R23, following the order: Type A x3, Type B x1, Type A x4, Type B x1, Type A x1, so the tentacles are distributed around the front of the body.
  • After finishing tentacles, close the holes on the head by working into the BACK LOOPS of R23 to secure the base, then stuff the head firmly before continuing.
  • Close the final opening by working R24 (Dec 10 (10)), stuff firmly, then R25 (Dec 5, Sl St (5)), fasten off and sew the hole closed, hiding thread ends inside.
  • Embroider eyelashes and the smile with black cotton thread, tie knots and hide ends inside the body for a clean finish; with the second eye leave a longer thread if desired for decorative effect.

Important Notes

  • 💡Attach tentacles using the FRONT LOOP ONLY of round 23 to create the curled, spiral effect described in the pattern.
  • 💡Place safety eyes between rounds 19 and 20, spaced by 6 stitches (3 stitches from center) and use secure backings to prevent loosening.
  • 💡Stuff the head firmly but gradually to maintain shape; overstuffing may distort the squid and under-stuffing will make sewing and finishing difficult.
  • 💡Hide all thread ends inside the body after finishing embroidery and assembly to keep the outside neat and safe for handling.

This sweet Squid Amigurumi is a delightful, squishy toy that brightens any room and makes a lovely handmade gift. The plush yarn and curly tentacles give it a playful, tactile appeal that kids and adults will adore. Make one in your favorite colors and watch it become a cherished companion. 🧶💖

You ask,

we answer.

FAQs

What size will the finished piece be?

The finished amigurumi measures approximately 9.8 inches (25 cm) tall when using the recommended super bulky plush yarn and 4.5 mm hook.

Can I use different yarn weights for this pattern?

Yes, you can use different yarn weights, but this will affect the final size and texture; adjust your hook size and expect different curl behavior on the tentacles.

Do I need prior crochet experience for this pattern?

This pattern is beginner friendly, so basic knowledge of single crochet, increases, decreases and working in rounds is recommended for best results.

How long does this project typically take?

Most crocheters complete this project in 2-3 hours using the recommended materials, though time may vary based on experience and customization.

Where do I attach the tentacles and how many are there?

Attach tentacles into the FRONT LOOP of round 23; the pattern makes 10 tentacles total (8 of Type A and 2 of Type B) and provides a placement order in the instructions.