🧢 Beautiful ✨ Detailed πŸ’ Adorable

Bumble Blossom Amigurumi Pattern

Bumble Blossom Amigurumi Pattern
4.8β˜… Rating
5-7 Hours Time Needed
1.3K Made This
βœ‚οΈ

Intermediate Level

Ideal for those with basic crochet experience, featuring slightly more advanced stitches and techniques to expand your skills.

⏱️

Weekend Treat

Takes 5-7 hours, making it an enjoyable project to finish over a couple of days.

🧸

Cute Companion

An adorable friend to cherish, handcrafted with love to bring comfort and joy for years to come.

About This Bumble Blossom Amigurumi Pattern

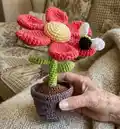
This pattern creates a charming potted amigurumi flower complete with petals, a textured center, leaves, a sturdy stem and a tiny bumblebee. The design uses sport weight yarn and small hook to make a neat, dense fabric that holds shape well. It includes complete round-by-round instructions and clear assembly steps so you can sew the pieces together accurately and confidently.

Bumble Blossom Amigurumi Pattern crochet pattern - detailed view of completed project

Photo references are included to guide placement and finishing touches. The stem can be reinforced with wire if you want a more poseable final piece.

Why You'll Love This Bumble Blossom Amigurumi Pattern

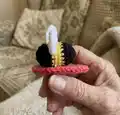
I absolutely love this pattern because it combines simple amigurumi techniques into a delightful decorative piece that feels both playful and elegant. I enjoy how each petal is worked individually then arranged to create a full, full-bodied bloom. I also love the tiny bumblebee companion β€” it adds personality and charm and is quick to make. Sewing the pieces together and watching the flower take shape is very rewarding and relaxing for me.

Bumble Blossom Amigurumi Pattern step 1 - construction progress Bumble Blossom Amigurumi Pattern step 2 - assembly progress Bumble Blossom Amigurumi Pattern step 3 - details and accessories Bumble Blossom Amigurumi Pattern step 4 - final assembly and finishing

Switch Things Up

I love how easy it is to customize this pattern by switching colors; I often make the petals in ombre shades for a different look.

I sometimes use a thicker yarn and larger hook to make a chunky, huggable version of the flower; this changes the size and feel completely.

I will add floral wire to the stem when I want the flower to be poseable or to keep heavier blooms upright.

I like to replace the cardboard in the pot with a small wooden disc for extra weight and durability in display pieces.

I enjoy making the bumblebee in different color combinations and occasionally embroider tiny eyes or antennae for added personality.

I sometimes reduce or increase the number of petals to change the bloom shape β€” try 5 or 8 petals to see different silhouettes.

I like to add tiny beads or French knots in the center for a textured look instead of the plain yellow center.

I also make a set of mini blooms by using fingering weight yarn and a 1.75mm hook to create a bouquet of tiny flowers.

I often sew a small loop to the base of the pot so the flower can be hung as a unique ornament or mobile.

I recommend experimenting with surface embroidery or felt leaves for a mixed-media finish that still uses the same basic pieces.

Common Mistakes & How to Fix Them

βœ— Failing to work tightly will make the stem and petals floppy; maintain firm, consistent tension and use a 2mm hook as recommended. βœ— Forgetting to stuff gradually can create lumps or uneven shape; add stuffing bit by bit while shaping so the piece remains smooth. βœ— Not reinforcing the stem can cause the flower to flop forward; insert optional wire into the stem or use firm stuffing to keep it upright. βœ— Skipping stitch counts during increases and decreases leads to uneven rounds; count stitches after each increase or decrease round to ensure accuracy.

Bumble Blossom Amigurumi Pattern

Bring a cheerful, handcrafted flower to life with this detailed amigurumi pattern. You will crochet petals, a stem, leaves, a potted base and a tiny bumblebee using sport weight yarn. The pattern includes full round-by-round instructions and step-by-step assembly guidance so you can finish a charming tabletop decoration. Perfect for gifting or brightening your own home.

Intermediate 5-7 Hours

Materials Needed for Bumble Blossom Amigurumi Pattern

β€” Main Fabric

  • 01
    Sport weight yarn (Schachenmayr Catania recommended)
  • 02
    Kamelie 00252 - pink (petals) - small skein
  • 03
    Honig 00206 - light yellow (flower center) - small skein
  • 04
    Greenery 00418 - green (stem and leaves) - small skein
  • 05
    Teddy 00161 - light brown (pot interior/top of dirt accents) - small skein
  • 06
    Marone 00157 - brown (dirt) - small skein
  • 07
    Sonne 00208 - yellow (bumblebee stripes) - small scrap
  • 08
    Schwarz 00110 - black (bumblebee body) - small scrap
  • 09
    Weiss 00106 - white (bumblebee wings) - small scrap

β€” Tools Required

  • 01
    Crochet hook size 2.0mm (approximately 2mm hook specified)
  • 02
    Sewing needle for finishing and sewing pieces together
  • 03
    Stitch marker
  • 04
    Scissors
  • 05
    Yarn needle for weaving ends
  • 06
    Polyester stuffing
  • 07
    Cardboard circle for the pot base
  • 08
    Optional wire for reinforcing the stem
  • 09
    Pins for assembly placement

Progress Tracker

0% Complete

β€” Petals :

Round 1 :

6 sc in mr (6)

Round 2 :

6 inc (12)

Round 3 :

(1 sc, 1 inc) x 6 (18)

Round 4 :

(2 sc, 1 inc) x 6 (24)

Round 5-7 :

24 sc (24) (3 rounds)

Round 8 :

(2 sc, 1 dec) x 6 (18)

Round 9-11 :

18 sc (18) (3 rounds)

Round 12 :

(1 sc, 1 dec) x 6 (12)

Round 13 :

12 sc (12)

Info :

Cut the yarn and fasten off, leaving a long tail for sewing. Do not add stuffing.

β€” Stem :

Round 1 :

8 sc in mr (8)

Round 2-30 :

8 sc (8) (29 rounds)

Info :

Add stuffing material to the stem as you go along. It is important to stuff the stem very firmly to make sure the finished project stands up. Adding wire is encouraged to help the flower stand up, especially if your stitches tend to be looser.

Round 31 :

BLO (1 sc, 1 inc) x 4 (12)

Round 32 :

12 inc (24)

Round 33 :

(3 sc, 1 inc) x 6 (30)

Round 34 :

(9 sc, 1 inc) x 3 (33)

Round 35 :

33 sc (33)

Info :

Cut the yarn and fasten off invisibly.

Sepal (Make 8) :

Add the sepal to the stem. Holding the flower with the stem facing up, insert the hook into the last stitch of the remaining loops of round 31 and attach green yarn. ch 4, 3-ch picot, ch 1, slst into the next loop in the row. Repeat 7 more times in the remaining loops for a total of 8 sepal. Cut yarn and fasten off invisibly.

β€” Flower Center :

Round 1 :

6 sc in mr (6)

Round 2 :

6 inc (12)

Round 3 :

(1 sc, 1 inc) x 6 (18)

Round 4 :

(2 sc, 1 inc) x 6 (24)

Round 5 :

(3 sc, 1 inc) x 6 (30)

Round 6 :

(9 sc, 1 inc) x 3 (33)

Round 7-8 :

33 sc (33) (2 rounds)

Info :

Cut the yarn and fasten off, leaving a long tail for sewing.

β€” Leaves :

Round 1 :

5 sc in mr (5)

Round 2 :

(1 sc, 1 inc) x 2, 1 sc (7)

Round 3 :

(2 sc, 1 inc) x 2, 1 sc (9)

Round 4 :

(2 sc, 1 inc) x 3 (12)

Round 5-7 :

12 sc (12) (3 rounds)

Round 8 :

(2 sc, 1 dec) x 3 (9)

Round 9 :

(1 sc, 1 dec) x 3 (6)

Info :

Cut the yarn and fasten off, leaving a long tail for sewing. Do not add stuffing.

β€” Pot :

Round 1 :

6 sc in mr (6)

Round 2 :

6 inc (12)

Round 3 :

(1 sc, 1 inc) x 6 (18)

Round 4 :

(2 sc, 1 inc) x 6 (24)

Round 5 :

(3 sc, 1 inc) x 6 (30)

Round 6 :

(4 sc, 1 inc) x 6 (36)

Round 7 :

(5 sc, 1 inc) x 6 (42)

Round 8 :

BLO 42 sc (42)

Round 9-11 :

42 sc (42) (3 rounds)

Round 12 :

(13 sc, 1 inc) x 3 (45)

Round 13-15 :

45 sc (45) (3 rounds)

Round 16 :

(14 sc, 1 inc) x 3 (48)

Round 17-19 :

48 sc (48) (3 rounds)

Round 20 :

FLO (7 dc, 1 dcinc) x 6 (54)

Round 21 :

54 sc (54)

Info :

Cut the yarn and fasten off invisibly.

β€” Dirt :

Round 1 :

6 sc in mr (6)

Round 2 :

6 inc (12)

Round 3-14 :

12 sc (12) (12 rounds)

Info :

Cut the yarn and fasten off invisibly. Begin to crochet the top of the dirt. Holding the hole with the opening facing up, insert the hook from the inside of the hole going out and re-attach the yarn to continue to crochet the dirt top.

Round 15 :

(1 sc, 1 inc) x 6 (18)

Round 16 :

(2 sc, 1 inc) x 6 (24)

Round 17 :

(3 sc, 1 inc) x 6 (30)

Round 18 :

(4 sc, 1 inc) x 6 (36)

Round 19 :

(5 sc, 1 inc) x 6 (42)

Round 20 :

(6 sc, 1 inc) x 6 (48)

Info :

Cut the yarn and fasten off, leaving a long tail for sewing.

β€” Bumblebee Wing :

Round 1 :

Using white yarn, ch 4. Starting in the 2nd chain from the hook and working into both sides of the chain: 1 sc, 1 hdc, 5 dc in the same stitch, 1 hdc, 1 sc (9)

Info :

Cut the yarn and fasten off, leaving a long tail for sewing. Make 2 wings.

β€” Bumblebee Body :

Round 1 :

6 sc in mr (6)

Round 2 :

6 inc (12)

Round 3 :

12 sc (12)

Info :

Switch to yellow yarn.

Round 4-5 :

12 sc (12) (2 rounds)

Info :

Switch to black yarn.

Round 6-7 :

12 sc (12) (2 rounds)

Info :

Begin to add stuffing material, adding more as you go along if needed. Switch to yellow yarn.

Round 8 :

6 dec (6)

Info :

Cut the yarn and use the yarn tail to close the remaining stitches.

β€” Assembly :

Info :

Begin to assemble the flower by attaching the stem to the center piece. Place the center piece on the stem and sew the pieces together using the yarn tail of the center piece.

Info :

Add stuffing before sewing the last remaining stitches closed to shape the center and stem connection.

Info :

Attach the petals by sewing along the rounds where the stem and center piece were connected. The petals will fit closely next to one another when attached, with very little space between one another.

Info :

Position the leaves on either side of the stem and sew in place using the long yarn tails.

Info :

Before assembling the pot, cut out a piece of cardboard and add it to the bottom of the pot for added stability.

Info :

Attach the dirt to the pot by sewing into the remaining loops of round 20 of the pot. Add stuffing before sewing the last remaining loops closed and ensure the hole is centered in the pot so the flower stands upright.

Info :

Sew the wings to the bumblebee body between rounds 4 and 5 of the body using the long yarn tails. Use the bumblebee tail to secure and hide ends.

Assembly Instructions

  • Place the light yellow center piece onto the stem and sew them together using the long yarn tail from the center piece, aligning the final rounds carefully and securing with small whipstitches.
  • Attach each petal around the center by sewing along the rounds where the stem and center were connected; space the 6 petals evenly so they sit closely with minimal gaps.
  • Position the two leaves on opposite sides of the stem and sew the long tail of each leaf through the stem rounds to secure them in place.
  • Cut a cardboard circle slightly smaller than the pot opening and insert it into the bottom of the pot for stability before adding the dirt piece.
  • Sew the dirt piece into the remaining loops of round 20 of the pot, add stuffing so the planted hole sits centered, then close the remaining loops to secure.
  • Sew the bumblebee wings to the bee body between rounds 4 and 5 and attach the finished bee to a petal using the bee's yarn tail or an embroidered stitch.

Important Notes

  • πŸ’‘Work stitches tightly to achieve a firm fabric suitable for amigurumi; loose stitches may cause the piece to lose shape.
  • πŸ’‘Each round is worked in a spiral and does not need to be joined unless otherwise specified in the instructions.
  • πŸ’‘The stem may be reinforced by adding wire for extra stability; this is recommended if your tension is looser or you want a poseable stem.
  • πŸ’‘Pin parts in place before sewing to ensure symmetry and correct placement of petals, leaves and the center.

This Bumble Blossom makes a delightful handmade accent for any shelf, nursery or desk and adds a splash of color that never needs watering. 🌸🧢 Make a whole bouquet by varying colors and sizes for gifts or seasonal decorations. 🎁✨ Enjoy the crafting process and display your finished flower with pride β€” happy crocheting! 🌼

You ask,

we answer.

FAQs

What size will the finished piece be?

The finished amigurumi measures approximately 12cm tall by 8.5cm wide when using the recommended sport weight yarn and 2mm hook.

Can I use different yarn weights for this pattern?

Yes, you can change the yarn weight but this will affect final size and stitch density; use an appropriate hook and expect a larger or smaller finished piece.

Do I need prior crochet experience for this pattern?

This pattern is rated intermediate; basic knowledge of amigurumi techniques (magic ring, increases, decreases and sewing pieces) is recommended.

How long does this project typically take to complete?

Most crafters finish this project in 5-7 hours, though time may vary depending on experience, assembly detail and whether you reinforce the stem.