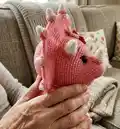
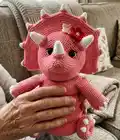
Make a charming Triceratops amigurumi with this complete, photo-guided crochet pattern. You will create a soft, structured dinosaur with rings, horns, spots and detachable parts that make playtime fun. The pattern includes full round-by-round instructions, materials and assembly tips so you can sew and finish with confidence. Perfect as a special handmade gift or a colorful nursery companion.
Progress Tracker
0% Complete
— BASE :
Round 4 :
(1 sc; inc)*6 (18)
Round 7 :
(2 sc; inc)*6 (24)
Round 11 :
(3 sc; inc)*6 (30)
Round 16 :
(4 sc; inc)*6 (36)
Round 22 :
(5 sc; inc)*6 (42)
Round 29 :
(6 sc; inc)*6 (48)
Round 37 :
(7 sc; inc)*6 (54)
Round 46 :
(8 sc; inc)*6 (60)
Round 47 :
FLO (9 sc; inc)*6 (66)
Round 48 :
5 sc; inc; (10 sc; inc)*5; 5 sc (72)
Round 49 :
(11 sc; inc)*6 (78)
Round 50 :
6 sc; inc; (12 sc; inc)*5; 6 sc (84)
Round 51 :
(13 sc; inc)*6 (90)
Round 52 :
7 sc; inc; (14 sc; inc)*5; 7 sc (96)
Round 53 :
(15 sc; inc)*6 (102)
Round 54 :
8 sc; inc; (16 sc; inc)*5; 8 sc (108)
Round 55 :
(17 sc; inc)*6 (114)
Round 56-62 :
114 sc (114)
Round 63 :
(17 sc; dec)*6 (108)
Round 64 :
8 sc; dec; (16 sc; dec)*5; 8 sc (102)
Round 65 :
(15 sc; dec)*6 (96)
Round 66 :
7 sc; dec; (14 sc; dec)*5; 7 sc (90)
Round 67 :
(13 sc; dec)*6 (84)
Round 68 :
6 sc; dec; (12 sc; dec)*5; 6 sc (78)
Round 69 :
(11 sc; dec)*6 (72)
Round 70 :
5 sc; dec; (10 sc; dec)*5; 5 sc (66)
Round 71 :
(9 sc; dec)*6 (60)
Round 72 :
connect round 71 with round 47 (BLO) with 60 sc (60) fill with stuffing as you go, then continue to work in rounds.
Round 73 :
(8 sc; dec)*6 (54)
Round 74 :
(7 sc; dec)*6 (48)
Round 75 :
(6 sc; dec)*6 (42)
Round 76 :
(5 sc; dec)*6 (36)
Round 77 :
(4 sc; dec)*6 (30)
Round 78 :
(3 sc; dec)*6 (24)
Round 79 :
(2 sc; dec)*6 (18)
Round 80 :
(1 sc; dec)*6 (12)
Round 81 :
6 dec (6) cut the yarn, pull off hole, hide a tail.
— LEGS :
Info :
make 2. With pink yarn
Round 3 :
(1 sc; inc)*6 (18)
Round 4 :
(2 sc; inc)*6 (24)
Round 5 :
(3 sc; inc)*6 (30)
Round 6 :
(4 sc; inc)*6 (36)
Round 7 :
BLO (2 sc; inc)*4; 24 sc (40)
Round 8 :
(3 sc; inc)*4; 24 sc (44)
Round 9 :
3 sc; dec; (4 sc; inc)*2; 3 sc; dec; 24 sc (44)
Round 10 :
2 sc; dec; (4 sc; dec)*2; 2 sc; dec; 24 sc (40)
Round 11 :
3 sc; (3 sc; dec)*2; 27 sc (38)
Round 12 :
3 sc; (2 sc; dec)*2; 27 sc (36)
Round 14 :
(4 sc; dec)*6 (30)
Round 15 :
(3 sc; dec)*6 (24) fill with stuffing
Round 16 :
BLO (2 sc; dec)*6 (18)
Round 17 :
(1 sc; dec)*6 (12) close the hole, leave a tail for sewing
Info :
NAILS (make 4 on each foot) With white yarn in one sc of the foot make (3 ch; 3 tr) and crochet them together, fasten off, cut the yarn, pull it through and tide a knot like in the pictures, then hide sticking yarn.
Info :
Sew legs to base in the front loops of round 16 like in the pictures (pin it before sewing, it really helps:)
— LARGE RING :
Round 1 :
60 ch; slst in 1st ch (60)
Round 2 :
(9 sc; inc)*6 (66)
Round 3 :
5 sc; inc; (10 sc; inc)*5; 5 sc (72)
Round 4 :
(11 sc; inc)*6 (78)
Round 5 :
6 sc; inc; (12 sc; inc)*5; 6 sc (84)
Round 6 :
(13 sc; inc)*6 (90)
Round 7 :
7 sc; inc; (14 sc; inc)*5; 7 sc (96)
Round 8 :
(15 sc; inc)*6 (102)
Round 16 :
(15 sc; dec)*6 (96)
Round 17 :
7 sc; dec; (14 sc; dec)*5; 7 sc (90)
Round 18 :
(13 sc; dec)*6 (84)
Round 19 :
6 sc; dec; (12 sc; dec)*5; 6 sc (78)
Round 20 :
(11 sc; dec)*6 (72)
Round 21 :
5 sc; dec; (10 sc; dec)*5; 5 sc (66)
Round 22 :
(9 sc; dec)*6 (60)
Info :
Sew round 22 with round 1, fill with stuffing as you go.
— MIDDLE RING :
Round 1 :
48 ch; slst in 1st ch (48)
Round 2 :
(7 sc; inc)*6 (54)
Round 3 :
4 sc; inc; (8 sc; inc)*5; 4 sc (60)
Round 4 :
(9 sc; inc)*6 (66)
Round 5 :
5 sc; inc; (10 sc; inc)*5; 5 sc (72)
Round 6 :
(11 sc; inc)*6 (78)
Round 7 :
6 sc; inc; (12 sc; inc)*5; 6 sc (84)
Round 8 :
(13 sc; inc)*6 (90)
Round 16 :
(13 sc; dec)*6 (84)
Round 17 :
6 sc; dec; (12 sc; dec)*5; 6 sc (78)
Round 18 :
(11 sc; dec)*6 (72)
Round 19 :
5 sc; dec; (10 sc; dec)*5; 5 sc (66)
Round 20 :
(9 sc; dec)*6 (60)
Round 21 :
4 sc; dec; (8 sc; dec)*5; 4 sc (54)
Round 22 :
(7 sc; dec)*6 (48)
Info :
Sew round 22 with round 1, fill with stuffing as you go.
— ARMS :
Info :
make 2. With pink yarn
Round 3 :
(1 sc; inc)*6 (18)
Round 4 :
(2 sc; inc)*6 (24)
Round 10 :
(10 sc; dec)*2 (22)
Round 16 :
(9 sc; dec)*2 (20)
Round 22 :
(8 sc; dec)*2 (18)
Round 23 :
18 sc (18) fill with a little bit of stuffing
Round 24 :
(7 sc; dec)*2 (16)
Round 25 :
Fold in half and make 8 sc, fasten off, leave a long tail for sewing.
Info :
NAILS (make 3 on each hand) With white yarn in one sc of the hand make (2 ch; 2 dc) and crochet them together, fasten off, cut the yarn, pull it through and tide a knot the same way as we did with feet, then hide sticking yarn.
— SMALL RING :
Round 1 :
36 ch; slst in 1st ch (36)
Round 2 :
(5 sc; inc)*6 (42)
Round 3 :
3 sc; inc; (6 sc; inc)*5; 3 sc (48)
Round 4 :
(7 sc; inc)*6 (54)
Round 5 :
4 sc; inc; (8 sc; inc)*5; 4 sc (60)
Round 6 :
(9 sc; inc)*6 (66)
Round 7 :
5 sc; inc; (10 sc; inc)*5; 5 sc (72)
Round 8 :
(11 sc; inc)*6 (78)
Round 16 :
(11 sc; dec)*6 (72)
Round 17 :
5 sc; dec; (10 sc; dec)*5; 5 sc (66)
Round 18 :
(9 sc; dec)*6 (60)
Round 19 :
4 sc; dec; (8 sc; dec)*5; 4 sc (54)
Round 20 :
(7 sc; dec)*6 (48)
Round 21 :
3 sc; dec; (6 sc; dec)*5; 3 sc (42)
Round 22 :
(5 sc; dec)*6 (36)
Info :
Sew round 22 with round 1, fill with stuffing as you go.
Info :
Make "dimples" in the arms. Sew arms to the small ring as you can see in the pictures.
— HEAD :
Info :
The head consists of three parts: main part, large bony frill and inner part.
MAIN PART - Round 1 :
6 sc in MR (6)
Round 3 :
(1 sc; inc)*6 (18)
Round 4 :
(5 sc; inc)*3 (21)
Round 5 :
(6 sc; inc)*3 (24)
Round 6 :
(7 sc; inc)*3 (27)
Round 7 :
(8 sc; inc)*3 (30)
Round 8 :
(9 sc; inc)*3 (33)
Round 9 :
(10 sc; inc)*3 (36)
Round 10 :
(11 sc; inc)*3 (39)
Round 11 :
(12 sc; inc)*3 (42)
Round 12 :
(13 sc; inc)*3 (45)
Round 13 :
(14 sc; inc)*3 (48)
Round 14 :
(15 sc; inc)*3 (51)
Round 15 :
(16 sc; inc)*3 (54)
Round 16 :
(8 sc; inc)*4; 17 sc; inc (59)
Round 17 :
(9 sc; inc)*4; 18 sc; inc (64)
Round 18 :
(10 sc; inc)*4; 19 sc; inc (69)
Round 19 :
(5 sc; inc)*8; 21 sc (77)
Round 20 :
(6 sc; inc)*7; 28 sc (84)
Round 27 :
(BLO 60 sc); 3 sc; 18 ch (skip 18 sc); 3 sc (84)
Round 29 :
(BLO 60 sc); 24 sc (84)
Round 34 :
(12 sc; dec)*6 (78)
Round 35 :
(11 sc; dec)*6 (72)
Round 36 :
(10 sc; dec)*6 (66)
Round 37 :
(9 sc; dec)*6 (60)
Round 38 :
(8 sc; dec)*6 (54)
Round 39 :
(7 sc; dec)*6 (48)
Round 40 :
(6 sc; dec)*6 (42)
Round 41 :
(5 sc; dec)*6 (36)
Round 42 :
(4 sc; dec)*6 (30)
Round 43 :
(3 sc; dec)*6 (24)
Round 44 :
(2 sc; dec)*6 (18)
Round 45 :
(1 sc; dec)*6 (12)
— LARGE BONY FRILL :
Info :
With pink yarn start to crochet in 60 front loops of R 26:
Round 1 :
5 sc; (2 inc; 10 sc)*4; 2 inc; 5 sc turn and continue to crochet in front loops of round 28; 5 sc; (2 inc; 10 sc)*4; 2 inc; 5 sc (140)
Round 3 :
Sew back loops of round 2, crochet FLO: dec; 4 sc; (2 inc; 12 sc)*4; 2 inc; 4 sc; 2 dec; 4 sc; (2 inc; 12 sc)*4; 2 inc; 4 sc; dec (156)
Round 5 :
Sew back loops of round 4, crochet FLO: dec; 4 sc; (2 inc; 14 sc)*4; 2 inc; 4 sc; 2 dec; 4 sc; (2 inc; 14 sc)*4; 2 inc; 4 sc; dec (172)
Round 7 :
Sew back loops of round 6, crochet FLO: dec; 4 sc; (2 inc; 7 sc)*8; 2 inc; 4 sc; 2 dec; 4 sc; (2 inc; 7 sc)*8; 2 inc; 4 sc; dec (204)
Round 9 :
Sew back loops of round 8, crochet FLO: 2 dec; 2 sc; (2 inc; 9 sc)*8; 2 inc; 2 sc; 4 dec; 2 sc; (2 inc; 9 sc)*8; 2 inc; 2 sc; 2 dec (232)
Round 10 :
232 sc (232) fasten off.
Info :
Now we need to make 9 points on edges, they will be located in places where we made 2 inc in the R9 of the frill. Sew stitches between those points FLO, fill with stuffing as you go.
— POINTS on edges (9) :
With white yarn
Round 1 :
BLO 4sc, turn 4 sc (8)
Round 3 :
(2 sc; dec)*2 (6)
Round 4 :
6 sc (6) fill with stuffing, fasten off.
Info :
With pink yarn make (1 sc; inc)*4 (12) in front loops around each point.
— INSERT EYES & INNER PART :
Info :
Insert safety eyes in R16, between 11sc-12sc (15 sc apart) between 26sc-27sc or sew crochet eyes.
INNER PART - Round 1 :
BLO 36 sc (36)
Round 5 :
(4 sc; dec)*6 (30)
Round 8 :
(3 sc; dec)*6 (24)
Round 11 :
(2 sc; dec)*6 (18)
Round 13 :
(1 sc; dec)*6 (12)
Round 14 :
6 dec (6) fasten off.
— TAIL :
Round 4 :
(2 inc; 4 sc)*2 (16)
Round 6 :
1 sc; 2 inc; 6 sc; 2 inc; 5 sc (20)
Round 8 :
2 sc; 2 inc; 8 sc; 2 inc; 6 sc (24)
Round 10 :
3 sc; 2 inc; 10 sc; 2 inc; 7 sc (28)
Round 12 :
4 sc; 2 inc; 12 sc; 2 inc; 8 sc (32)
Round 14 :
5 sc; 2 inc; 14 sc; 2 inc; 9 sc (36)
Round 16 :
6 sc; 2 inc; 16 sc; 2 inc; 10 sc (40)
Round 18 :
7 sc; 2 inc; 18 sc; 2 inc; 11 sc (44)
Round 20 :
8 sc; 2 inc; 20 sc; 2 inc; 12 sc (48)
Round 22 :
9 sc; 2 inc; 22 sc; 2 inc; 13 sc (52)
Round 24 :
10 sc; 2 inc; 24 sc; 2 inc; 14 sc (56)
Round 26 :
11 sc; 2 inc; 26 sc; 2 inc; 15 sc (60)
Round 28 :
12 sc; 2 inc; 28 sc; 2 inc; 16 sc (64)
Round 29 :
64 sc (64) fasten off, fill with stuffing, sew to the base.
— SPOTS :
Info :
For the Triceratops we will need "spots" (optional) of three different sizes: large, medium and small. And horns for the head two bigger brow horns and one short horn.
— LARGE SPOTS (make 3) :
Round 3 :
(1 sc; inc)*6 (18)
Round 4 :
(2 sc; inc)*6 (24) fasten off, leave long tail for sewing.
— SMALL SPOTS (make 8) :
Round 2 :
6 inc (12) fasten off, leave long tail for sewing.
— MEDIUM SPOTS (make 6) :
Round 3 :
(1 sc; inc)*6 (18) fasten off, leave long tail for sewing.
— HORNS :
— BROW HORNS (make 2) :
Info :
Start with white yarn
Round 2 :
(1 sc; inc)*3 (9)
Round 4 :
(2 sc; inc)*3 (12)
Round 6 :
(3 sc; inc)*3 (15)
Info :
change to pink color
Round 11 :
FLO (1 sc; inc)*6 (18)
Round 12 :
18 sc (18) fasten off.
— SHORT HORN (make 1) :
Info :
Start with white yarn
Round 2 :
(1 sc; inc)*3 (9)
Round 4 :
(2 sc; inc)*3 (12)
Round 6 :
(3 sc; inc)*3 (15)
Info :
change to pink color
Round 9 :
FLO (1 sc; inc)*6 (18)
Round 10 :
18 sc (18) fasten off.
Assembly Instructions
- Insert safety eyes into the head in round 16 between 11sc-12sc (placing eyes 15 sc apart) or sew crochet eyes in place before closing the inner part.
- Sew the inner part to the main head by returning to the hole between rounds 26 and 27 and closing with the inner rounds; stuff the head evenly before final closure.
- Attach the large bony frill by sewing stitches between points in front loops as indicated, then sew the 9 white points to the frill edges and secure with pink loops around points.
- Sew the brow horns and short horn to the head using back loops of round 10 (brow horns) and back loops of round 8 (short horn); pin first to check placement.
- Assemble rings by sewing round 22 to round 1 for each ring, filling with stuffing as you go, then stack and sew rings together as desired for stability.
- Sew legs to the base in the front loops of round 16, pinning them to match placement shown in photos for symmetry and balance.
Important Notes
- 💡Use stitch markers to keep track of rounds, especially in large rounds and ring joins to avoid losing position.
- 💡Stuff pieces gradually and shape as you go; overstuffing can distort the form while understuffing will lose structure.
- 💡When sewing parts, pin in place and check symmetry from photos before stitching to ensure accurate placement.
- 💡Follow BLO and FLO instructions carefully for edges and frill points; the correct loop choice creates the intended shapes and attachment points.
This adorable Triceratops ring tower is a playful, tactile toy that stacks, cuddles, and charms every dinosaur lover. It features a sculpted head, textured bony frill, and removable rings and spots for creative play. Make one in your favorite colors for a handmade gift that will be treasured. 🧶🦕
What size will the finished piece be?
The finished Triceratops ring tower size depends on yarn and stuffing, but with the recommended yarn and 3 mm hook the assembled toy measures roughly medium-sized—perfect for display or gentle play.
Can I use different yarn weights for this pattern?
Yes, you can use different yarn weights but this will affect final size and stitch counts; choose an appropriate hook and expect the rings and head to grow proportionally larger or smaller.
Do I need prior crochet experience for this pattern?
This pattern is rated intermediate, so basic knowledge of amigurumi techniques, working increases/decreases and front/back loop stitches is recommended for best results.
How long does this project typically take to complete?
Most crocheters complete this project in 12-15 hours across multiple sessions, though time will vary with experience and how many details (spots, nails) you add.
Stay in the Loop!
Get notified when we release new free crochet patterns and join our crafting community!