🧢 Beautiful ✨ Detailed πŸ’ Adorable

The Snowman Mug Amigurumi Pattern

The Snowman Mug Amigurumi Pattern
4.4β˜… Rating
8-10 Hours Time Needed
3.5K Made This
βœ‚οΈ

Intermediate Level

Ideal for those with basic crochet experience, featuring slightly more advanced stitches and techniques to expand your skills.

⏱️

All-Day Adventure

Requires 8-10 hours, ideal for a full day of immersive crocheting.

🧸

Cute Companion

An adorable friend to cherish, handcrafted with love to bring comfort and joy for years to come.

About This The Snowman Mug Amigurumi Pattern

This pattern creates a whimsical snowman sitting inside a crochet mug, complete with a hat, holly leaves, berries, and embroidered snowflakes. Youll work separate elements (mug, snowman, arms, nose, hat, handles and decorations) and assemble them for a charming finished piece. The pattern uses DK-weight cotton/acrylic yarns and a small hook for neat stitches and crisp shaping.
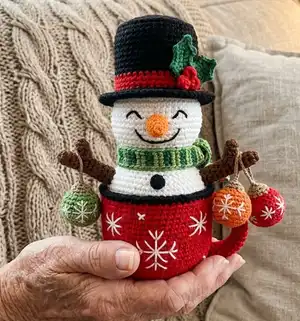
The Snowman Mug Amigurumi Pattern crochet pattern - detailed view of completed project

Step-by-step rounds and clear photos make shaping and assembly easy to follow, including wireframe instructions for posable arms. The finished toy measures approximately 15 cm without the hat and about 20 cm with the hat when using the recommended materials.

Why You'll Love This The Snowman Mug Amigurumi Pattern

I absolutely love this pattern because it combines classic amigurumi shaping with practical construction (a crochet mug!) that feels both fun and useful. I enjoyed designing the layered pieces β€” the mug base, the snowman body, and the playful hat β€” so each element becomes its own mini project. The embroidered snowflakes and tiny berries let me add personal touches, and I find the wireframed arms add wonderful poseability. Making one feels like creating a tiny holiday scene you can hold in your hands.

The Snowman Mug Amigurumi Pattern step 1 - construction progress The Snowman Mug Amigurumi Pattern step 2 - assembly progress The Snowman Mug Amigurumi Pattern step 3 - details and accessories The Snowman Mug Amigurumi Pattern step 4 - final assembly and finishing

Switch Things Up

I like to change up colors to make a whole set of seasonal mugs: try pastel shades for a spring-themed version, jewel tones for an elegant holiday look, or bold primary colors for a playful kids version.

I often substitute yarn weight and hook size to create different sizes: use a thicker yarn and larger hook for a chunky cuddle-friendly version, or a finer yarn for a tiny keychain snowman.

I sometimes add small crocheted accessories like a tiny scarf, mittens, or a mini banner across the mug to personalize the gift for friends and family.

To make the snowman more posable, I use a slightly sturdier wire for the arms and wrap the ends carefully with tape before inserting them so they stay secure and covered with yarn.

I also enjoy mixing techniquesβ€”embroidery, beads, and felt accents. Tiny seed beads or pearls work well as accents on the mug or as berry centers on the holly.

If you want a waterproof display, consider lining the inside of the mug with cardboard covered by a plastic disk, or place a small jar inside to protect the crochet from spills.

Try varying eye styles: embroidered closed eyes (as shown) create a sleepy, sweet expression, while small safety eyes or French knots give a different character.

You can make matching ornaments by reducing the pattern scale: switch to fingering weight yarn and a smaller hook to create tiny versions for the tree.

I also like to experiment with trims: adding a pompom on the hat, a tiny bell, or metallic thread details gives a festive sparkle to finished pieces.

Finally, turn the pattern into a setβ€”make several mugs with different snowmen and display them as a seasonal collection or give them as a coordinated gift set.

Common Mistakes & How to Fix Them

βœ— Skipping stitch markers during long rounds and shaping can cause miscounts and uneven shaping; place markers and recount frequently to stay accurate. βœ— Overstuffing the snowman makes shaping difficult and can distort round decreases; stuff gradually and shape as you go for an even silhouette. βœ— Crocheting too loosely will show stuffing through the stitches and weaken structure; use the recommended hook size and maintain a tight gauge. βœ— Not securing wireframe ends properly can make arms unstable; bend the wire ends, secure with adhesive tape, and curl/cover them before inserting to prevent poking. βœ— Forgetting to pin parts in place before sewing leads to asymmetry; always pin and check placement visually before stitching pieces permanently.


The Snowman Mug Amigurumi Pattern

Make a charming snowman-in-a-mug with this detailed crochet pattern. Youll create a sturdy mug base, an adorable snowman with wireframed arms, and festive details like holly leaves and berries. Clear step-by-step rounds and photos guide you through every piece so you can craft a handmade holiday keepsake. Perfect for gifting or seasonal decor, this pattern brings cozy, crafty joy to your holiday projects.

Intermediate 8-10 Hours

Materials Needed for The Snowman Mug Amigurumi Pattern

β€” Main Fabric

  • 01
    DK weight yarn - Yarn Art Jeans (55% cotton/45% acrylic; 50 g/160 m)
  • 02
    Yarn Alize Cotton Gold (55% cotton / 45% acrylic; 100 g / 330 m)
  • 03
    Yarn Art Jeans No. 51 - cherry (for mug, handle)
  • 04
    Yarn Art Jeans No. 28 - dark grey (for rim, hat, button)
  • 05
    Yarn Art Jeans No. 90 - red (decoration)
  • 06
    Yarn Art Jeans No. 35 - yellow (nose)
  • 07
    Yarn Art Jeans No. 70 - dark brown (arms)
  • 08
    Yarn Art Jeans No. 69 - green (scarf, leaves)
  • 09
    Alize Cotton Gold No. 62 - white (snowman body)
  • 10
    Small amounts of accent colors (light grey, orange) for ornaments and details

β€” Tools Required

  • 01
    Crochet hook 2.0 mm or 2.25 mm
  • 02
    Stuffing material (fiberfill/polyester)
  • 03
    Tapestry needle
  • 04
    Scissors
  • 05
    Stitch markers (a scrap of contrasting yarn)
  • 06
    Pins for assembly
  • 07
    Two cardboard circles for the bottom of a mug, about 5.8 - 6 cm (2.3 - 2.4 inches)
  • 08
    A piece of wire 7-8 cm (3 inches) long, 3 pieces - for a handle of the mug and arms of a snowman
  • 09
    Adhesive tape to secure the wireframe ends
  • 10
    Pliers
  • 11
    Sewing black thread for the embroidery of the eyes

Progress Tracker

0% Complete

β€” Mug :

Round 1 :

8 into MR

Round 2 :

8 inc (16)

Round 3 :

(1 sc, inc)*8 (24)

Round 4 :

(2 sc, inc)*8 (32)

Round 5 :

(3 sc, inc)*8 (40)

Round 6 :

(4 sc, inc)*8 (48)

Round 7 :

(5 sc, inc)*8 (56)

Round 8 :

(6 sc, inc)*8 (64)

Round 9 :

(7 sc, inc)*8 (72)

Round 10 :

(8 sc, inc)*8 (80)

Round 11-28 :

80 sc (18 rounds)

Info :

* Crochet the next round through front loops only.

Round 29 :

80 sc

Info :

* Crochet the next round through both loops.

Round 30 :

80 sc

Info :

Trace the bottom of the mug on the cardboard and cut it out. Put the template inside.

Round 31 :

80 sc

Info :

* Crochet the next round through front loops only.

Round 32 :

80 HDC

β€” Snowman :

Info :

Attach white yarn to round 29. (Alize Cotton Gold No. 62)

Round 1-5 :

80 sc (5 rounds)

Round 6 :

(8 sc, dec)*8 (72)

Round 7 :

(7 sc, dec)*8 (64)

Round 8 :

64 sc

Round 9 :

(6 sc, dec)*8 (56)

Round 10 :

(5 sc, dec)*8 (48)

Round 11 :

48 sc

Round 12 :

(4 sc, dec)*8 (40)

Round 13 :

40 sc

Info :

Stuff it with fiberfill.

Info :

Insert the wireframe: Mark the position on the sides symmetrically using pins. Insert the wireframe into the pinned points. Bend the edge of the wire using the pliers. Secure the ends with adhesive tape. Curl the ends of the wireframe. Secure it with adhesive tape. Stuff with fiberfill.

Round 14 :

(4 sc, inc)*8 (48)

Round 15 :

(5 sc, inc)*8 (56)

Round 16 :

(6 sc, inc)*8 (64)

Round 17 :

64 sc

Round 18 :

(7 sc, inc)*8 (72)

Round 19-26 :

72 sc (8 rounds)

Round 27 :

(7 sc, dec)*8 (64)

Round 28-29 :

64 sc (2 rounds)

Round 30 :

(6 sc, dec)*8 (56)

Round 31 :

(5 sc, dec)*8 (48)

Round 32 :

48 sc

Round 33 :

(4 sc, dec)*8 (40)

Info :

Stuff with fiberfill.

Round 34 :

40 sc

Round 35 :

(3 sc, dec)*8 (32)

Round 36 :

32 sc

Round 37 :

(2 sc, dec)*8 (24)

Round 38 :

(1 sc, dec)*8 (16)

Round 39 :

(2 sc, dec)*4 (12)

Info :

Break yarn, leaving a long tail for tightening the hole. Stuff it with fiberfill. Do not tighten the hole!

β€” Nose :

Round 1 :

4 into MR

Round 2 :

4 inc (8)

Round 3-4 :

8 sc (2 rounds)

Round 5 :

(1 sc, inc)*4 (12)

Round 6 :

12 sc, 2 sl st

Info :

Break yarn, tighten the hole, and hide the tail inside. Stuff the nose with fiberfill.

β€” Arms (make 2) :

Round 1 :

6 into MR

Round 2 :

(1 sc, inc)*3 (9)

Round 3-5 :

9 sc (3 rounds)

Info :

In the next round, crochet the thumb.

Round 6 :

4 sc, (DC5tog cluster), 4 sc (9)

Round 7-20 :

9 sc (14 rounds), 2 sl st

Info :

NOTE! Try on the arm onto the wireframe. Crochet more or fewer rounds if needed. Break yarn, leaving a long tail for sewing.

β€” Button :

Round 1 :

6 into MR, 1 sl st

Info :

Break yarn.

β€” Assembly :

Item (P1) :

1. Sew the nose. (Insert the needle and draw it out in the hole on the top of the head). Pin the nose. Split yellow yarn in half and sew it on.

Item (P2) :

2. Embroider the eyes and mouth. Pin the position of the eyes. (I mark between rounds 22-23 from the mug. The distance between the eyes is 8 sc, the length is 4 sc and the height of the eye is 1 sc). Embroider the eyes using black thread.

Item (P3) :

3. Sew a button. Pin and sew the button to the front of the body.

Item (P4) :

4. Embroider snowflakes. Mark the borders of the snowflake. Embroider the snowflakes using a white yarn strand that has been split in half.

Item (P5) :

5. Stuff with fiberfill. Tighten the hole using a tapestry needle. Tighten the hole, weaving through each of the 12 front loops of the last round, and pull tight. Once you weaved through 12 loops, weave through 2-3 loops at once with a tapestry needle. Do not forget to tighten. Repeat 3 times. Cut the excess yarn and hide the yarn tail inside the snowman.

Item (P6) :

6. Sew the arms to the body. Secure the wireframe with adhesive tape additionally. Put the ready arms onto the wireframe and sew them to the snowman.

β€” Mug Handles :

Info :

Chain 12 and form a circle. Crochet in a circle.

Round 1-4 :

12 sc (4 rounds)

Round 5 :

3 sc, 3 dec, 3 sc (9)

Round 6-21 :

9 sc (16 rounds), 1 sl st

Info :

Prepare a wireframe with the same length as the handle. Bend the ends, and secure them with adhesive tape. Insert wireframe into the handle and stuff with fiberfill. Bend the handle and sew it to the mug.

β€” Leaf (make 2) :

Info :

Chain 12, start working in the second chain from a hook in the back direction - 10 sc, 3 sc in 1 stitch. Continue crocheting on the other side of the chain foundation - 9 sc, 3 sc in 1 stitch. (25)

Round 2 :

(3 sc, chain 3, 1 sc in the previous stitch)*3, 3 sc, chain 3, 1 sc in the previous stitch, (3 sc, chain 3, 1 sc in the previous stitch)*3, 2 sc, 2 sl st.

Info :

Break yarn, leaving a long tail for sewing. Iron the leaves with steam through a damp cloth for a few seconds to make them flat.

β€” Berries (make 3) :

Info :

Chain 7. Start working in the second chain from a hook 3 Bobble stitches similar to the thumb for the arm. Crochet in the second chain – ((dc4tog cluster), 1 sc)*3. Turn all bobbles inside out. Make 1 sl st in the first bobble. Tie the yarn tails together.

β€” Hat :

Round 1 :

8 into MR

Round 2 :

8 inc (16)

Round 3 :

(1 sc, inc)*8 (24)

Round 4 :

(2 sc, inc)*8 (32)

Round 5 :

(3 sc, inc)*8 (40)

Round 6 :

(4 sc, inc)*8 (48)

Round 7 :

(5 sc, inc)*8 (56)

Round 8 :

(6 sc, inc)*8 (64)

Round 9 :

(7 sc, inc)*8 (72)

Info :

* In the next round, crochet through front posts. Insert the hook in the first stitch and draw it out through the front post of the second stitch, grabbing the working yarn and making sc.

Round 10 :

72 sc (through front posts)

Round 11-20 :

72 sc (10 rounds)

Round 21 :

(7 sc, dec)*8 (64)

Round 22-24 :

64 sc (3 rounds)

Assembly Instructions

  • Sew the nose: insert the needle through the top hole, pin the nose in position between rounds 19 and 22 from the mug, split the yellow yarn in half and sew securely.
  • Embroider eyes and mouth: mark between rounds 22-23 from the mug; distance between eyes is 8 sc, eye length 4 sc and eye height 1 sc; embroider with black thread.
  • Insert and secure wireframes: bend wire ends, secure with adhesive tape, insert into pinned points, curl and tape wireframe ends, then stuff and sew arms over the wireframes.
  • Attach head and body: place the stuffed snowman head into the mug opening, align and sew around the neck opening, tightening the neck hole after sewing.
  • Sew the arms and handles: slide finished arms onto the wireframe and sew them in place; prepare handle wireframes, insert into crocheted handles, stuff and sew handles to the mug.
  • Embroider snowflakes and sew button: mark snowflake placements, embroider using a split white yarn strand; sew the dark grey button to the center front of the snowman body.

Important Notes

  • πŸ’‘NOTE! Yarn consumption, size, and appearance of the toy depend on crochet density and how you hold the yarn; check your gauge before starting.
  • πŸ’‘The presented toy is crocheted with V and X look single crochet; practice the technique before starting the final project to ensure consistent texture.
  • πŸ’‘Make sure you crochet tight enough, otherwise the stuffing will show through the holes and affect the finished look.
  • πŸ’‘Crochet the toy in spirals without turning chains and use stitch markers to keep track of round starts and shaping.

This adorable Snowman Mug pattern turns simple cotton yarn into a festive, huggable keepsake perfect for holiday display and gifting. The detailed rounds, wireframe arms, embroidered snowflakes, and tiny accessories make it a joy to craft and personalize. Whether you follow the pattern exactly or add your own colors and extras, this cheerful mug will bring holiday smiles. πŸŽ„πŸ§Ά

You ask,

we answer.

FAQs

What size will the finished piece be?

The finished snowman measures approximately 6 inches/15 cm in height and about 7.8 inches/20 cm height with the hat using the recommended yarn and hook.

Can I use different yarn weights for this pattern?

Yes, you can use different yarn weights, but the final size will change. Adjust your hook size accordingly and expect differences in stitch counts when substituting yarns.

Do I need experience with wireframes and embroidery?

Basic experience is helpful: you will insert a small wireframe for the arms and sew/embroider facial features and snowflakes. Clear photo instructions are included to guide you.

How long does this project typically take to complete?

Most crocheters finish this pattern in about 8-10 hours, though time will vary by experience level and how many decorative details you add.