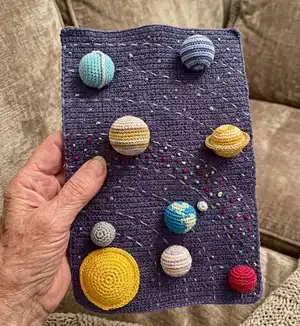
Create a charming solar system wall hanging with crocheted planets and a textured backdrop. This pattern guides you through making a rectangular base, loops for wooden rods, and detailed amigurumi planets with hemispheres, beads and Velcro attachment. Youll enjoy mixing colors, adding tiny embroidered stars and arranging planets on a removable display. A lovely handmade decor piece and a great project for gifting or teaching children about planets.
Progress Tracker
0% Complete
— The base :
Info :
Work in back and forth rows with a 3.0 mm crochet hook. Begin each row with a turning chain.
Step :
Chain 65, start working in the 3rd chain from hook:
Rows 2-107 :
1 t-ch, 63 sc, turn (63)
Info :
The finished wall hanging using the materials stated in this pattern is 28*42 cm. (The width and size could be different due to the different crochet density.)
Info :
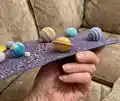
To attach the crocheted piece to your branch/wooden stick, you will need to crochet the loops. We need to make three loops from above, below, in the center, and on the edges. If you use the wooden stick of a similar diameter, then work as follows:
Loop Rows 2-11 :
1 t-ch, 9 sc, turn (9)
Info :
Leave a long yarn tail for sewing. If you use the branch of a different diameter, then make the required number of rows. Try on if needed. Do not sew now. Complete assembling the base later.
— Earth :
Info :
For each planet, you need to crochet two parts - a circle and a hemisphere. Crochet in continuous spirals without a turning chain. Use a 1.5 mm hook.
Circle Round 1 :
8 sc into MR (8)
Circle Round 2 :
inc*8 (16)
Circle Round 3 :
(1 sc, inc)*8 (24)
Circle Round 4 :
(3 sc, inc)*6 (30)
Circle Round 5 :
(2 sc, inc, 2 sc)*6 (36)
Circle Round 6 :
(5 sc, inc)*6 (42)
Circle Round 7 :
(3 sc, inc, 3 sc)*6 (48)
Info :
Leave a long tail for sewing.
Hemisphere Note :
Work the hemisphere in back and forth rows. Begin each row with a turning chain. See how to change colors on page 5. Carry all yarns on the wrong side. Begin with white color yarn.
Hemisphere Row 1 :
4 sc into MR, pull the ring and turn (4)
Hemisphere Row 2 :
1 t-ch, inc*4, turn (8)
Hemisphere Row 3 :
White color: 1 t-ch, (1 sc, inc)*2. Light blue color: (1 sc, inc)*2, turn (12). Break white yarn. Continue crocheting with light blue yarn.
Hemisphere Row 4 :
1 t-ch, (3 sc, inc)*3, turn (15)
Hemisphere Row 5 :
1 t-ch, (2 sc, inc, 2 sc)*3, turn (18)
Hemisphere Row 6 :
Light blue color: 1 t-ch, 5 sc, hold yarn BEHIND the work. Green color: 1 inc, hold the yarn BEHIND the work. Light blue color: (5 sc, inc)*2, turn (21)
Hemisphere Row 7 :
Light blue color: 1 t-ch, (3 sc, inc, 3 sc)*2, 1 sc, hold yarn IN FRONT OF work. Green color: 1 sc, inc, hold yarn IN FRONT OF work. Light blue color: 4 sc, turn (24)
Hemisphere Row 8 :
Light blue color: 1 t-ch, 4 sc, hold yarn BEHIND the work. Green color: 4 sc, hold yarn BEHIND the work. Light blue color: 16 sc, turn (24)
Hemisphere Row 9 :
Light blue color: 1 t-ch, 16 sc, hold yarn IN FRONT OF work. Green color: 4 sc, hold yarn IN FRONT OF work. Light blue color: 4 sc, turn (24)
Hemisphere Row 10 :
Light blue color: 1 t-ch, 3 sc, hold yarn BEHIND work. Green color: 5 sc, hold yarn BEHIND work. Light blue color: 16 sc, turn (24)
Hemisphere Row 11 :
Light blue color: 1 t-ch, 15 sc, hold yarn IN FRONT OF work. Green color: 6 sc, hold yarn IN FRONT OF work. Light blue color: 3 sc, turn (24)
Hemisphere Row 12 :
Light blue color: 1 t-ch, 3 sc, hold yarn BEHIND work. Green color: 8 sc, hold yarn BEHIND work. Light blue color: 13 sc, turn (24)
Hemisphere Row 13 :
Light blue color: 1 t-ch, 13 sc, hold yarn IN FRONT OF work. Green color: 8 sc, hold yarn IN FRONT OF work. Light blue color: 3 sc, turn (24)
Hemisphere Row 14 :
Light blue color: 1 t-ch, 4 sc, hold yarn BEHIND work. Green color: 5 sc, hold yarn BEHIND work. Light blue color: 15 sc, turn (24)
Hemisphere Row 15 :
Light blue color: 1 t-ch, 13 sc, hold yarn IN FRONT OF work. Green color: 2 sc, hold yarn IN FRONT OF work. Light blue color: 2 sc, hold yarn IN FRONT OF work. Green color: 3 sc, hold yarn IN FRONT OF work. Light blue color: 4 sc, turn (24)
Hemisphere Row 16 :
Light blue color: 1 t-ch, 6 sc, dec, 2 sc, hold yarn BEHIND work. Green color: 3 sc, hold yarn BEHIND work. Light blue color: 1 sc, dec, 6 sc, dec, turn (21)
Hemisphere Row 17 :
Light blue color: 1 t-ch, 3 sc, dec, 3 sc, hold yarn IN FRONT OF work. Green color: 5 sc, hold yarn IN FRONT OF work. Light blue color: 1 sc, dec, 2 sc, dec, 1 sc, turn (18)
Hemisphere Row 18 :
Light blue color: 1 t-ch, 4 sc, hold yarn BEHIND work. Green color: 1 sc, dec, 4 sc, dec, 1 sc, hold yarn BEHIND work. Light blue color: 2 sc, dec, turn (15)
Hemisphere Row 19 :
Green color: 1 t-ch, sc, hold yarn IN FRONT OF work. Light blue color: 1 sc, hold yarn IN FRONT OF work. Green color: dec, 2 sc, dec, 3 sc, hold yarn IN FRONT OF work. Light blue color: dec, 2 sc, turn (12)
Hemisphere Row 20 :
Light blue color: 1 t-ch, 2 sc, hold yarn BEHIND work. Green color: dec, (1 sc, dec)*2, dec, turn (8). Break green color yarn.
Hemisphere Row 21 :
1 t-ch, dec*4 (4)
Hemisphere Row 22 :
sc 4 cluster (pull loops). Break yarn, and secure the tail.
Info :
Put some stuffing material in the hemisphere. Sew the parts to each other. Glue / sew Velcro (I glued the soft half, and I will glue the sharp half to the base).
— Mercury :
Info :
The smallest and closest planet to the Sun. Use gray yarn, crochet hook 1.5 mm.
Circle Round 1 :
8 sc into a MR (8)
Circle Round 2 :
inc*8 (16)
Circle Round 3 :
(1 sc, inc)*8 (24)
Circle Round 4 :
(3 sc, inc)*6 (30)
Circle Round 5 :
(2 sc, inc, 2 sc)*6 (36)
Info :
Cut yarn. Leave a long tail for sewing.
Hemisphere Row 1 :
4 sc into a MR, turn (4)
Hemisphere Row 2 :
1 t-ch, inc*4, turn (8)
Hemisphere Row 3 :
1 t-ch, (1 sc, inc)*4, turn (12)
Hemisphere Row 4 :
1 t-ch, (3 sc, inc)*3, turn (15)
Hemisphere Row 5 :
1 t-ch, (2 sc, inc, 2 sc)*3, turn (18)
Hemisphere Rows 6-11 :
6 rows: 1 t-ch, 18 sc, turn (18)
Hemisphere Row 12 :
1 t-ch, (4 sc, dec)*3, turn (15)
Hemisphere Row 13 :
1 t-ch, (1 sc, dec, 2 sc)*3, turn (12)
Hemisphere Row 14 :
1 t-ch, (dec, 1 sc)*4, turn (8)
Hemisphere Row 15 :
1 t-ch, dec*4, turn (4)
Hemisphere Row 16 :
sc 4 cluster (pull the loops). Cut off the yarn and secure it.
Info :
Sew the Velcro to the circle. Stuff with fiberfill. Sew the parts together.
— Mercury finishing :
Info :
Embroider the stars with white thread if desired.
— Venus :
Info :
Venus is the second planet from the Sun. Very hot, with a dense atmosphere. Use a pastel or print yarn as preferred. Circle: work in continuous spirals with a 1.5 mm hook.
Circle Round 1 :
8 sc into a MR (8)
Circle Round 2 :
inc*8 (16)
Circle Round 3 :
(1 sc, inc)*8 (24)
Circle Round 4 :
(3 sc, inc)*6 (30)
Circle Round 5 :
(2 sc, inc, 2 sc)*6 (36)
Circle Round 6 :
(5 sc, inc)*6 (42)
Circle Round 7 :
(3 sc, inc, 3 sc)*6 (48)
Info :
Cut yarn. Leave a long tail for sewing.
Hemisphere Row 1 :
4 sc into a MR, turn (4)
Hemisphere Row 2 :
1 t-ch, inc*4, turn (8)
Hemisphere Row 3 :
1 t-ch, (1 sc, inc)*4, turn (12)
Hemisphere Row 4 :
1 t-ch, (3 sc, inc)*3, turn (15)
Hemisphere Row 5 :
1 t-ch, (2 sc, inc, 2 sc)*3, turn (18)
Hemisphere Row 6 :
1 t-ch, (5 sc, inc)*3, turn (21)
Hemisphere Row 7 :
1 t-ch, (3 sc, inc, 3 sc)*3, turn (24)
Hemisphere Rows 8-15 :
8 rows: 1 t-ch, 24 sc, turn (24)
Hemisphere Row 16 :
1 t-ch, (6 sc, dec)*3, turn (21)
Hemisphere Row 17 :
1 t-ch, (2 sc, dec, 3 sc)*3, turn (18)
Hemisphere Row 18 :
1 t-ch, (4 sc, dec)*3, turn (15)
Hemisphere Row 19 :
1 t-ch, (1 sc, dec, 2 sc)*3, turn (12)
Hemisphere Row 20 :
1 t-ch, (dec, 1 sc)*4, turn (8)
Hemisphere Row 21 :
1 t-ch, dec*4, turn (4)
Hemisphere Row 22 :
sc 4 cluster (pull the loops). Cut off the yarn and secure. Sew the velcro to the circle. Stuff with fiberfill. Sew the parts together.
— Mars :
Info :
The "red" planet contains a lot of iron. Use two shades of red if desired. Circle: work in continuous spirals with 1.5 mm hook.
Circle Round 1 :
8 sc into a MR (8)
Circle Round 2 :
inc*8 (16)
Circle Round 3 :
(1 sc, inc)*8 (24)
Circle Round 4 :
(3 sc, inc)*6 (30)
Circle Round 5 :
(2 sc, inc, 2 sc)*6 (36)
Circle Round 6 :
(5 sc, inc)*6 (42)
Info :
Cut yarn. Leave a long tail for sewing.
Hemisphere Row 1 :
4 sc into a MR, turn (4)
Hemisphere Row 2 :
1 t-ch, inc*4, turn (8)
Hemisphere Row 3 :
1 t-ch, (1 sc, inc)*4, turn (12)
Hemisphere Row 4 :
1 t-ch, (3 sc, inc)*3, turn (15)
Hemisphere Row 5 :
1 t-ch, (2 sc, inc, 2 sc)*3, turn (18)
Hemisphere Row 6 :
1 t-ch, (5 sc, inc)*3, turn (21)
Hemisphere Rows 7-13 :
7 rows: 1 t-ch, 21 sc, turn (21)
Hemisphere Row 14 :
1 t-ch, (2 sc, dec, 3 sc)*3, turn (18)
Hemisphere Row 15 :
1 t-ch, (4 sc, dec)*3, turn (15)
Hemisphere Row 16 :
1 t-ch, (1 sc, dec, 2 sc)*3, turn (12)
Hemisphere Row 17 :
1 t-ch, (dec, 1 sc)*4, turn (8)
Hemisphere Row 18 :
1 t-ch, dec*4, turn (4)
Hemisphere Row 19 :
sc 4 cluster (pull the loops). Cut off the yarn and secure it. Sew the velcro to the circle. Stuff with fiberfill. Sew the parts together.
— Jupiter :
Info :
Jupiter is the largest planet. Circle: work in continuous spirals.
Circle Round 1 :
8 sc into a MR (8)
Circle Round 2 :
inc*8 (16)
Circle Round 3 :
(1 sc, inc)*8 (24)
Circle Round 4 :
(3 sc, inc)*6 (30)
Circle Round 5 :
(2 sc, inc, 2 sc)*6 (36)
Circle Round 6 :
(5 sc, inc)*6 (42)
Circle Round 7 :
(3 sc, inc, 3 sc)*6 (48)
Circle Round 8 :
(7 sc, inc)*6 (54)
Circle Round 9 :
(4 sc, inc, 4 sc)*6 (60)
Info :
Cut yarn. Leave a long tail for sewing.
Hemisphere Rows (work in back and forth rows):
Gray color: 1. 4 sc into a MR, turn (4)
Hemisphere Row 2 :
1 t-ch, inc*4, turn (8)
Hemisphere Row 3 :
1 t-ch, (1 sc, inc)*4, turn (12)
Hemisphere Row 4 :
1 t-ch, (3 sc, inc)*3, turn (15)
Hemisphere Row 5 :
1 t-ch, (2 sc, inc, 2 sc)*3, turn (18)
Hemisphere Row 6 :
1 t-ch, (5 sc, inc)*3, turn (21)
Hemisphere Row 7 :
1 t-ch, (3 sc, inc, 3 sc)*3, turn (24)
Hemisphere Row 8 :
1 t-ch, (7 sc, inc)*3, turn (27)
Hemisphere Row 9 :
White color: 1 t-ch, (4 sc, inc, 4 sc)*3, turn (30)
Rows 10-11 :
Brown color: 1 t-ch, 30 sc, turn (30)
Rows 12-14 :
Yellow color: 1 t-ch, 30 sc, turn (30)
Row 15 :
Gray color: 1 t-ch, 30 sc, turn (30)
Row 16 :
White color: 1 t-ch, 30 sc, turn (30)
Row 17 :
Yellow color: 1 t-ch, 30 sc, turn (30)
Rows 18-19 :
Brown color: 1 t-ch, 30 sc, turn (30)
Row 20 :
Brown color: 1 t-ch, (4 sc, dec, 4 sc)*3, turn (27)
Gray shaping rows :
21. 1 t-ch, (7 sc, dec)*3, turn (24)
Row 22 :
1 t-ch, (6 sc, dec)*3, turn (21)
Row 23 :
1 t-ch, (2 sc, dec, 3 sc)*3, turn (18)
Row 24 :
1 t-ch, (4 sc, dec)*3, turn (15)
Row 25 :
1 t-ch, (1 sc, dec, 2 sc)*3, turn (12)
Row 26 :
1 t-ch, (dec, 1 sc)*4, turn (8)
Row 27 :
1 t-ch, dec*4, turn (4)
Row 28 :
sc 4 cluster (pull the loops). Cut off the yarn and secure. Sew the velcro to the circle. Stuff with fiberfill. Sew the parts together.
— Neptune, Uranus, Saturn (giant planets) :
Info :
I crocheted these three giant planets according to one description. For Neptune, I used two shades of blue yarn. For crocheting Saturn - melange yarn of yellow shades.
Circle Round 1 :
8 sc into a MR (8)
Circle Round 2 :
inc*8 (16)
Circle Round 3 :
(1 sc, inc)*8 (24)
Circle Round 4 :
(3 sc, inc)*6 (30)
Circle Round 5 :
(2 sc, inc, 2 sc)*6 (36)
Circle Round 6 :
(5 sc, inc)*6 (42)
Circle Round 7 :
(3 sc, inc, 3 sc)*6 (48)
Circle Round 8 :
(7 sc, inc)*6 (54). Cut yarn. Leave a long tail for sewing.
Info :
For Neptune, Uranus and Saturn hemispheres, work in back and forth rows as follows:
Hemisphere Row 1 :
4 sc into a MR, turn (4)
Hemisphere Row 2 :
1 t-ch, inc*4, turn (8)
Hemisphere Row 3 :
1 t-ch, (1 sc, inc)*4, turn (12)
Hemisphere Row 4 :
1 t-ch, (3 sc, inc)*3, turn (15)
Hemisphere Row 5 :
1 t-ch, (2 sc, inc, 2 sc)*3, turn (18)
Hemisphere Row 6 :
1 t-ch, (5 sc, inc)*3, turn (21)
Hemisphere Row 7 :
1 t-ch, (3 sc, inc, 3 sc)*3, turn (24)
Hemisphere Row 8 :
1 t-ch, (7 sc, inc)*3, turn (27)
Hemisphere Rows 9-17 :
1 t-ch, 27 sc, turn (27)
Hemisphere Row 18 :
1 t-ch, (7 sc, dec)*3, turn (24)
Row 19 :
1 t-ch, (6 sc, dec)*3, turn (21)
Row 20 :
1 t-ch, (2 sc, dec, 3 sc)*3, turn (18)
Row 21 :
1 t-ch, (4 sc, dec)*3, turn (15)
Row 22 :
1 t-ch, (1 sc, dec, 2 sc)*3, turn (12)
Row 23 :
1 t-ch, (dec, 1 sc)*4, turn (8)
Row 24 :
1 t-ch, dec*4, turn (4)
Row 25 :
sc 4 cluster (pull the loops). Cut off the yarn and secure. Sew the velcro to the circle. Stuff with fiberfill. Sew the parts together.
Info :
Put the bead onto the mono-thread using the beading needle (I used light shades beads). Sew the ring to Uranus vertically. For Saturn, use beads of a suitable shade and sew them horizontally to make rings.
— Moon :
Info :
The Moon is the only natural satellite of the earth. Use gray yarn and 1.5 mm crochet hook.
Circle Round 1 :
8 sc into a MR (8)
Circle Round 2 :
inc*8 (16)
Circle Round 3 :
16 sc (16). Cut yarn. Leave a long tail for sewing.
This Solar System wall hanging pattern lets you create a playful, educational decor piece full of handmade charm. Each planet is crafted with small hooks and cotton yarn for neat detail and a soft, tactile finish. Display it in a nursery, classroom or cozy corner — its removable planets make rearranging fun and easy. 🪐✨🧶