🧢 Beautiful ✨ Detailed πŸ’ Adorable

Donut Amigurumi Pattern

Donut Amigurumi Pattern
4.8β˜… Rating
1-2 Hours Time Needed
3.9K Made This
βœ‚οΈ

Beginner Friendly Level

Perfect for those just starting their crochet journey, with clear instructions and simple techniques

⏱️

Quick Make

Complete in under 2 hoursβ€”lightning fast fun for instant gratification and quick gifts.

🎁

Tiny Treasure

Small, sweet, and gift-worthy creations that fit perfectly in the palm of your hand with detailed charm.

About This Donut Amigurumi Pattern

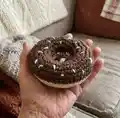
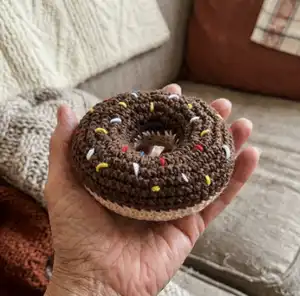
This pattern creates a small, charming crochet donut with a beige base and a brown frosting/topping, complete with colorful yarn sprinkles. It uses sport/fine (4-ply) yarn, a 3 mm hook, and simple single crochet shaping for quick and satisfying results. You'll sew inner and outer rings together, stuff lightly, and add decorative sprinkles to finish.

Donut Amigurumi Pattern crochet pattern - detailed view of completed project

Ideal for beginners, the rounds are short and easy to follow with clear stitch counts and simple assembly. The finished donut makes a thoughtful handmade gift or a cute little decoration.

Why You'll Love This Donut Amigurumi Pattern

I absolutely love this pattern because it turns a simple crochet circle into a whimsical, handmade treat that brings smiles. I enjoy how fast it comes togetherβ€”perfect for an evening project or a quick gift. I also love the playful finishing step of adding tiny yarn sprinkles that let me experiment with colors. Making a set in different colours never fails to brighten my day and inspires more small food-themed creations.

Donut Amigurumi Pattern step 1 - construction progress Donut Amigurumi Pattern step 2 - assembly progress Donut Amigurumi Pattern step 3 - details and accessories Donut Amigurumi Pattern step 4 - final assembly and finishing

Switch Things Up

I love customizing colours β€” I often swap the beige base for pastel tones like pale pink or mint to create a sweet pastel donut collection.

I sometimes use variegated yarn for the frosting to get a multicolour glaze effect without changing colours repeatedly.

To make a larger donut, I switch to DK or worsted weight yarn and a larger hook and then adjust the chain and increase rounds proportionally.

For a tiny keychain version, I use thinner yarn and a smaller hook, then attach a small split ring through a few stitches at the top before finishing.

I enjoy changing sprinkle styles by using embroidery floss for very fine sprinkles or bulkier yarn for chunky, playful toppings.

Try adding felt accents like small hearts or stars instead of yarn sprinkles for a safer toy for small children.

I sometimes embroider a little face on the frosting to turn a donut into a cute character with personality.

To make a set, I mix different frosting colours and arrange them in a small gift box β€” they make great party favors.

I like to lightly scent the stuffing with a few drops of essential oil on a cotton ball (placed inside, not touching the yarn) to make scented decorative donuts.

For more structure, I reinforce the inner ring seam with a second round of sewing before stuffing; this helps the donut keep its round hole shape.

Common Mistakes & How to Fix Them

βœ— Skipping the long tail when starting the base will make inner attachment difficult; leave a 15 cm tail as instructed to sew the inner rings together easily. βœ— Not counting stitches after increases can lead to incorrect shaping and uneven rounds; count after each round especially after increase rounds to confirm stitch totals. βœ— Pulling your tension too tight on the initial chain can make the first round small and distorted; keep a relaxed, even tension when chaining and starting round 1. βœ— Forgetting to stuff gradually will produce lumps and uneven shape; fill with small amounts of polyester fiberfill as you join the outside rings, shaping as you go. βœ— Cutting the frosting tail too early will prevent you attaching the inner ring correctly; for the base keep the long tail and for frosting follow instructions to slip and cut only when told.

Donut Amigurumi Pattern

Create an adorable crochet donut you can gift, display, or turn into a cute keychain. This pattern uses sport/fine (4-ply) yarn and simple single crochet rounds so you can finish quickly. Perfect for practicing round shaping, colour accents, and a tiny finishing touch with sprinkles. Follow the clear step-by-step rounds and assembly notes to complete a sweet little handmade treat.

Beginner Friendly 1-2 Hours

Materials Needed for Donut Amigurumi Pattern

β€” Main Fabric

  • 01
    Sport/Fine Yarn / 4 Ply Weight Yarn (recommended)
  • 02
    Alize Cotton Gold - Beige colour (used for base)
  • 03
    YarnArt Jeans - Brown colour (used for frosting/topping)
  • 04
    Some small amounts of various colours of yarn for sprinkles (assorted colours)
  • 05
    Note: yarn composition used in pattern examples - 55% Acrylic, 45% Cotton

β€” Tools Required

  • 01
    Crochet hook 3 mm
  • 02
    Stitch marker
  • 03
    Yarn Needle / Tapestry Needle
  • 04
    Polyester Fiberfill

Progress Tracker

0% Complete

β€” Materials :

Info :

Yarn : Sport/Fine Yarn/4 Ply Weight Yarn. I used Alize Cotton Gold-Beige Colour and YarnArt Jeans-Brown Colour (55 % Acrylic, 45 % Cotton). Some colours of yarn for sprinkles. Crochet Hook : 3 mm. Stitch marker. Yarn Needle/Tapestry Needle. Polyester Fiberfill.

β€” Abbreviations :

Infos :

Ch:Chain. Sl: slip stitch. Sc: single crochet. Inc: increase. BLO: Back Loop Only.

β€” Difficulty :

Info :

Easy/Beginner

β€” Donut Base :

Info :

Start with BEIGE YARN, make a long tail about 15 cm and start with 20 chain

Round 1 :

sc 20 in the chain (20)

Round 2 :

(sc, inc) x 10 (30)

Round 3 :

(2 sc, inc) x 10 (40)

Round 4 :

(3 sc, inc) x 10 (50)

Round 5 :

(4 sc, inc) x 10 (60)

Round 6-8 :

Sc around

Info :

Sl, leave a long tail for sewing

β€” Donut Frosting / Topping :

Info :

Make same with BROWN (ANY COLOUR) YARN but no need give a long tail (sl and cut the yarn)

Round 1 :

sc 20 in the chain (20)

Round 2 :

(sc, inc) x 10 (30)

Round 3 :

(2 sc, inc) x 10 (40)

Round 4 :

(3 sc, inc) x 10 (50)

Round 5 :

(4 sc, inc) x 10 (60)

Round 6-8 :

Sc around

Info :

Sl, cut the yarn

Info :

With yarn Needle attach colours yarn as the sprinkles.

β€” Attachment :

Info :

First attach the inner of donuts (base and frosting/topping) using the long tail of yarn with slip stich (20).

Info :

Then attach the outside (base and top side); slip stitch donut base with frosting (BLO frosting/top base) until 50 stitch, then fill the polyfill.

Info :

Then slip stitch all until done (60).

Assembly Instructions

  • Attach the inner rings: use the long tail from the beige base to sew the inner circle of the base to the inner circle of the frosting/topping using slip stitch across 20 stitches.
  • Join the outer edge: with the base and top positioned, slip stitch through the base and frosting (working into BLO of frosting/top base) until you have completed 50 stitches, leaving an opening for stuffing.
  • Stuff and finish: fill the donut with polyester fiberfill evenly through the opening, shaping as you go, then continue slip stitching the remaining rounds until you reach 60 stitches and the seam is closed.
  • Secure and weave ends: fasten off and weave in the long tail and all yarn ends through the body with a tapestry needle so they are neat and hidden.
  • Add sprinkles: using a yarn needle and small lengths of assorted yarn, stitch short sprinkle pieces into the frosting in a random pattern, knotting and weaving ends to secure.

Important Notes

  • πŸ’‘Leave a long tail of beige yarn (about 15 cm) when starting the base so you can attach the inner rings easily during assembly.
  • πŸ’‘Use stitch markers to mark the beginning of each round if you are new to working in continuous rounds to avoid losing your place.
  • πŸ’‘Stuff the donut gradually as you join the outer rings to control shape and avoid overfilling which can distort the seam.
  • πŸ’‘When adding sprinkles, use small yarn lengths and secure each with a knot and a few stitches to prevent them from coming loose.

This sweet donut amigurumi is a tiny handmade treat that brightens any shelf or gift box! 🍩 Make several in different colours to create a delightful assortment for friends and family. 🧢 It is quick to make, beginner friendly, and perfect for gifting or decorating your space. 🎁

You ask,

we answer.

FAQs

What size will the finished piece be?

The finished donut will be a small palm-sized amigurumi; exact size depends on your yarn and tension but typically fits comfortably in the palm when using sport/fine yarn and a 3 mm hook.

Do I need special skills to make this donut?

No special skills are required; this is a beginner-friendly pattern using chains, single crochet, increases, and slip stitches. Basic experience with working in rounds is helpful.

Can I change the yarn weight or hook size?

Yes, you can change yarn weight and hook size, but the final donut size and stitch counts may change; adjust expectations and check tension swatch before starting if you need a specific finished size.

How should I attach the sprinkles?

Use a yarn/tapestry needle and short lengths of yarn in assorted colours; stitch each sprinkle into the frosting, knot or secure the yarn end, then weave the tail inside the donut to hide it.