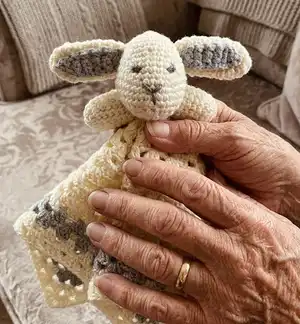
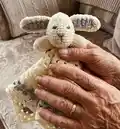
Create a soft, cuddly snuggle bunny lovey with this easy-to-follow crochet pattern. Youll make a small granny-square blanket with a sweet amigurumi bunny head, ears and arms for a perfect baby comforter. The pattern uses Baby DK yarn and simple stitches, making it ideal for quick handmade gifts. Follow the step-by-step rounds and finishing notes for a professional result.
Progress Tracker
0% Complete
— Main Section :
Info :
Make 4 ch using 4mm (UK 8 - US G6) crochet hook and A, and join with a ss to form a ring.
Round 1 :
3 ch (counts as first st), 2 tr (dc) into ring, (2 ch, 3 tr (dc) into ring) 3 times, 1 ch, 1 dc (sc) into top of 3 ch at beg of round.
Round 2 :
3 ch (counts as first st), 2 tr (dc) into ch sp partly formed by dc (sc) at end of previous round, *1 ch, miss 3 tr (dc), (3 tr (dc), 2 ch and 3 tr (dc)) into next ch sp, rep from * twice more, 1 ch, 3 tr (dc) into same ch sp as used at beg of round, 1 ch, 1 dc (sc) into top of 3 ch at beg of round.
Round 3 :
3 ch (counts as first st), 2 tr (dc) into ch sp partly formed by dc (sc) at end of previous round, *1 ch, miss 3 tr (dc), 3 tr (dc) into next ch sp, 1 ch, miss 3 tr (dc)**, (3 tr (dc), 2 ch and 3 tr (dc)) into next ch sp, rep from * to end, ending last rep at **, 3 tr (dc) into same ch sp as used at beg of round, 1 ch, 1 dc (sc) into top of 3 ch at beg of round.
Round 4 :
3 ch (counts as first st), 2 tr (dc) into ch sp partly formed by dc (sc) at end of previous round, *(1 ch, miss 3 tr (dc), 3 tr (dc) into next ch sp) twice, 1 ch, miss 3 tr (dc)**, (3 tr (dc), 2 ch and 3 tr (dc)) into next ch sp, rep from * to end, ending last rep at **, 3 tr (dc) into same ch sp as used at beg of round, 1 ch, 1 dc (sc) into top of 3 ch at beg of round.
Round 5 :
3 ch (counts as first st), 2 tr (dc) into ch sp partly formed by dc (sc) at end of previous round, *(1 ch, miss 3 tr (dc), 3 tr (dc) into next ch sp) 3 times, 1 ch, miss 3 tr (dc)**, (3 tr (dc), 2 ch and 3 tr (dc)) into next ch sp, rep from * to end, ending last rep at **, 3 tr (dc) into same ch sp as used at beg of round, 1 ch, 1 dc (sc) into top of 3 ch at beg of round.
Round 6 :
3 ch (counts as first st), 2 tr (dc) into ch sp partly formed by dc (sc) at end of previous round, *(1 ch, miss 3 tr (dc), 3 tr (dc) into next ch sp) 4 times, 1 ch, miss 3 tr (dc)**, (3 tr (dc), 2 ch and 3 tr (dc)) into next ch sp, rep from * to end, ending last rep at **, 3 tr (dc) into same ch sp as used at beg of round, 1 ch, 1 dc (sc) into top of 3 ch at beg of round.
Round 7 :
3 ch (counts as first st), 2 tr (dc) into ch sp partly formed by dc (sc) at end of previous round, *(1 ch, miss 3 tr (dc), 3 tr (dc) into next ch sp) 5 times, 1 ch, miss 3 tr (dc)**, (3 tr (dc), 2 ch and 3 tr (dc)) into next ch sp, rep from * to end, ending last rep at **, 3 tr (dc) into same ch sp as used at beg of round, 1 ch, 1 dc (sc) into top of 3 ch at beg of round.
Round 8 :
3 ch (counts as first st), 2 tr (dc) into ch sp partly formed by dc (sc) at end of previous round, *(1 ch, miss 3 tr (dc), 3 tr (dc) into next ch sp) 6 times, 1 ch, miss 3 tr (dc)**, (3 tr (dc), 2 ch and 3 tr (dc)) into next ch sp, rep from * to end, ending last rep at **, 3 tr (dc) into same ch sp as used at beg of round, 1 ch, 1 dc (sc) into top of 3 ch at beg of round.
Round 9 :
3 ch (counts as first st), 2 tr (dc) into ch sp partly formed by dc (sc) at end of previous round, *(1 ch, miss 3 tr (dc), 3 tr (dc) into next ch sp) 7 times, 1 ch, miss 3 tr (dc)**, (3 tr (dc), 2 ch and 3 tr (dc)) into next ch sp, rep from * to end, ending last rep at **, 3 tr (dc) into same ch sp as used at beg of round, 1 ch, 1 dc (sc) into top of 3 ch at beg of round.
Round 10 :
3 ch (counts as first st), 2 tr (dc) into ch sp partly formed by dc (sc) at end of previous round, *(1 ch, miss 3 tr (dc), 3 tr (dc) into next ch sp) 8 times, 1 ch, miss 3 tr (dc)**, (3 tr (dc), 2 ch and 3 tr (dc)) into next ch sp, rep from * to end, ending last rep at **, 3 tr (dc) into same ch sp as used at beg of round, 1 ch, 1 dc (sc) into top of 3 ch at beg of round.
Round 11 :
3 ch (counts as first st), 2 tr (dc) into ch sp partly formed by dc (sc) at end of previous round, *(1 ch, miss 3 tr (dc), 3 tr (dc) into next ch sp) 9 times, 1 ch, miss 3 tr (dc)**, (3 tr (dc), 2 ch and 3 tr (dc)) into next ch sp, rep from * to end, ending last rep at **, 3 tr (dc) into same ch sp as used at beg of round, 1 ch, 1 dc (sc) into top of 3 ch at beg of round. Break off A and join in B.
Round 12 :
3 ch (counts as first st), 2 tr (dc) into ch sp partly formed by dc (sc) at end of previous round, *(1 ch, miss 3 tr (dc), 3 tr (dc) into next ch sp) 10 times, 1 ch, miss 3 tr (dc)**, (3 tr (dc), 2 ch and 3 tr (dc)) into next ch sp, rep from * to end, ending last rep at **, 3 tr (dc) into same ch sp as used at beg of round, 1 ch, 1 dc (sc) into top of 3 ch at beg of round.
Round 13 :
3 ch (counts as first st), 2 tr (dc) into ch sp partly formed by dc (sc) at end of previous round, *(1 ch, miss 3 tr (dc), 3 tr (dc) into next ch sp) 11 times, 1 ch, miss 3 tr (dc)**, (3 tr (dc), 2 ch and 3 tr (dc)) into next ch sp, rep from * to end, ending last rep at **, 3 tr (dc) into same ch sp as used at beg of round, 1 ch, 1 dc (sc) into top of 3 ch at beg of round. Break off B and join in A.
Round 14 :
3 ch (counts as first st), 2 tr (dc) into ch sp partly formed by dc (sc) at end of previous round, *(1 ch, miss 3 tr (dc), 3 tr (dc) into next ch sp) 12 times, 1 ch, miss 3 tr (dc)**, (3 tr (dc), 2 ch and 3 tr (dc)) into next ch sp, rep from * to end, ending last rep at **, 3 tr (dc) into same ch sp as used at beg of round, 1 ch, 1 dc (sc) into top of 3 ch at beg of round.
Round 15 :
3 ch (counts as first st), 2 tr (dc) into ch sp partly formed by dc (sc) at end of previous round, *(1 ch, miss 3 tr (dc), 3 tr (dc) into next ch sp) 13 times, 1 ch, miss 3 tr (dc)**, (3 tr (dc), 2 ch and 3 tr (dc)) into next ch sp, rep from * to end, ending last rep at **, 3 tr (dc) into same ch sp as used at beg of round, 2 ch, ss to top of 3 ch at beg of round.
Round 16 :
1 ch (does NOT count as st), 1 dc (sc) into st at base of 1 ch, 1 dc (sc) into each of next 2 tr, *(1 dc (sc) into next ch sp, 1 dc (sc) into each of next 3 tr) 14 times, 3 dc (sc) into next ch sp**, 1 dc (sc) into each of next 3 tr, rep from * to end, ending last rep at **, ss to first dc (sc). Fasten off.
— Head :
Info :
Make 2 ch using 3mm (UK 11 - US C2/D3) crochet hook and A.
Round 1 :
(rs) 6 dc (sc) into 2nd ch from hook, ss to first dc (sc), turn. 6 sts.
Round 2 :
1 ch (does NOT count as st), 2 dc (sc) into st at base of 1 ch, 2 dc (sc) into each of next 5 dc (sc), ss to first dc (sc), turn. 12 sts.
Round 3 :
1 ch (does NOT count as st), (1 dc (sc) into next dc (sc), 2 dc (sc) into next dc (sc)) repeated to increase to 18 sts, ss to first dc (sc), turn. 18 sts.
Round 4 :
1 ch (does NOT count as st), 1 dc (sc) into each of first 8 sts, 2 dc (sc) into each of next 2 sts, 1 dc (sc) into each of last 8 sts, ss to first dc (sc), turn. 20 sts.
Round 5 :
1 ch (does NOT count as st), (1 dc (sc) into each of next 2 dc (sc), 2 dc (sc) into next dc (sc)) twice, 1 dc (sc) into each of next 3 dc (sc), 2 dc (sc) into each of next 3 dc (sc), 1 dc (sc) into each of next 2 dc (sc) twice, ss to first dc (sc), turn. 26 sts.
Round 6 :
1 ch (does NOT count as st), 1 dc (sc) into each st to end, ss to first dc (sc), turn.
Round 7 :
1 ch (does NOT count as st), (1 dc (sc) into each of next 3 dc (sc), 2 dc (sc) into next dc (sc)) 3 times, 1 dc (sc) into each of next 4 dc (sc), (2 dc (sc) into next dc (sc), 1 dc (sc) into next 3 dc (sc)) twice, ss to first dc (sc), turn. 32 sts.
Round 9 :
1 ch (does NOT count as st), 1 dc (sc) into each of first 15 dc (sc), 2 dc (sc) into each of next 2 dc (sc), 1 dc (sc) into each of last 15 dc (sc), ss to first dc (sc), turn. 34 sts.
Round 11 :
1 ch (does NOT count as st), (1 dc (sc) into each of next 3 dc (sc), dc2tog (sc2tog) over next 2 dc (sc)) twice, 1 dc (sc) into each of next 14 dc (sc), (dc2tog (sc2tog) over next 2 dc (sc)) over next 2 dc (sc), 1 dc (sc) into each of next 3 dc (sc) twice, ss to first dc (sc), turn. 30 sts.
Round 13 :
1 ch (does NOT count as st), (1 dc (sc) into each of next 2 dc (sc), dc2tog (sc2tog) over next 2 dc (sc)) twice, 1 dc (sc) into each of next 5 dc (sc), (dc2tog (sc2tog) over next 2 dc (sc)) twice, 1 dc (sc) into each of next 5 dc (sc), (dc2tog (sc2tog) over next 2 dc (sc)) twice, 1 dc (sc) into each of next 2 dc (sc) twice, ss to first dc (sc), turn. 24 sts.
Round 14 :
1 ch (does NOT count as st), 1 dc (sc) into each of first 10 sts, (dc2tog (sc2tog) over next 2 sts) twice, 1 dc (sc) into each of last 10 sts, ss to first dc (sc), turn. 22 sts.
Round 15 :
1 ch (does NOT count as st), (1 dc (sc) into next st, dc2tog (sc2tog) over next 2 sts) 3 times, (dc2tog (sc2tog) over next 2 sts) twice, 1 dc (sc) into next st 3 times, ss to first dc (sc), turn. 14 sts.
Round 16 :
1 ch (does NOT count as st), (dc2tog (sc2tog) over next 2 sts) 7 times, ss to first st. 7 sts. Fasten off, leaving a fairly long end.
— Ears (Make 2) :
Info :
Make 2 ch using 3mm (UK 11 - US C2/D3) crochet hook and A.
Round 1 :
(rs) 4 dc (sc) into 2nd ch from hook, ss to first dc (sc), turn. 4 sts.
Round 2 :
1 ch (does NOT count as st), 2 dc (sc) into st at base of 1 ch, 2 dc (sc) into each of next 3 dc (sc), ss to first dc (sc), turn. 8 sts.
Round 3 :
1 ch (does NOT count as st), 1 dc (sc) into st at base of 1 ch, 1 dc (sc) into each dc (sc) to end, ss to first dc (sc), turn.
Round 4 :
1 ch (does NOT count as st), 2 dc (sc) into st at base of 1 ch, 1 dc (sc) into each of next 2 dc (sc), 2 dc (sc) into each of next 2 dc (sc), 1 dc (sc) into each of next 2 dc (sc), 1 dc (sc) into each of next 2 dc (sc), ss to first dc (sc), turn. 12 sts.
Round 15 :
1 ch (does NOT count as st), dc2tog (sc2tog) over first 2 sts, 1 dc (sc) into each of next 2 dc (sc), (dc2tog (sc2tog) over next 2 dc (sc)), 1 dc (sc) into each of next 2 dc (sc), ss to first dc (sc), turn. 8 sts.
Info :
Fasten off, leaving a fairly long end.
— Ear Patches (Make 2) :
Info :
Make 2 ch using 3mm (UK 11 - US C2/D3) crochet hook and B.
Round 1 :
(rs) 3 dc (sc) into 2nd ch from hook, turn. 3 sts.
Round 2 :
1 ch (does NOT count as st), 1 dc (sc) into each dc (sc) to end, turn.
Round 10 :
1 ch (does NOT count as st), dc3tog (sc3tog) over all 3 sts, turn. 1 st.
Round 11 :
1 ch (does NOT count as st), 1 dc (sc) into top of dc3tog (sc3tog).
Info :
Fasten off, leaving a fairly long end.
— Arms (Make 2) :
Info :
Make 2 ch using 3mm (UK 11 - US C2/D3) crochet hook and A.
Round 1 :
(rs) 6 dc (sc) into 2nd ch from hook, ss to first dc (sc), turn. 6 sts.
Round 2 :
1 ch (does NOT count as st), 2 dc (sc) into st at base of 1 ch, 2 dc (sc) into each of next 5 dc (sc), ss to first dc (sc), turn. 12 sts.
Round 3 :
1 ch (does NOT count as st), 1 dc (sc) into st at base of 1 ch, 1 dc (sc) into each of next 11 sts, ss to first dc (sc), turn. Rep last round 6 times more.
Info :
Fasten off, leaving a fairly long end.
— Making Up :
Info :
Press Main Section only very carefully.
Info :
Insert toy filling into Head so that Head is firmly filled but still fairly soft. Beg and end of rounds is centre back of Head, and last round is neck edge round.
Info :
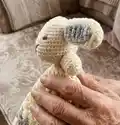
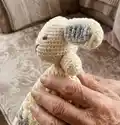
Fold Ears flat - final round is edge that will be attached to Head. Using photograph as a guide, lay Ear Patch centrally along one side of Ear so that foundation ch edge of Patch is level with final round of Ear, and very neatly sew Patch in place.
Info :
Sew Ears to Head as in photograph - Ears should "flop" forwards, with Ear Patch towards front of Head.
Info :
Using oddment of C and photograph as a guide, embroider satin stitch eyes onto Head, then embroider a straight stitch "Y" shape for nose.
Info :
Insert toy filling into Arms so that Arms are firmly filled but still fairly soft. Fold Arm flat at top (last round) and then neatly sew Arms to neck edge of Head, using photograph as a guide.
Info :
Sew completed Head, Ears and Arms onto centre of Main Section as in photograph.
Info :
Safety note: Ensure all stitching is very secure to avoid the risk of the baby pulling sections apart and swallowing them!
This Snuggle Bunny lovey brings a touch of handmade comfort to any nursery and makes a thoughtful, quick gift for new parents. The soft Baby DK yarn and simple construction make it a lovely first amigurumi project and a cozy companion for little hands. Happy crocheting and gifting—may your projects be soft, simple and full of love! 🧶🧵