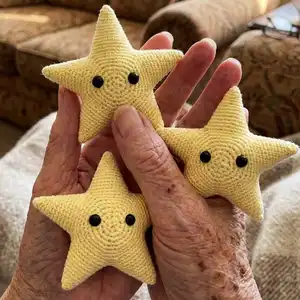
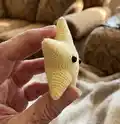
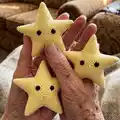
Make a sweet stuffed star with this friendly amigurumi pattern. Sterling the Star is perfect for gifting or decorating nurseries and playrooms. The pattern guides you through shaping five points, joining them into a star and finishing with safety or felt eyes. Follow the step-by-step rounds and the felt-eye tutorial to create a polished, cuddly star you can be proud of.
Progress Tracker
0% Complete
— Notes :
Info :
All pieces are worked through the back loops only. The pattern is worked in continuous spiral. Use a stitch marker to mark the start of the round.
— Points (Make 5) :
Round 1 :
SC 4 in Magic Ring— 4 sts
Round 2 :
(SC 2 in next st) 4 times— 8 sts
Round 3 :
SC in each st around
Round 4 :
(SC 2 in next st, SC in next st) 4 times—12 sts
Round 5 :
SC in each st around
Round 6 :
(SC 2 in next st, SC in next 2 sts) 4 times—16 sts
Round 7 :
SC in each st around
Round 8 :
(SC 2 in next st, SC in next 3 sts) 4 times—20 sts
Round 9 :
SC in each st around
Round 10 :
(SC 2 in next st, SC in next 4 sts) 4 times—24 sts
Round 11 :
SC in each st around
Round 12 :
(SC 2 in next st, SC in next 5 sts) 4 times—28 sts
Round 13 :
SC in each st around
Round 14 :
(SC 2 in next st, SC in next 6 sts) 4 times—32 sts
Round 15 :
SC in each st around
Round 16 :
(SC 2 in next st, SC in next 7 sts) 4 times—36 sts
Info :
Fasten off with long tail. Do not fasten off the fifth point; continue to work for the body (on next page):
— Front :
Round 1 :
(SC2tog, SC in next 7 sts) 2 times; to join next point, (SC2tog in next point, SC in next 7 sts, SC2tog, SC in next 7 sts). Repeat for each point— 80 sts
Info :
To join in a round, SC2tog the first 2 sts of round 1, this is the first SC2tog of round 2
Round 2 :
(SC2tog, SC in next 6 sts) 10 times—70 sts
Round 3 :
(SC2tog, SC in next 12 sts) 5 times—65 sts
Round 4 :
(SC2tog, SC in next 11 sts) 5 times—60 sts
Round 5 :
(SC2tog, SC in next 10 sts) 5 times—55 sts
Round 6 :
(SC2tog, SC in next 9 sts) 5 times—50 sts
Round 7 :
(SC2tog, SC in next 3 sts) 10 times— 40 sts
Round 8 :
(SC2tog, SC in next 2 sts) 10 times— 30 sts
Round 9 :
(SC2tog, SC in next st) 10 times—20 sts
Round 10 :
(SC2tog) 10 times—10 sts
Round 11 :
(SC2tog) 5 times—5 sts
— Back :
Info :
To join the yarn, locate the junction of the points where there is no yarn tail and attach the yarn to the first stitch of the point to the left.
Info :
Follow the instructions as for the Front.
Info :
After round 8, stop and sew up the holes created by where the points are connected.
Info :
If using safety eyes, attach them now to the front of the star at round 7. Felt eyes will be attached after the star is finished.
Info :
Stuff the star, beginning with the points. For best results, start with a little bit of stuffing in each point and slowly fill up each point. Once all of the points are stuffed, begin stuff the body.
Info :
Continue working, stopping and adding a little more stuffing every few rounds until the end.
Info :
Finishing: If using felt eyes, skip ahead to the tutorial at the end. Weave in any loose ends
— How to Sew on Felt Eyes :
Item Name (P1) :
Step One: Gather Materials - Your amigurumi. Black craft felt. Black embroidery floss or sewing thread. White Size 3 cotton crochet thread (or another thin white yarn). 2 different sized sewing needle (one for the floss and one for the crochet thread). Straight pins (with white heads).
Item Name (P2) :
Step Two: Cut the Felt - Using small, sharp scissors cut the felt into a rough circle shape slightly larger than the desired size. Slowly trim around the edges until the eyes are the right size and shape. The eyes I used are roughly 3/4" across.
Item Name (P3) :
Step Three: Sew on the Eyes - Before you start sewing, position the eye and pin it in place. I find it helpful to use a pin with a white head as it mimics the position and look of the eye highlight. The felt will be sewn on using an applique stitch, which are small whipstitches made around the circumference of the eye. Use a single strand of embroidery floss and the smaller needle to sew the eye into place.
Item Name (P4) :
Step Four: Create the Highlight - Use the pins to help decided where you want the highlight to be. The highlights themselves are simply French knots, with the yarn wrapped once around needle. Pull the ends of the white thread to snug up the knot. If you don't like the way it looks, simply pull the knot out and try again with a new thread.
Item Name (P5) :
Step Five: Finish Your Amigurumi - Tie loose ends together securely with square knots and pull the ends into the stuffing.
Thank you for making Sterling the Star — a little handmade friend full of charm! Add eyes and highlights to give personality and share your finished stars with loved ones. Enjoy crocheting and gifting this sunny, squishy companion. 🧶✨